Block Countdown: Difference between revisions
From Posstack.com Documentation
| (One intermediate revision by the same user not shown) | |||
| Line 11: | Line 11: | ||
[[File:Ecb-countdown-demo.png|border|frameless|800x800px]] | [[File:Ecb-countdown-demo.png|border|frameless|800x800px]] | ||
=== | === How to add Countdown Timer section === | ||
*'''Step 1''': Add a '''Section Settings''' section that allows you to control the global settings of the '''Countdown Timer''' section. | |||
:In this special section, you can specify multi-column layouts, activate full width, determine the section's maximum width, choose a background color, and set global margins and padding, among other options. | |||
:{{Note|Note: If you include the '''Countdown Timer''' in the core product information, skip the step for adding '''Section Settings'''. Just add the '''Countdown Timer'''. [[File:Ecb add section core product info.jpg|800px|frameless]]|reminder}} | |||
[[File:Ecb-countdown-config.png|border|frameless|800x800px]] | *'''Step 2''': Add a '''Countdown Timer''' section and customize the settings according to your preferences. | ||
:[[File:Ecb-countdown-config.png|border|frameless|800x800px]] | |||
{{Note|''If you are new to our Easy Content Builder, please take a look at the [[Add_section_settings|Add Sections]] section for detailed instructions on how to add a section to your theme.|reminder}} | {{Note|''If you are new to our Easy Content Builder, please take a look at the [[Add_section_settings|Add Sections]] section for detailed instructions on how to add a section to your theme.|reminder}} | ||
===Countdown settings=== | |||
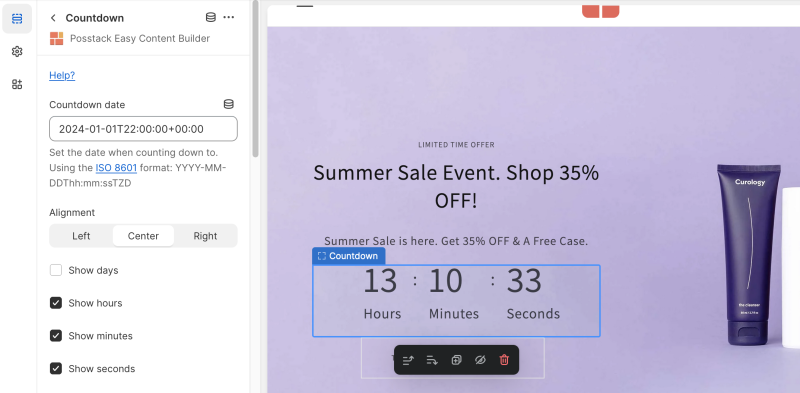
From the Shopify theme editor, click on the Countdown on the sidebar to view the details of settings. | |||
{| class="wikitable" | {| class="wikitable" | ||
!Section settings | !Section settings | ||
Latest revision as of 04:10, 7 November 2024
Countdown Timer enables you to add a countdown to any Shopify page in a simple way without the use of a 3rd party app. It's an effective sales tactic that helps you get more sales and conversions.
What is the Countdown section perfect for?
The Countdown section is perfect for promotional events, flash sales, limited-time offers, etc. You can add the Countdown to Landing pages, hero section on the homepage, product pages, etc.
See an example in the hero section: here.
How to add Countdown Timer section
- Step 1: Add a Section Settings section that allows you to control the global settings of the Countdown Timer section.
- In this special section, you can specify multi-column layouts, activate full width, determine the section's maximum width, choose a background color, and set global margins and padding, among other options.
- Step 2: Add a Countdown Timer section and customize the settings according to your preferences.
If you are new to our Easy Content Builder, please take a look at the Add Sections section for detailed instructions on how to add a section to your theme.
Countdown settings
From the Shopify theme editor, click on the Countdown on the sidebar to view the details of settings.
| Section settings | Description |
|---|---|
| Countdown date | set the destination date for your countdown in seconds, minutes, hours, and days using the ISO 8601 format: YYYY-MM-DDThh:mm:ssTZD |
| Alignment | Align all elements of the Countdown to the left, center, or right |
| Show days | Show the Days block if chosen. |
| Show hours | show the Hours block if chosen. |
| Show minutes | show the Minutes block if chosen. |
| Show seconds | show the Seconds block if chosen. |
| Separator | Enter the type of countdown separator, such as Colon, Dot, Dash, or leave it empty. |
| Show Labels | Show or Hide the labels. |
| Label of days | Enter the Label of days. |
| Label of hours | Enter the Label of hours. |
| Label of minutes | Enter the Label of minutes. |
| Label of seconds | Enter the Label of seconds. |
| Animate On Scroll | It lets you apply different types of animation to elements within each section as you scroll down the page. Learn more about scrolling animations here. |
| Margin | Set the vertical spacing between elements. |
| Padding | Set spacing between elements and their content. |
Add other content blocks
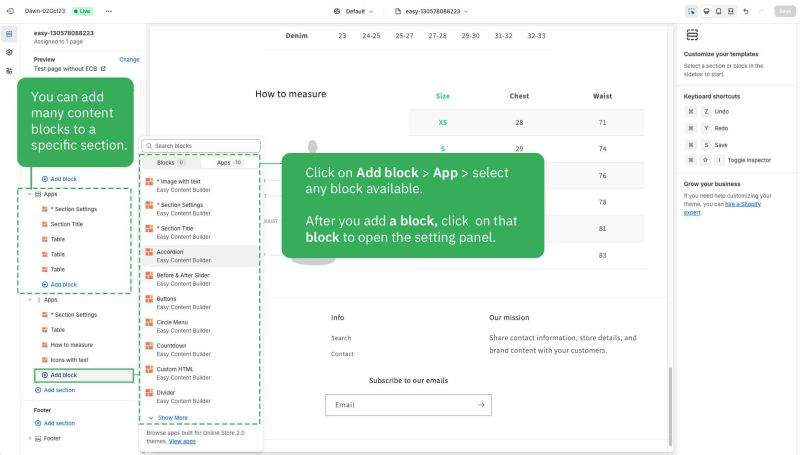
You can add many content blocks to a section you've created. These content blocks will be displayed in different positions within the section, depending on the Desktop/Mobile Layouts you configure.
See all content blocks available that you can add to a section.


