Add section settings: Difference between revisions
| (36 intermediate revisions by 2 users not shown) | |||
| Line 1: | Line 1: | ||
{{DISPLAYTITLE:Adding Sections}} | {{DISPLAYTITLE:Adding Sections}} | ||
This guide explains how to add new sections to a template. To create a new template, check out this guide: [[Create_Template_Apply_to_Multiple_Pages|Create a template]]. | |||
'''Steps Overview:''' | |||
* Select a template. | |||
* Add sections to the template. | |||
:* | === Select a template === | ||
: | '''From the Manage Templates page:''' | ||
* Click Apps > Easy Content Builder > Manage Templates. | |||
* Find the template that you want to edit. | |||
* Click '''Customize''' to edit the template. | |||
:[[File:Select-template-ecb.jpg|1024x1024px]] | |||
'''From the Shopify Theme Editor:''' | |||
To add a new section, you need to add a special block called '''Section Settings'''. This block allows you to manage the layouts of your section by choosing your preferred layouts (1-column, 2-column, 3-column, 4-column, or hierarchical layouts) and global configurations (full-width layout, mask color, mask image, background video, parallax animation, etc.). | * Select Online Store > Themes. | ||
* Next to the theme that you want to edit, click '''Customize'''. | |||
* It will navigate to the Theme Editor. | |||
* On the Theme Editor screen > Use the Template drop-down menu to select a template (Home page, collection, product or store page) that you want to edit. | |||
[[File:Select-template-themeeditor.jpg|frameless|1024x1024px]] | |||
=== Add Section === | |||
To add a new section, you need to add a special block called '''Section Settings'''. | |||
This block allows you to manage the layouts of your section by choosing your preferred layouts (1-column, 2-column, 3-column, 4-column, or hierarchical layouts) and global configurations (full-width layout, mask color, mask image, background video, parallax animation, etc.). | |||
{{Note|You can add multiple sections to a page. For each section, you can utilize a Section Settings block to customize the layout for that particular section.|inline}} | {{Note|You can add multiple sections to a page. For each section, you can utilize a Section Settings block to customize the layout for that particular section.|inline}} | ||
This video provides instructions on adding your first section: | This video provides instructions on adding your first section: | ||
: | :[[File:Add-1st-section.gif|frameless|960x960px]] | ||
{{Note|After adding the Section Settings block, the theme editor preview will show a blank placeholder. Once you add the new content blocks as per the guide '''Add Blocks''' below, they will appear in the theme editor.|reminder}} | {{Note|After adding the Section Settings block, the theme editor preview will show a blank placeholder. Once you add the new content blocks as per the guide '''Add Blocks''' below, they will appear in the theme editor.|reminder}} | ||
| Line 21: | Line 36: | ||
====Add Blocks==== | ====Add Blocks==== | ||
After adding your first section, add the blocks you want for this section by following the video tutorial below: | After adding your first section, add the blocks you want for this section by following the video tutorial below: | ||
: | |||
{{Note|'''Note''': You can add various block types, either from the Easy Content Builder app or other apps like Judge.me Reviews, to the section. Subsequently, you can use the steps in the guide below ([[Add_section_settings#Edit_Section_Settings|Edit Section Settings]]) to establish a multi-column layout for that section, allowing you to control the display position for each block or set the background image or padding.|inline}} | |||
:[[File:Section-add-block.gif|frameless|960x960px]] | |||
==Edit Section Settings== | ==Edit Section Settings== | ||
| Line 27: | Line 45: | ||
====Add multi-column layouts==== | ====Add multi-column layouts==== | ||
You can define your preferred section layouts (1-column, 2-column, 3-column, 4-column, or hierarchical layouts) by watching the video tutorial below: | You can define your preferred section layouts (1-column, 2-column, 3-column, 4-column, or hierarchical layouts) by watching the video tutorial below: | ||
: | :[[File:Section-settings-multi-cols.gif|frameless|960x960px]] | ||
====Add the background image==== | ====Add the background image==== | ||
You can set the section's background image. Once added, you can click the Change button below the image to delete or change it. | You can set the section's background image. Once added, you can click the Change button below the image to delete or change it. | ||
: | :[[File:Section-settings-bg-img.gif|frameless|960x960px]] | ||
====Add the background video==== | ====Add the background video==== | ||
| Line 37: | Line 55: | ||
====Add the background color==== | ====Add the background color==== | ||
: | |||
In the '''Section Settings''' block, you can customize the section's background color using CSS or Gradient options. Simply click the Background Color and use the Gradient color picker or enter the new color value in the CSS Code field. | |||
:[[File:Section-setting-bg-color.jpg|frameless|1024x1024px]] | |||
====Add the background container color==== | ====Add the background container color==== | ||
: | In Section Settings, you can customize the container's background color. You can also apply the background color of the container at the block level, such as with the Section Title block demonstrated in the video tutorial below: | ||
:[[File:Section-settings-container-bg-color.gif|frameless|960x960px]] | |||
====Set text color==== | ====Set text color==== | ||
: | In the '''Section Settings''' block, customize the text color within the section, which is great for adjusting the text color when using a dark background. | ||
:[[File:Section-setting-text-color.jpg|frameless|1269x1269px]] | |||
====Adjust the column gap==== | ====Adjust the column gap==== | ||
: | In the Section Settings block, you can also set the gap (in pixels) between the rows/columns. | ||
:[[File:Section-settings-col-gap.jpg|frameless|1024x1024px]] | |||
{{Note|'''Note''': Apart from adjusting the margin/padding in the '''Section Settings''' configuration, you can also open each block within that section to further adjust the padding/margin for each block (Each section may contain multiple blocks).|reminder}} | |||
==Next Step== | ==Next Step== | ||
* | * Edit Block Settings. | ||
Latest revision as of 07:09, 4 June 2024
This guide explains how to add new sections to a template. To create a new template, check out this guide: Create a template.
Steps Overview:
- Select a template.
- Add sections to the template.
Select a template
From the Manage Templates page:
- Click Apps > Easy Content Builder > Manage Templates.
- Find the template that you want to edit.
- Click Customize to edit the template.

From the Shopify Theme Editor:
- Select Online Store > Themes.
- Next to the theme that you want to edit, click Customize.
- It will navigate to the Theme Editor.
- On the Theme Editor screen > Use the Template drop-down menu to select a template (Home page, collection, product or store page) that you want to edit.

Add Section
To add a new section, you need to add a special block called Section Settings.
This block allows you to manage the layouts of your section by choosing your preferred layouts (1-column, 2-column, 3-column, 4-column, or hierarchical layouts) and global configurations (full-width layout, mask color, mask image, background video, parallax animation, etc.).
This video provides instructions on adding your first section:

Add Blocks
After adding your first section, add the blocks you want for this section by following the video tutorial below:

Edit Section Settings
Now that you've added your first section, it's time to further customize this specific section by utilizing the advanced features available in the Section Settings block.
Add multi-column layouts
You can define your preferred section layouts (1-column, 2-column, 3-column, 4-column, or hierarchical layouts) by watching the video tutorial below:

Add the background image
You can set the section's background image. Once added, you can click the Change button below the image to delete or change it.

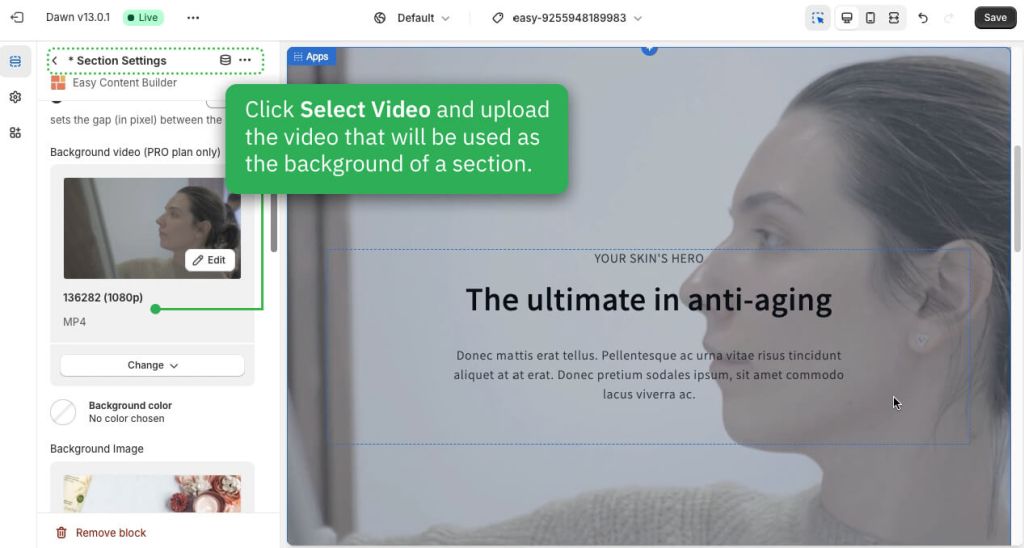
Add the background video
- In the Section Settings block, select a video to use as the section's background. After adding it, you can click the Change button below the video to delete or replace it.

Add the background color
In the Section Settings block, you can customize the section's background color using CSS or Gradient options. Simply click the Background Color and use the Gradient color picker or enter the new color value in the CSS Code field.

Add the background container color
In Section Settings, you can customize the container's background color. You can also apply the background color of the container at the block level, such as with the Section Title block demonstrated in the video tutorial below:

Set text color
In the Section Settings block, customize the text color within the section, which is great for adjusting the text color when using a dark background.

Adjust the column gap
In the Section Settings block, you can also set the gap (in pixels) between the rows/columns.

Next Step
- Edit Block Settings.