Block: Item List
Overview
The Item List section, formerly known as the Featured Products/Collections section, allows you to include:
1. A slider or grid of featured products (with Ajax Add to Cart) showcasing specific products or an entire collection on any Shopify page.
2. A carousel or grid of blog posts.
Item List examples
Featured Products/Collections Slider and Grid

Article Carousel and Grid

How to add Item List section
Add Item List section
- Step 1: Add a Section Settings section that allows you to control the global settings of the Item List section.
- In this special section, you can specify multi-column layouts, activate full width, determine the section's maximum width, choose a background color, and set global margins and padding, among other options.
- Note: If you include the Item List in the core product information, skip the step for adding Section Settings. Just add the Item List.


- Step 2: Add an Item List section and customize the settings according to your preferences.

Customize Item List
Item List global settings
From the Shopify theme editor, click on Item List on the sidebar to view the details of settings.

| Section settings | Description |
|---|---|
| Type | Select the source of products that you want to feature:
NOTE #1: If the "Products in Collection" or "Random Products in Collection" types are selected:
NOTE #2: For 'Articles' and 'Random Articles' types:
|
| Item Limit | The maximum number of products or articles that you can feature in the Item List section. |
| Select Products | Use this setting when you set Type to Select products manually. Use the Search bar to search for a specific product term or select the products available in the list. |
| Select Collection | Use this setting when you set Type to Products in collection. Use the Search bar to search for a specific collection term or select the product collection available in the list.
NOTE: If you select "Random products in Collection" as the type, make sure to familiarize yourself with how this feature functions. 1. By default, the order of products inside a collection is fixed, for example collection A has 50 products, all products order will be from 1, 2, ..., 49, 50. With the default Featured Products/Collections section, when you select to show 5 or 10 products from this collection A, the group of products will always start from 1, 2,...5 or 1,2,... 10. With 'Random products in Collections' enabled, Featured Products/Collections will show that group of 5 or 10 products starting from a random position. For example, 4, 5, 6, 7, 8 or 10, 11, ...14. 2. The product list may not always update immediately when refreshing a page due to caching by Shopify. Therefore, any changes to the product list on the page will be reflected after a few hours. |
| Select list of collections | Use this setting when you set Type to Collections. Use the Search bar to search for a specific collection term or select the collections available in the list. |
| Style | Select Slider or Grid to create a slider of products or a product grid with up to 5 products per row. |
| Card Style | Create layout boxes for each product item. Emphasize an item with a primary card style. |
| Card Size | Decrease or increase the padding of the card body. |
| Box Shadow | Decrease or increase the box shadows of the card. |
| Text Alignment | Align the Products’ title and price to the left, right, or center. |
| Rounded Border | Enable this setting to apply rounded corners. |
| Show multiple images | If enabled, users can click Prev/Next arrows within the product cards to scroll through multiple product images. This feature is only available for the Grid layout. |
| Add to Cart button |
Note: To use the Ajax Add to Cart feature, you must enable the Cart type 'Drawer' under your theme. Learn how to enable the Drawer type here. |
| Show Description | Show or hide descriptions of products/collections. |
| Description Length | Keep your descriptions long enough that they're sufficiently descriptive. The "optimal" length will vary depending on your specific situation. |
| Image Width | Set the width (in pixel) of the collection’s featured image. |
| Image Height | Set the width (in pixel) of the collection’s featured image. |
| (Items per row) Item Width on Mobile | Define the width of the product card.
|
| (Items per row) Item Width on Desktop | Item width on desktop:
|
| Gap | Set the gap between items. |
| Auto Play | Change slides of products after a specified interval (in milliseconds). Enter 0 to disable. |
| Show Slider Arrows | Show or hide the slider arrows on the Desktop. Place arrows inside or outside. |
| Show Navigation | Show or hide the dot navigation. |
| Slider Set | To loop through a set of slides instead of single items. |
| Animate On Scroll | It lets you apply different types of animation to elements within each section as you scroll down the page. Learn more about scrolling animations here. |
| Margin | Set the vertical spacing between elements. |
Enable Ajax Add to Cart
Step 1: Enable the Drawer cart type
- From your Shopify admin, click Online Store > Themes.
- Find your current theme, and then click Customize.
- Click Theme settings (the Gear icon)
- Navigate to the Carts and set the Cart Type to Drawer.

Step 2: Navigate to the Featured Products/Collections configuration under Easy Content Builder and set the Add To Cart button to Ajax (Pro):

Use Cases
Display the Judge.me reviews
Integrating Judge.me with Easy Content Builder is simple. The integration is included by default, so just use the Shopify theme editor to show or hide Judge.me reviews.

If you're new to Easy Content Builder and want to add a Featured Products/Collections section with Judge.me reviews, here are the steps to follow.
Add Related Product section using Dynamic sources
Besides the default option - Select products manually mentioned in Part 1 above, you can also display the Related Products using Dynamic sources.
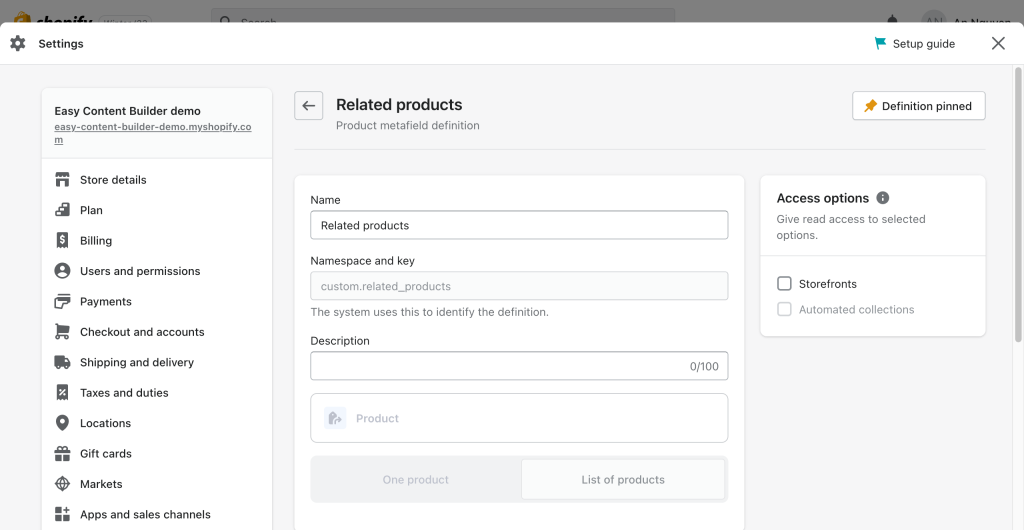
Step 1: Create a metafield definition for the Related Products
- From your Shopify admin, click Settings > Custom Data
- Click Products > click Add definition
- In the Product Metafield definition form, assign a namespace (the group that your metafield will belong to) and a key (the specific metafield name) as follows:
- Name: Related products
- Namespace and key: custom.related_products
- Description: (optional)
- Select type > Product, make sure you enable List of Product.

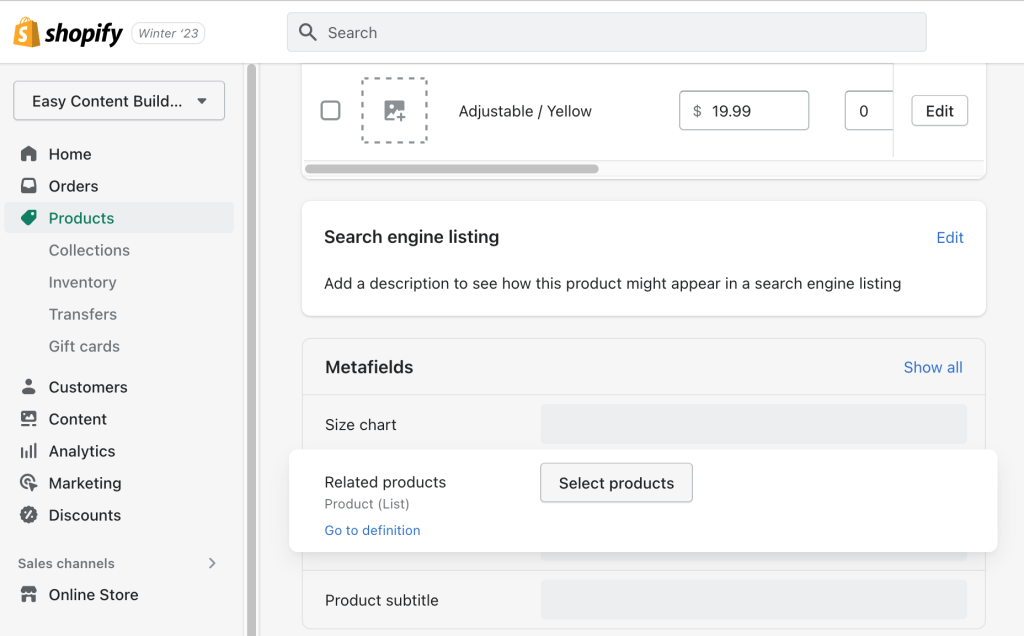
Step 2: Add value to the metafield
- From your Shopify admin > click Products > click the Product you want to add Related Product section.
- Scroll down to the Metafield section > click Related Products field to select the products you want to display as Related Product:

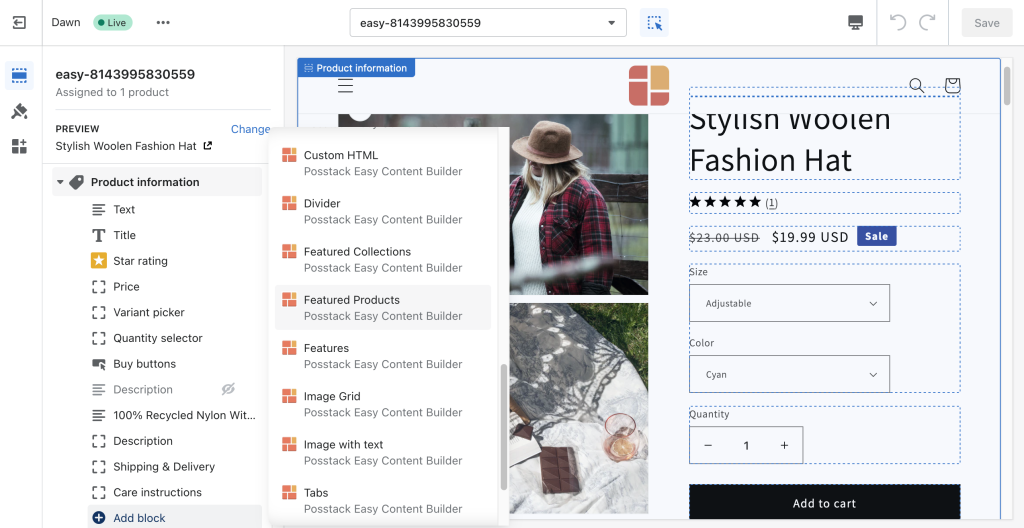
Step 3: Link the product metafields to your template
- From your Shopify admin, click Apps > Easy Content Builder
- Click Manage Templates > find the template of the product you want to edit, then click Customize
- Navigate to the section you want to add the Related Products.
- For example: you add Related Products to the core Product section, simply click Add block > click Featured Products:
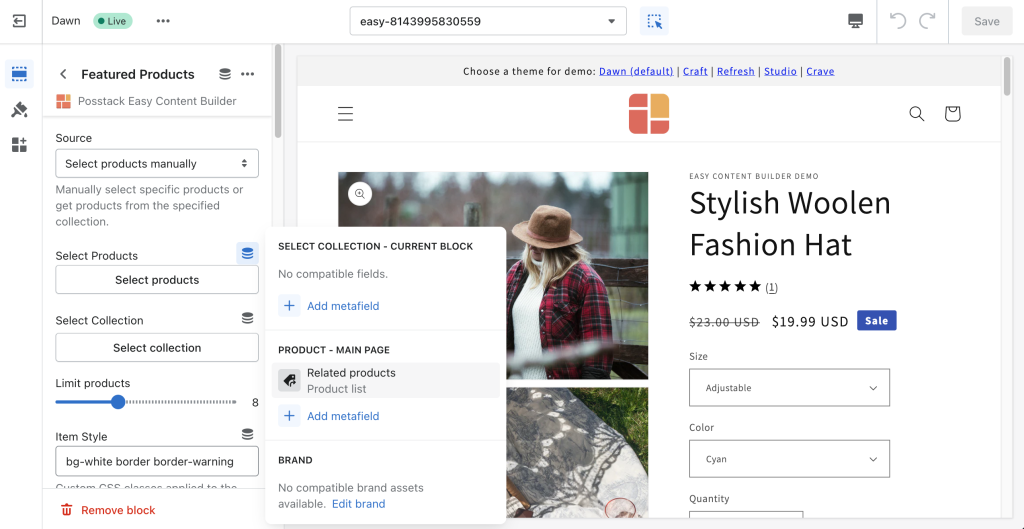
- Open the Featured Products section you’ve just created > click the connect dynamic source icon next to the Select Products field > click Related Products > then click Save to apply the changes to the storefront.
- Once you assign the related products using dynamic sources, you can edit and change the products your way through the Theme Editor.
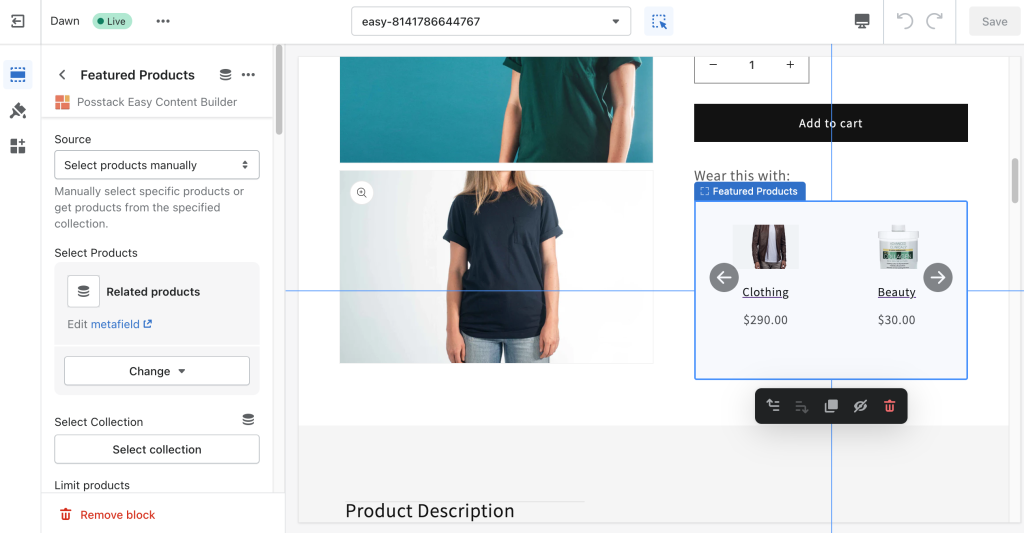
- For example: you add Related Products to the core Product section, simply click Add block > click Featured Products:


Display a custom Product description

You can choose to display or conceal the product description in a product carousel using the Featured Products section. If you want to use a distinct product description instead of the default product description snippet on the product page, follow these guidelines:
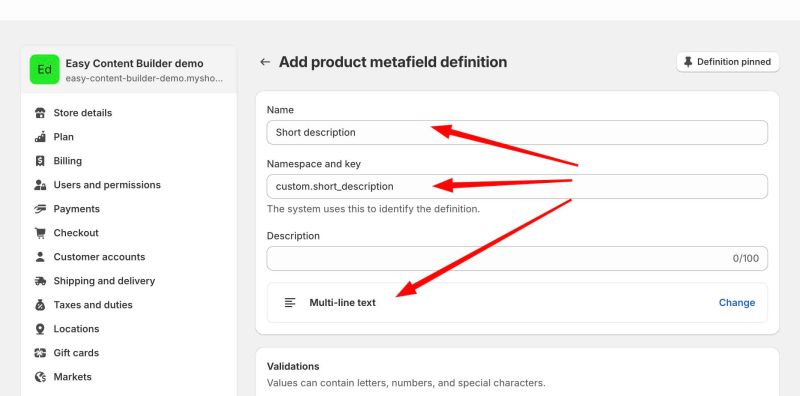
Step 1: Create a new metafield definition for the custom product description
- From your Shopify admin, click Settings > Custom Data

- Click Products > click Add definition

- In the Product Metafield definition form, assign a namespace (the group that your metafield will belong to) and a key (the specific metafield name) as follows:
- Name: Short description
- Namespace and key: custom.short_description
- Description: (optional)
- Select type > Product, and make sure you enable Multi-line text.

Step 2: Add value to the metafield
- From your Shopify admin > click Products > click the Product you want to add custom short description.
- Scroll down to the Metafields section > click the Short description field to enter the short description you want to display in the Featured Products/Collections carousel.

Step 3: Enable the "Show Description" setting
- From your Shopify admin, click Apps > Easy Content Builder
- Click Manage Templates > find the template you want to edit, then click Customize.
- From the Theme Editor, open the Featured Products/Collections section you wish to edit.
- Enable the Show Description setting.
The Featured Products/Collections carousel will automatically show the short description for any product with a Short Description metafield with a value. Otherwise, it will show the default product description.
Create and display a Product attribute using metafield
If you run a bookstore, you might need to add new product attributes (such as ISBN, author, publisher, publication date) beyond the standard product attributes such as title, price, and description.
Below is an example of how to add an ISBN (International Standard Book Number) on your product pages using metafield.
Step 1: Create a metafield definition for the Related Products
- From your Shopify admin, click Settings > Custom Data
- Click Products > click Add definition
- In the Product Metafield definition form, assign a namespace (the group that your metafield will belong to) and a key (the specific metafield name) as follows:
- Name: ISBN
- Namespace and key: custom.isbn
- Description: (optional)
- Select type > Integer, make sure you enable One value.

Step 2: Add value to the ISBN metafield
- From your Shopify admin > click Products > click the Product you want to add ISBN.
- Scroll down to the Metafield section > click ISBN field to enter the ISBN number:

Step 3: Link the ISBN metafields to your template
- From your Shopify admin, click Apps > Easy Content Builder
- Click Manage Templates > find the template of the product you want to edit, then click Customize
- Navigate to the section you want to add the ISBN number. For demo purpose, you add ISBN to the core Product section, simply click Add block > click Section Title:

- Open the Section Title block you’ve just created > click the connect dynamic source icon next to the Description field > click ISBN. You leave other settings of the Section Title, such as Title, Tagline blank and update Margin/Padding as you wish. Then click Save to apply the changes to the storefront.

Add other content blocks
You can add many content blocks to a section you've created. These content blocks will be displayed in different positions within the section, depending on the Desktop/Mobile Layouts you configure.
