Block Video: Difference between revisions
mNo edit summary |
m (→Video tutorial) |
||
| (14 intermediate revisions by the same user not shown) | |||
| Line 1: | Line 1: | ||
The [https://easy-content-builder-demo.myshopify.com/pages/section-video '''Video''' section] makes it easy to add horizontally and vertically oriented videos to your page. You can upload your videos or insert the video URLs. | {{DISPLAYTITLE:Block: Video}} | ||
=== Overview === | |||
The [https://easy-content-builder-demo.myshopify.com/pages/section-video '''Video''' section] makes it easy to add horizontally and vertically oriented videos to your page. You can upload your videos or insert the video URLs. | |||
{{Note|'''Useful Information''': | |||
Easy Content Builder provides you with five options for video presentations: | |||
1. Video section (the current page): Add horizontal and vertical videos to your Shopify pages by uploading or using video URLs, perfect for product launches, announcements, and reviews. Supports TikTok, YouTube Shorts, Vimeo, and Instagram Reels for vertical videos. | |||
2. [[Block_Video_Slider|Video Slider]] section: Create a sleek video slider or grid from your uploaded videos: | |||
3. [[Block_Gallery|Gallery]] Section: Showcase a grid of photos alongside a featured video. | |||
4. [[Add_section_settings#Add_the_background_video|Video Background]]: Add dynamic video background to your page. | |||
5. [[Block_Icons_With_Text#How_to_create_an_Icons_With_Text_metaobject|Instagram/TikTok/YouTube Video Slider]]: Display an auto-scrolling video carousel. Opens links in a modal upon clicking.|reminder}} | |||
=== Video use cases === | |||
For the vertical videos (for the Pro plan only), you can add Tiktok, YouTube Shorts, Vimeo, Instagram Reels. | For the vertical videos (for the Pro plan only), you can add Tiktok, YouTube Shorts, Vimeo, Instagram Reels. | ||
| Line 7: | Line 23: | ||
[[File:Ecb-vertical-videos.jpg|frameless|800x800px]][[File:Ecb-video-demo.png|border|frameless|800x800px]] | [[File:Ecb-vertical-videos.jpg|frameless|800x800px]][[File:Ecb-video-demo.png|border|frameless|800x800px]] | ||
{{Note| See video section examples [https://easy-content-builder-demo.myshopify.com/products/diamond-ring-set-in-white-pearl here], [https://easy-content-builder-demo.myshopify.com/products/the-women-greenhouse-tee here], or [https://easy-content-builder-demo.myshopify.com/products/posstack-porcelain-mug here]. |inline}} | {{Note| See video section examples [https://easy-content-builder-demo.myshopify.com/products/diamond-ring-set-in-white-pearl here], [https://easy-content-builder-demo.myshopify.com/products/the-women-greenhouse-tee here], or [https://easy-content-builder-demo.myshopify.com/products/posstack-porcelain-mug here]. |inline}} | ||
You can also upload local videos to host them on your Shopify store, with the option to set them to autoplay and loop by default. However, this is optional. | |||
[[File:Ecb local videos.jpg|800px|frameless]] | |||
===Watch Video tutorial=== | |||
You can watch the video tutorial below to learn about the Video section. | |||
The video explains three methods for adding videos to Shopify pages (using Easy Content Builder): | |||
# Use a background video. | |||
# Integrate video sliders from YouTube, TikTok, or Instagram (using the '''Video''' section). | |||
# Add a video slider next to the Add to Cart button (using the '''Video Slider''' section). | |||
Feel free to jump to '''Part 2''' for instructions on using the '''Video''' section. | |||
Watch the video '''[https://www.youtube.com/watch?v=xQ19apSSOzI here]'''. | |||
=== How to add Video section === | |||
*'''Step 1''': Add a '''Section Settings''' section that allows you to control the global settings of the '''Video''' section. | |||
:In this special section, you can specify multi-column layouts, activate full width, determine the section's maximum width, choose a background color, and set global margins and padding, among other options. | |||
:{{Note|Note: If you include the '''Video''' in the core product information, skip the step for adding '''Section Settings'''. Just add the '''Video'''. [[File:Ecb add section core product info.jpg|800px|frameless]]|reminder}} | |||
*'''Step 2''': Add a '''Video''' section and customize the settings according to your preferences. | |||
:[[File:Block video.png|1200x1200px]] | |||
{{Note|''If you are new to our Easy Content Builder, please take a look at the [[Add_section_settings|Add Sections]] section for detailed instructions on how to add a section to your theme.|reminder}} | |||
=== Video section settings === | |||
From the Shopify theme editor, click on '''Video''' on the sidebar to view the details of settings. | From the Shopify theme editor, click on '''Video''' on the sidebar to view the details of settings. | ||
{| class="wikitable" | {| class="wikitable" | ||
!Section settings | !Section settings | ||
!Description | !Description | ||
|- | |- | ||
|Specify a Video URL | |Specify a Video URL | ||
| Line 24: | Line 66: | ||
Here's an example of our demo: ''<nowiki>https://www.youtube.com/watch?v=Wksv_21Elvw</nowiki>'' | Here's an example of our demo: ''<nowiki>https://www.youtube.com/watch?v=Wksv_21Elvw</nowiki>'' | ||
|- | |- | ||
|Tiktok Video ID | |Tiktok Video ID | ||
| Line 34: | Line 73: | ||
|Enter your Instagram Reel ID | |Enter your Instagram Reel ID | ||
|- | |- | ||
|Instagram | |Aspect ratio | ||
|Set the horizontal or vertical video. | |||
|- | |||
|Show Instagram Caption | |||
|Show/hide Instagram Caption | |Show/hide Instagram Caption | ||
|- | |||
|Local Video | |||
|Select the video to upload if you want to host it on your Shopify. | |||
Available settings for the Local Video: | |||
* '''Controls''': Shows video controls. | |||
* '''Autoplay''': Starts playing the video as soon as it's ready. (Note: Some browsers may need the video to be muted for automatic playback.) | |||
* '''Muted''': Mutes the audio output of the video. | |||
* '''Loop''': Restarts the video every time it finishes. | |||
|- | |- | ||
|Container Max Width | |Container Max Width | ||
| Line 47: | Line 98: | ||
|} | |} | ||
===Connect Youtube links to a dynamic source=== | |||
If you're looking to link a YouTube video to a dynamic source, the current '''Video''' section doesn't support that functionality. | |||
As an alternative, consider using the '''Icons With Text''' section. This option enables you to incorporate video links using metaobjects, allowing videos to play in a modal when users click on the video thumbnail. Please keep in mind that this feature is exclusive to the Pro plan. | |||
'''Example''': check out this dynamic source feature (using a metaobject) and the modal link [https://easy-content-builder-demo.myshopify.com/pages/section-icons-with-text here] (Refer to Use Case #7). | |||
'''Setup guide:'''[[File:Ecb-dynamic-source-videos.jpg|frameless|800x800px]]For guidance on creating a metaobject to store your YouTube link and connect it to the Icons With Text section through a dynamic source, take a look at [[Block_Icons_With_Text#How_to_create_an_Icons_With_Text_metaobject|this guide]]. | |||
===Add other content blocks=== | ===Add other content blocks=== | ||
You can add many content blocks to a section you've created. These content blocks will be displayed in different positions within the section, depending on the Desktop/Mobile Layouts you configure. | You can add many content blocks to a section you've created. These content blocks will be displayed in different positions within the section, depending on the Desktop/Mobile Layouts you configure. | ||
Revision as of 14:28, 16 December 2024
Overview
The Video section makes it easy to add horizontally and vertically oriented videos to your page. You can upload your videos or insert the video URLs.
Easy Content Builder provides you with five options for video presentations:
1. Video section (the current page): Add horizontal and vertical videos to your Shopify pages by uploading or using video URLs, perfect for product launches, announcements, and reviews. Supports TikTok, YouTube Shorts, Vimeo, and Instagram Reels for vertical videos.
2. Video Slider section: Create a sleek video slider or grid from your uploaded videos:
3. Gallery Section: Showcase a grid of photos alongside a featured video.
4. Video Background: Add dynamic video background to your page.
5. Instagram/TikTok/YouTube Video Slider: Display an auto-scrolling video carousel. Opens links in a modal upon clicking.Video use cases
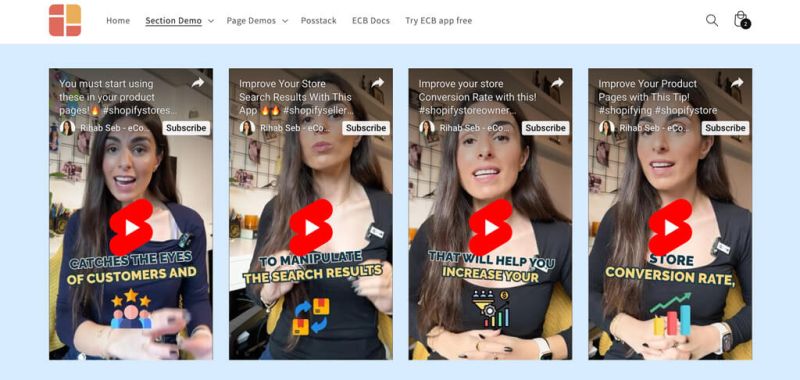
For the vertical videos (for the Pro plan only), you can add Tiktok, YouTube Shorts, Vimeo, Instagram Reels.
It's great to feature product launch videos, featured announcements, UGC and unboxing videos, customer reviews, etc.
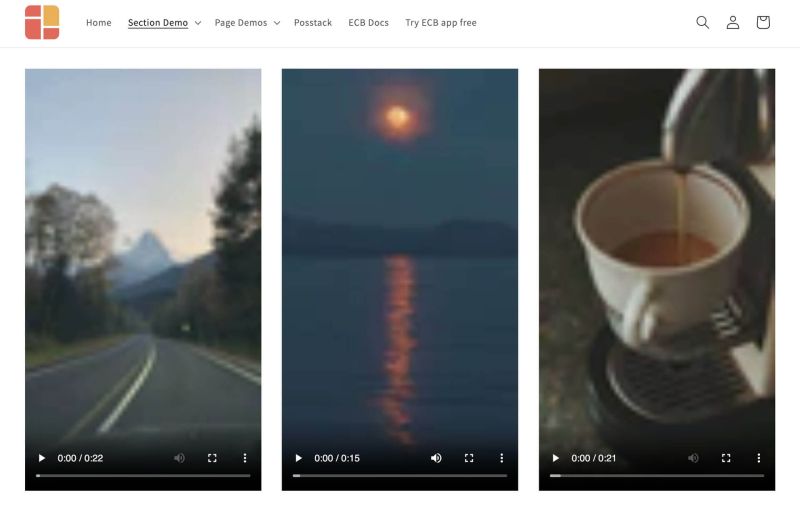
You can also upload local videos to host them on your Shopify store, with the option to set them to autoplay and loop by default. However, this is optional.
Watch Video tutorial
You can watch the video tutorial below to learn about the Video section.
The video explains three methods for adding videos to Shopify pages (using Easy Content Builder):
- Use a background video.
- Integrate video sliders from YouTube, TikTok, or Instagram (using the Video section).
- Add a video slider next to the Add to Cart button (using the Video Slider section).
Feel free to jump to Part 2 for instructions on using the Video section.
Watch the video here.
How to add Video section
- Step 1: Add a Section Settings section that allows you to control the global settings of the Video section.
- In this special section, you can specify multi-column layouts, activate full width, determine the section's maximum width, choose a background color, and set global margins and padding, among other options.
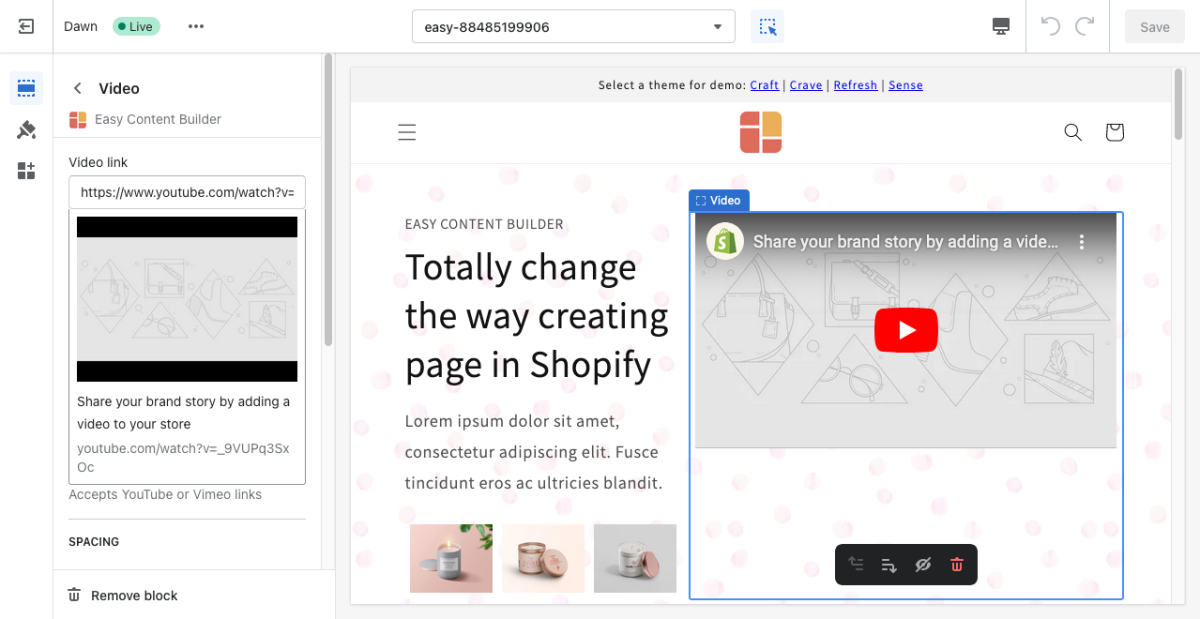
- Step 2: Add a Video section and customize the settings according to your preferences.
Video section settings
From the Shopify theme editor, click on Video on the sidebar to view the details of settings.
| Section settings | Description |
|---|---|
| Specify a Video URL | Add your YouTube or Vimeo links.
Ex. To add a YouTube short (the portrait-mode videos), append your video ID to this URL: https://www.youtube.com/watch?v= Here's an example of our demo: https://www.youtube.com/watch?v=Wksv_21Elvw |
| Tiktok Video ID | Enter your Tiktok Video ID |
| Instagram Video ID | Enter your Instagram Reel ID |
| Aspect ratio | Set the horizontal or vertical video. |
| Show Instagram Caption | Show/hide Instagram Caption |
| Local Video | Select the video to upload if you want to host it on your Shopify.
Available settings for the Local Video:
|
| Container Max Width | Define the maximum width (in pixels) of the video's container. |
| Animate On Scroll | This feature is only available for the Pro plan. It lets you apply different types of animation to the videos as you scroll down the page. Learn more about scrolling animations here. |
| Margin | Set the vertical spacing between elements. |
Connect Youtube links to a dynamic source
If you're looking to link a YouTube video to a dynamic source, the current Video section doesn't support that functionality.
As an alternative, consider using the Icons With Text section. This option enables you to incorporate video links using metaobjects, allowing videos to play in a modal when users click on the video thumbnail. Please keep in mind that this feature is exclusive to the Pro plan.
Example: check out this dynamic source feature (using a metaobject) and the modal link here (Refer to Use Case #7).
Setup guide: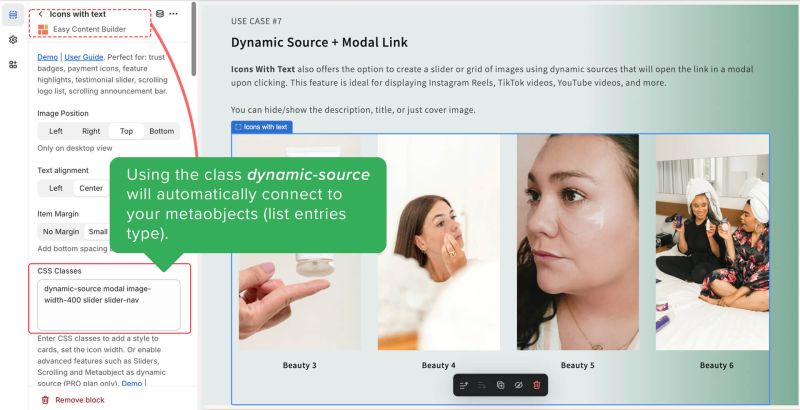 For guidance on creating a metaobject to store your YouTube link and connect it to the Icons With Text section through a dynamic source, take a look at this guide.
Add other content blocks
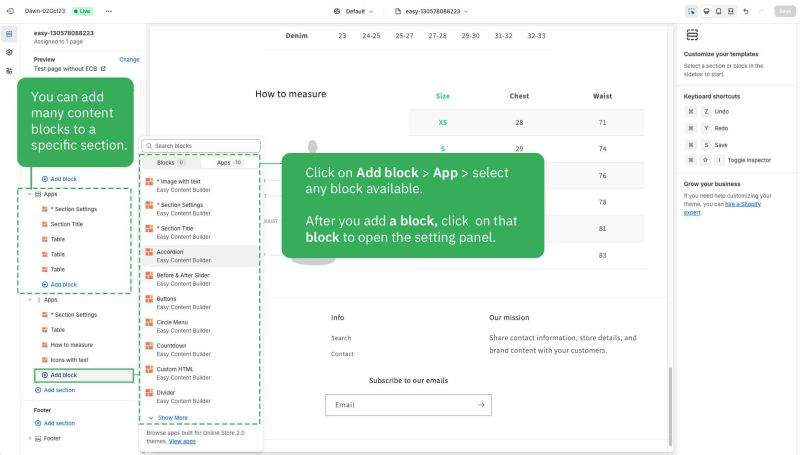
You can add many content blocks to a section you've created. These content blocks will be displayed in different positions within the section, depending on the Desktop/Mobile Layouts you configure.
