Create MetaObjects
With metaobjects, you can conveniently add unique content sections per product/page and manage those custom content in a centralized place.
This guide will walk you through what Shopify Metaobjects are, when to use metaobjects, and how to create a metaobject template using the Easy Content Builder app.How to build a meta object template with Easy Content Builder.
Metaobject overview
What is Shopify metaobject?
Metaobjects are groupings of metafields. With metaobjects, you can create and manage entirely new custom data that's not natively available in your default Shopify data structure. Learn more about the difference between Metaobjects and Metafields here.
Metaobjects are ideal for showing custom data on your Shopify storefronts (such as Recipes, Size charts, FAQs, Ingredient lists, Material information, Book metadata, Technical product specifications, Product manual (pdf files), Author bio, etc.) or storing custom data for internal use in your Shopify admin.
When to use metaobjects?
Metaobjects are handy when you want to add fully custom data per product/page using a single template. That means some (or all) products/pages have unique content sections specific to each product/page, even though they use the same Template.

Another helpful scenario in the metaobjects is creating a single content section that will be used in multiple pages, such as the Author Bio section. For example, display the same Author A bio block on 5 product pages. When you update the Author A Bio, all five products will automatically reflect your edits.
Metaobject use cases with Easy Content Builder
Combing Metaobjects and Easy Content Builder, you can:
- Create an entire page template using Metaobjects such as Recipes (view the demo 1, demo 2, demo 3), Books (view the demo), Artist bio (view the demo), Product specifications (view the demo 1, demo 2) etc.
- Add dynamic metaobjects (section, block, video, image, rich text) into specific parts per product/page (Note: these products/pages still use the same template).
- Template for multiple pages: create one template and apply it to multiple pages in bulk. More details.
- Template for single page: perfect when you want each page (product, page, article, etc) to have its unique template. More details.
- Template for standard pages such as Homepage, Collection pages, etc. More details.
How to create a metaobject template using Easy Content Builder
Overview:

Types of metaobjects available in Easy Content Builder.
At present, Easy Content Builder allows you to create six types of metaobjects:
- ECB Media and ECB Rich Text metaobjects: you can use both of these metaobjects for creating long-form pages (cooking recipes, ingredient lists, product pages with complex specifications, bookstore pages, etc.) with rich content such as videos, images, icons, and rich text.
- ECB Media: where you store rich media data such as videos, images, icons.
- ECB Rich Text: where you store rich text data such as headings, subheadings, descriptions, etc.
- Metaobjects for specific blocks:
- ECB Author Bio: allows you to store the writer, artist, author profile etc (such as name, position, avatar, and relevant information).
- ECB Tabs: allows you to store tab content in metaobjects and display this dynamic content on a tab section on your theme using your Shopify theme editor. Read setup guide.
- ECB Accordions: allows you to store accordion content in metaobjects and display this dynamic content on an accordion section on your theme using your Shopify theme editor. Read setup guide
- ECB Icons With Text: allows you to store Icons With Text content (including Heading, Icons, Description, and Links) in metaobject and display this dynamic content on an Icons With Text section on your theme using your Shopify theme editor. Read setup guide.
Step 1: Create Metaobjects
- From your Shopify admin, navigate to Apps > Posstack Easy Content Builder > Metaobjects.
- Click on Create next to the ECB Media and ECB Rich Text content types. Once done, you should see two metaobject definitions (ECB Media and ECB Rich Text) automatically created with the message Metaobject and Metafield created:

- ECB Media is a group of fields where you store rich media data, including videos, images, and icons.
- ECB Rich Text is a group of fields where you store headings, subheadings, links, regular texts, and rich texts.
Step 2: Create a metaobject template using Easy Content Builder.
Steps to select a pre-built metaobject template:
- From your Shopify admin, click Apps > Easy Content Builder > Browse Templates.
- Click on Metaobject Templates horizontal filter > Find the Template you want to use, then Choose Template.

Prebuilt Metaobjects templates provided by Easy Content Builder.
Step 3: Customize & assign the metaobject template
Step 3.1: Add sections/blocks to the metaobject template
After you complete Step 2, you will be redirected to the Shopify theme editor, where you can start adding the sections/blocks to the Template.
If you want to edit an existing metaobject template you created with Easy Content Builder before, follow these steps:
- From your Shopify admin, click Apps > Easy Content Builder.
- From the Easy Content Builder dashboard, click Manage Templates.
- Then select the template that you want to edit and click Customize.
- Next, add or open each section/block you want to edit.
Step 3.2. Assign the metaobject template to pages.
You can follow one of the steps below depending on the type of pages (product, store page, blog post) to which you want to assign the template:
Step 4: Add and link metaobject entries
Step 4.1: Create entries for the metaobject.
Entries are custom data that you store in a metaobject.
For example, for each cooking Recipe page, you will add one entry (that contains Method, Ingredients, How-to steps, video or images, etc.). The metaobjects definitions (ECB Media and ECB Rich Text) we created in Step 1 above define these content fields automatically.
Why do you need to add entries to ECB Media and ECB Rich Text?
Your custom data might contain both media (video, image, icons) and rich text, so Easy Content Builder app lets you add and manage those data in two separate groups:
- ECB Media is where you create and manage all the media content you plan to use for the page, such as video (for featured videos, background videos), images (featured images, background images, gallery), and icons. You will create a separate ECB Media entry for each metaobject page.
- ECB Rich Text is where you create and manage the rich text you plan to use for the page (such as headings, subheadings, descriptions, etc.). Depending on which information you want to display on the storefront, you can enter your custom content into some or all of those pre-defined fields in metaobjects. You will create a separate ECB Rich Text entry for each metaobject page.
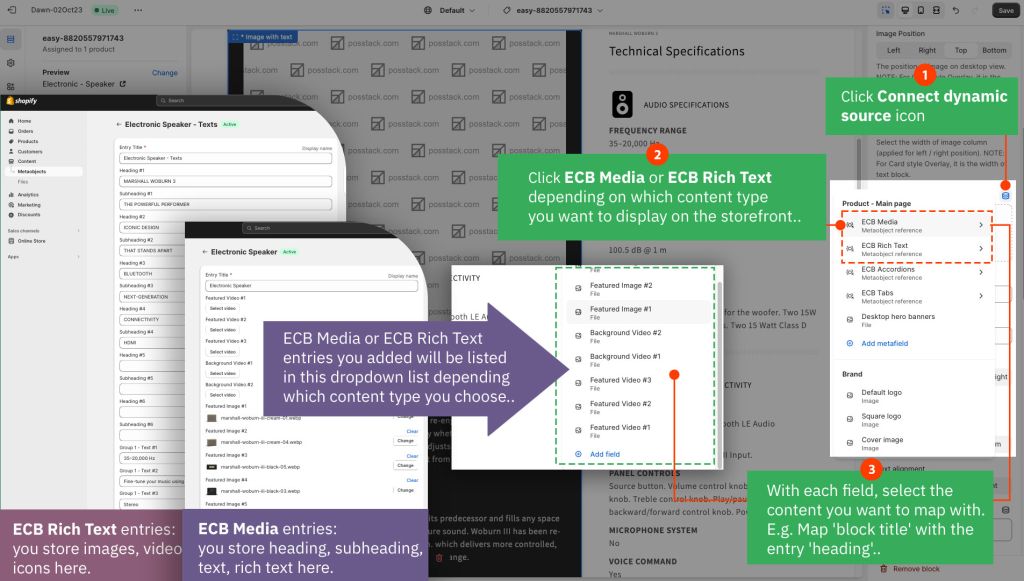
- The screenshot below illustrates how entries stored in ECB Media + ECB Rich Text metaobjects are mapped with section fields in the Shopify theme editor.

For demo purposes, this guide walks you through the steps to create a product page using metaobjects. You can apply this workflow to create and display metaobjects in parts or an entire page/blog post/product.
- From your Shopify admin, select the part of your store that you want to add a metaobject to, for example, Products (or Pages, Blog Posts if you choose to).
- Click the name of a product you want to edit.
- In the Metafields section, you need to add entries for two metaobjects, ECB Media and ECB Rich Text.
- First, click on the ECB Media form field > click Select Entry > click Create new entry (If you already added entries before, simply select the one you want to use here).

- Then, complete the fields for your ECB Media entry. By default, ECB Media provides you with a wide list of fields below to use in different use cases, you can leave any fields blank if you have no related content for them yet.
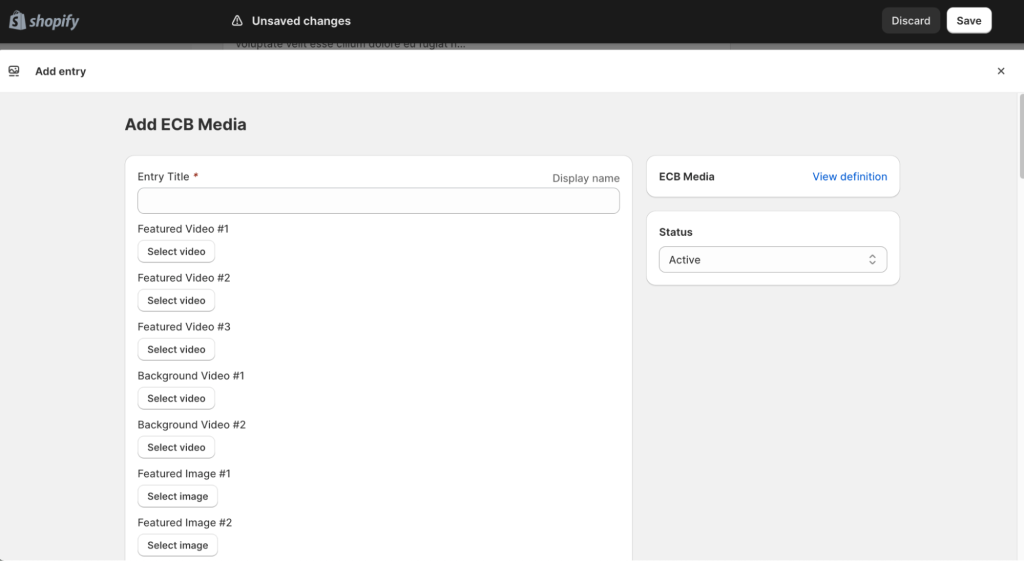
- Entry Title: This field is for your internal use only. It helps to identify the entry in your Shopify admin. For example, you can enter “Recipe - Media’ if you are creating a media entry for a Recipe page.
- Featured Video: you can add up to 3 videos (e.g. How-to videos, tutorials, cooking guides, etc.)
- Background Video: you can add up to 2 videos to use as the background of a section.
- Feature Image: you can add up to 6 featured images.
- Icons: you can add up to 10 icons.
- Background Desktop: you can add up to 3 background images for the Desktop (e.g., Hero banners)
- Background Mobile: you can add up to 3 background images for the Mobile (e.g., Hero banners)
- Gallery Image: you can add up to 12 gallery images (e.g. Before & After images in a cooking recipe or featured images of your product in different use cases, etc.)
- Next, follow the same steps to add entries to ECB Rich Text. Click on the ECB Rich Text form field > click Select Entry > click Create new entry (If you already added entries before, simply select the one you want to use here).
- Then, complete the fields for your ECB Rich Text entry. By default, ECB Rich Text provides you with a wide list of fields below to use in different use cases, you can leave any fields blank if you have no related content for them yet.
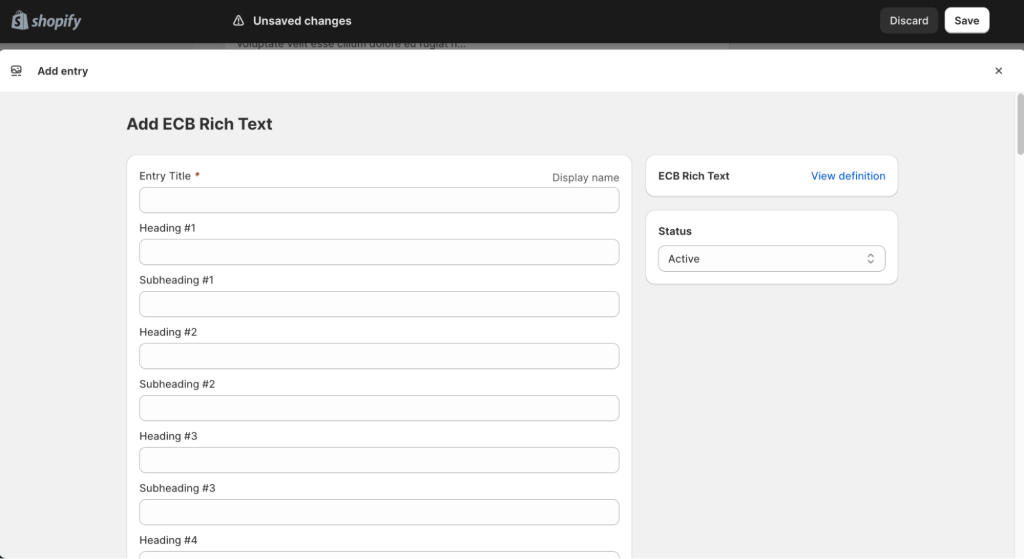
- Entry Title: This field is for your internal use only. It helps to identify the entry in your Shopify admin. For example, you can enter “Recipe - Rich Text’ if you are creating a rich text entry for a Recipe page.
- Heading: you can add up to 6 Headings.
- Subheading: you can add up to 6 subheadings.
- Text: you can add up to 18 text fields (we group these fields into three groups "group 1", "group 2", and "group 3" to make it easy for you to keep track of which group the text belongs to).
- Link: you can add up to 3 links.
- Rich text: you can add up to 6 rich text blocks.


- Click Save.
Once you hit Save, you successfully store all custom content in the metaobjects ECB Media and Rich Text.
Step 4.2: Link the metaobject entries
Now, you can map the metaobject entries created in Step 4.1 above to the sections/blocks through your Shopify theme editor (you determine which sections/blocks you want to link those metaobjects) and display them on your storefront.

Example: Add a featured image stored in the ECB Media metaobject to an Image With Text section in Easy Content Builder.

An example of how to link a metaobject to a section using Dynamic Source.
You can follow similar steps to add Heading, Subheading, Rich text stored in ECB Rich Text metaobjects to the Image With Text section in Easy Content Builder.
1. Assign an existing metaobject template to that new page.
2. Then, add the core data (default data for product/blog post, etc.) and create new metaobject entries for that new page.How to create Author Bio metaobjects
What is the ECB Author metaobject?
ECB Author metaobject provides a structured record of a specific person who can be a manufacturer, an artist, a book author, a board member, a mentor, or yourself. It lets you store the information about that person, including popular fields such as First name, Last Name, birth date, job title, avatar, bio, etc.
What is the ECB Author metaobject perfect for?
You can use ECB Author metaobject in various circumstances, for example:
- Manufacturer profile - view the demo.

- An artist profile - view the demo.

- Profiles of an author, mentor, investor, Board member, etc - view the author demo.

You can display an Author section on multiple pages. Once you change this block, your edits will be reflected automatically on all pages where the Author metaobject is used.
How to use ECB Author metaobject
- Suppose you only need to add a specific metaobject - tabs, accordions, Icons With Text - to part of your Shopify pages. In that case, we highly recommend you use ECB Tabs, ECB Accordions, or ECB Icons With Text metaobjects, depending on which content type you need.
- To create a custom long-form page, use ECB Media and ECB Rich Text Metaobjects by following these steps.
- You can also mix all the metaobjects mentioned above on one page if you choose to.
Step 1: Create ECB Author Metaobject
- From your Shopify admin, navigate to Apps > Posstack Easy Content Builder > Metaobjects.
- Click on Create next to the ECB Author. Once created, you should see the message Metaobject and Metafield created:

Step 2: Create entries for the ECB Author metaobject
- From your Shopify admin, select the part of your store to which you want to add a metaobject, for example, Products (Easy Content Builder now supports metaobjects for Products, Pages, Blog Posts).
- Click the name of a product you want to edit.
- In the Metafields section, click on the form field Author to add an entry.
- Then click Select Entry > click Create new entry. (If you already added entries before, simply select the one you want to use here).

- Complete the fields for your entry. These fields are determined by the ECB Author metaobject. You can leave any field blank if you have no data for them yet.
- Click Save.
Step 3: Displaying ECB Author metaobject on your Online Store
You do so by connecting ECB Author metaobject to your Online Store through dynamic sources.
- From your Shopify admin, click Apps > Easy Content Builder
- From the Easy Content Builder dashboard, click Manage Templates.
- Then select the template that you want to edit and click Customize.
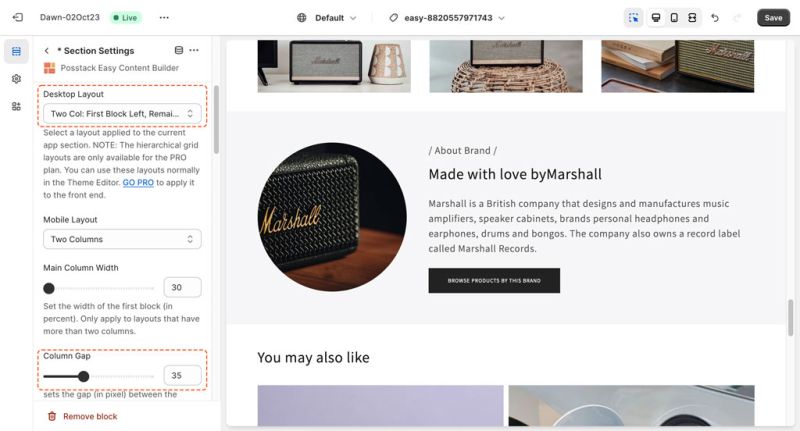
- From the Theme Editor, open a block where you want to edit. Then click on Use Dynamic Sources icon next to the content fields to link individual entries with each field.
- Section Settings to specify a two-column layout for this Manufacturer section:
- Then, create a Gallery section to display a circle avatar:
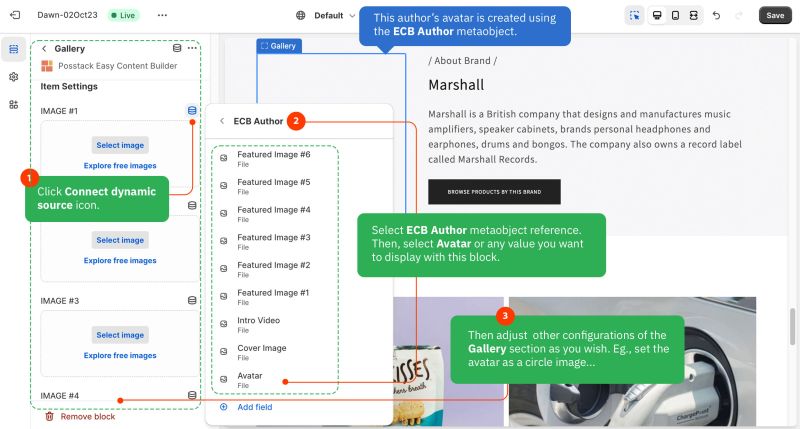
- Next, create a Section Title to display the Manufacturer name, description, etc.
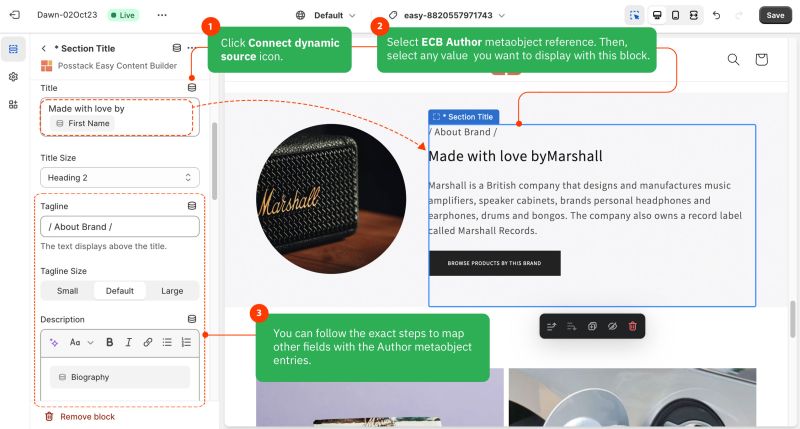


Please note that you can delete or edit any field of the Author block.
How to create Tabs/Accordions metaobjects
- If you only need to add a specific metaobject - tabs, accordions, or Icons With Text - to part of your Shopify pages, we highly recommend you use ECB Tabs, ECB Accordions, or ECB Icons With Text metaobjects depending on which content type you need.
- If you want to create a custom long-form page, use ECB Media and ECB Rich Text Metaobjects by following these steps.
Step 1: Create Metaobjects
- From your Shopify admin, navigate to Apps > Posstack Easy Content Builder > Metaobjects.
- Click on Create next to the desired content type (ECB Tabs, ECB Accordions, etc.). Once created, you should see the message Metaobject and Metafield created:

Step 2: Create entries for the metaobject.
- From your Shopify admin, select the part of your store that you want to add a metaobject to. For example, Products (Easy Content Builder now supports metaobjects for Products, Pages, Blog Posts).
- Click the name of a product you want to edit.
- In the Metafields section, click on the form field to add an entry (ECB Accordions, ECB Tabs depending on which metaobjects you created in Step 1)
- Then click Select Entry > click Create new entry. (If you already added entries before, simply select the one you want to use here).

- Complete the fields for your entry. These fields are determined by the metaobject.
- Click Save.
Step 3: Displaying metaobjects on your Online Store
You do so by connecting metaobjects to your Online Store through dynamic sources
- From your Shopify admin, click Apps > Easy Content Builder
- From the Easy Content Builder dashboard, click Manage Templates.
- Then select the template that you want to edit and click Customize.
- From the Theme Editor, open the Tabs/Accordion block where you want to edit.
- Then click on Use Dynamic Sources icon next to the block title.
- Easy Content Builder app will automatically link all values defined under the related metaobject entries. No need to enter each entry values to each field.


- Once done, you can delete or edit any field of the Tab/Accordion block as you wish.
How to create an Icons With Text metaobject
- If you only need to add a specific metaobject - tabs, accordions, or Icons With Text - to part of your Shopify pages, we highly recommend you use ECB Tabs, ECB Accordions, or ECB Icons With Text metaobjects depending on which content type you need.
- If you want to create a custom long-form page, use ECB Media and ECB Rich Text Metaobjects by following these steps.
Step 1: Grant the Access Scope for Creating Metaobject Definitions
Grant the Access Scope for Creating Metaobject Definitions by updating the App permission: [UPDATE APP]. This step is only needed if you install an old version of the Easy Content Builder.
Please discard this step for those who just installed the Easy Content Builder app.

- Note: If your store has multiple staff members, make sure you assign the right permission for staff to work on the metaobjects.
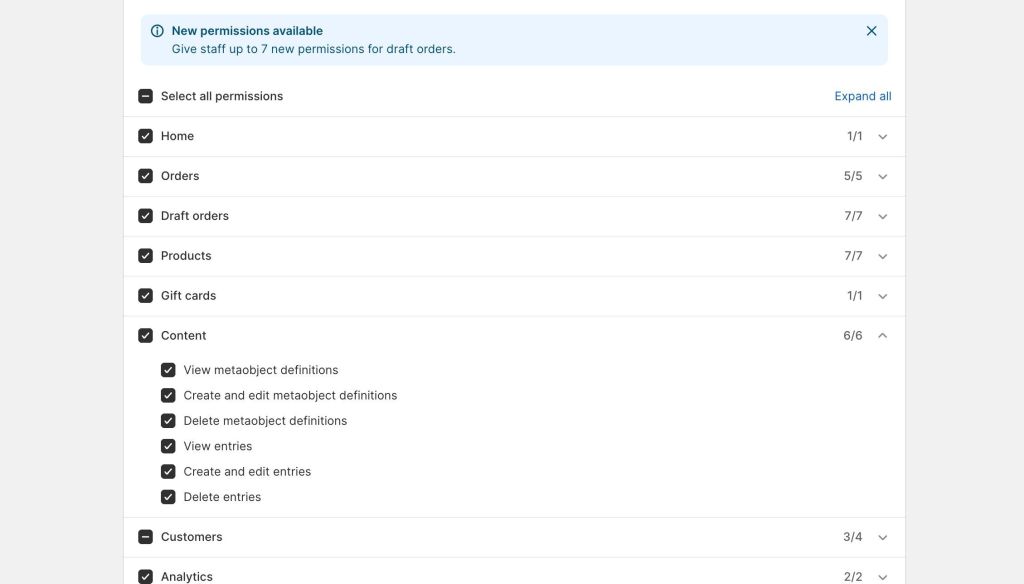

- Otherwise, your staff can not add entries when working with the metaobjects.

Step 2: Create Metaobjects
- From your Shopify admin, navigate to Apps > Posstack Easy Content Builder > Custom Data.
- Click on Create next to the desired content type (Icons With Text, Tabs, Accordions). Once created, you should see the message Metaobject and Metafield created:

- And all metafields associated with the above-mentioned metaobjects are automatically created too. You can check those metafields by following these steps:
- In your Shopify admin, click Settings > Custom data
- You should see 3 metafields Products, Pages, Blog Posts:

- Click on each metafield Products, Pages, or Blog Posts to see the metafield definitions:

Step 3: Create entries for the Metaobjects
- From your Shopify admin, select the part of your store that you want to add a metaobject to. For example, Products (Easy Content Builder now supports metaobjects for Products, Pages, Blog Posts).
- Click the name of a product you want to edit.
- In the Metafields section, click on the form field to add an entry (ECB Accordions, ECB Tabs, or ECB Icons With Text depending on which metaobjects you created in Step 2)

- Next, click Select Entry > Create New Entry and complete the fields for your entry. Once done, click Save.

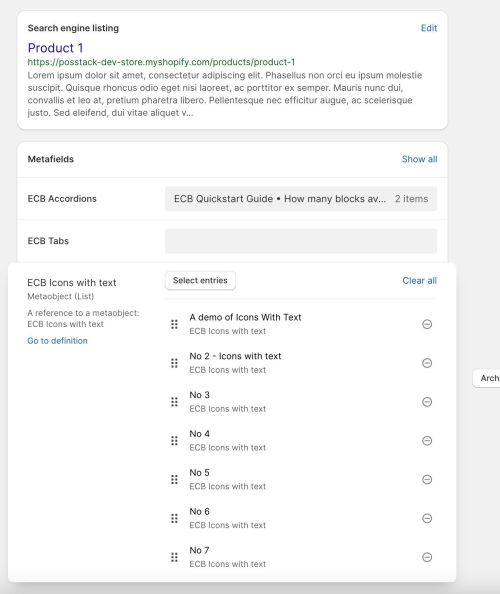
- To create other entries, you repeat the exact steps by clicking Select Entry > Create New Entry. If you have already created entries, simply click the checkboxes to determine which entries will be displayed on your storefront. Here is an example of metaobject entries we created for demo purposes:

- Once done, click Save.
Step 4: Connecting metaobjects to your Online Store through dynamic sources
- From your Shopify admin, click Apps > Easy Content Builder
- From the Easy Content Builder dashboard, click Manage Templates.
- Then select the template that you want to edit and click Customize.
- From the Theme Editor, open the Icons With Text block where you want to edit. Then insert two classes into the CSS classes field: dynamic-source image-width-100 (replace 100 with the desired value for your icons' width).

How to add multiple metaobjects on one page
Case 1: Adding multiple metaobjects (ECB Media, ECB Accordions, ECB Tabs, etc.) to the same page.
You can use multiple metaobjects Easy Content Builder provides (ECB Media & ECB Rich Text, ECB Accordion & ECB Tabs, ECB Icons With Text, ECB Author) in the same page template, depending on which content type you need.
Here is an example of a product page where we combined three types: ECB Media, ECB Rich Text, and ECB Author.
How to display each metaobject on your page: scroll up to the top of this page for step-by-step guides for each metaobject.
Case 2: Duplicate a metaobject on the same page.
There might be circumstances where you need more entry fields beyond the default ones available under a specific ECB metaobject. For example, your knitted fabric product page requires 30 images for the Color Chart section (far beyond the default 12 images for the gallery).
In this case, you can duplicate a metaobject to display both on the same page.
Note: This guide uses the ECB Media metaobject as an example. Suppose you have already added and displayed an ECB Media metaobject on your product page. Now you add the 2nd ECB Media metaobject to the same page by following these steps:
Step 1: Create a reference to a metaobject
- In your Shopify admin, go to Settings > Custom data.
- Select the part of your store that you want to create the reference for—for example, Products.
- Click Add definition. Then, enter a name for your definition into the Name field, for example, ECB Media 2 (if you want to duplicate an ECB Media metaobject - this is an easy way to find it later).
- Click Select type > Metaobject.
- Then reference the ECB Media and choose One entry.

- Select Storefronts to allow your metafield content to be accessible by your storefront.
- Click Save.
Step 2: Create entries for the Metaobject
- From your Shopify admin, select the part of your store to which you want to add a metaobject—for example, Products (Easy Content Builder supports metaobjects for Products, Pages, Blog Posts).
- Click the name of a product you want to edit.
- In the Metafields section, click on the form field ECB Media 2 to add an entry (this form label varies depending on what we created in Step 1 above).

- Next, click Select Entry > Create New Entry and complete the fields for your entry. Once done, click Save.
Step 3: Displaying the 2nd metaobject on your Online Store
Now that you already have the 2nd ECB Media metaobject with new entries in place. You display this newly duplicated metaobject to your Online Store following the exact steps like other ECB Metaobjects:
- From your Shopify admin, click Apps > Easy Content Builder.
- From the Easy Content Builder dashboard, click Manage Templates.
- Then select the template that you want to edit and click Customize.
- From the Theme Editor, open each section/block you want to edit.
- Then click on Use Dynamic Sources icon next to the content fields to link individual entries with each field.
Edit an entry
Please keep in mind that if an entry is published anywhere on your store, then your edits will automatically be reflected wherever the entry is used.
Steps to edit individual entries:
- In your Shopify admin, go to Content > Metaobjects.
- Click an entry you want to edit.
- Make any required changes to the entry.
- Use the drop-down menu to set the status to Draft or Active.
- Click Save.
Delete an entry
- In your Shopify admin, go to Content > Metaobjects.
- Click an entry that you want to delete.
- Click Delete to remove the entry.
Delete a metaobject
- In your Shopify admin, go to Apps > Easy Content Builder > Custom Data
- Click on Delete next to the metaobject that you want to delete.