Use Metafields as Dynamic Source
Metafield & Dynamic source introduction
Metafields & Dynamic sources in Shopify
Metafields are custom attributes or fields that let you attach extra information to Shopify's products, collections, customers, orders, and other objects that aren't usually available in the default Shopify fields.
Technically, a metafield includes a namespace, a key, and a value. The [namespace] is the group that your metafield will belong to, and the [key] is the specific metafield name. The value stores your actual data.
Dynamic resources allow you to use metafields to display dynamic information on your Shopify store. Ultimately, dynamic sources link your custom data (that you store in a metafield) to a section or block in the theme editor - without having to type any metafields definitions. Then, you can display that custom data on the storefront wherever you assign the section (e.g, collections, products, pages, etc.).
Metafield use cases
Every Shopify store is different, so you can use metafields for various purposes that fit well with your business goals.
Here are a few examples of how you can use metafields to improve your Shopify store:
- Improve your product page: Product materials, care manuals, size charts, lists of ingredients, etc.
- Custom product attributes (e.g. ISBN (International Standard Book Number) on product pages for a bookstore)
- Create custom filter and sorting options based on specific product metafields. Metafield-based filters have a certain limitation, though - filters based on product/variant metafields only support a few content types (single-line text, number, true or false). More details.
- Improve articles: blog post summaries, etc.
- Adding custom meta tags for SEO purposes, etc.
Using metafields in sections
You can use Easy Content Builder in combination with Metafields to display dynamic content on your storefront. You can do so by creating metafields, then connecting that metafield to a section in the theme editor. Refer to the step-by-step guide below for more information.
How to create & display metafields on your Shopify store
Creating and using metafields in Shopify involves a few general steps:
- Create metafields: create a metafield definition (e.g. type of metafield, metafield details, scope, etc.)
- Populate metafields: add values to the objects (e.g. products) that you add metafields to.
- Display metafields: use 'dynamic sources' or Liquid code (if you're familiar with coding) to link and display the metafield values in your Shopify store.
Below you will find step-by-step instructions on how to create and display a few sections (related products, dynamic hero banner, etc) using Easy Content Builder and metafield, but these steps work for other custom data too.
Use case 1: Create and display a Related Product section using metafield.
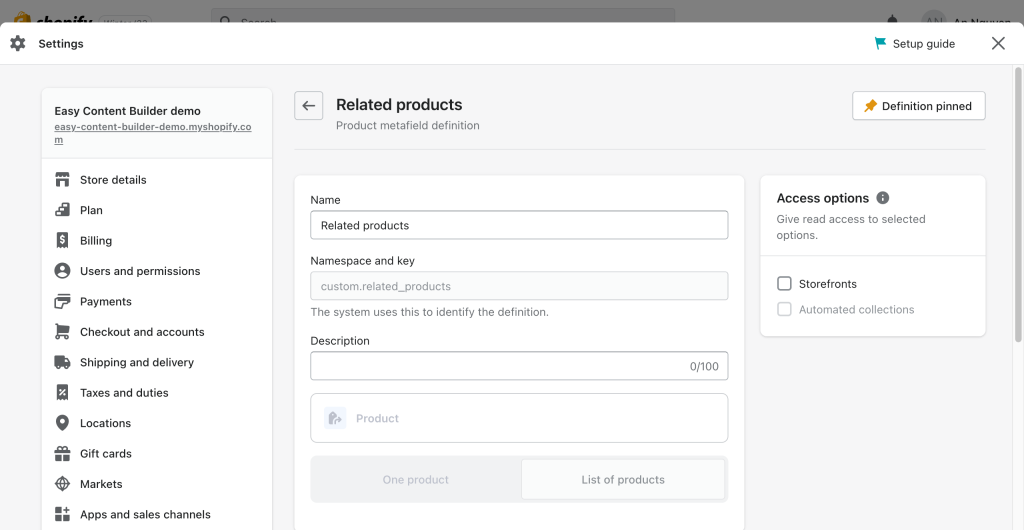
Step 1: Create a metafield definition for the Related Products
- From your Shopify admin, click Settings > Custom Data
- Click Products > click Add definition
- In the Product Metafield definition form, assign a namespace (the group that your metafield will belong to) and a key (the specific metafield name) as follows:
- Name: Related products
- Namespace and key: custom.related_products
- Description: (optional)
- Select type > Product, make sure you enable List of Product.

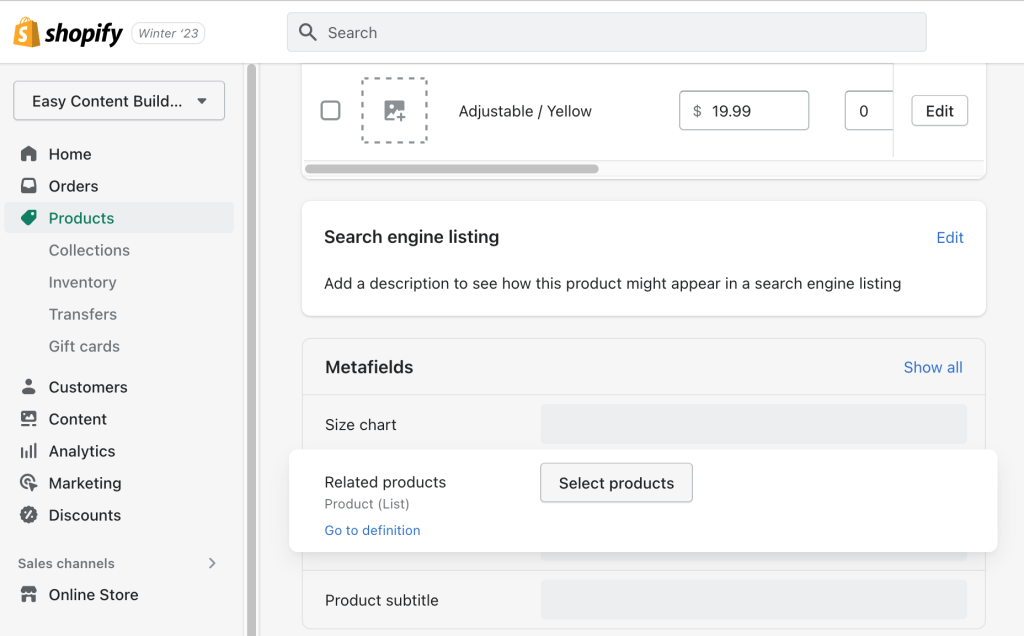
Step 2: Add value to the metafield
- From your Shopify admin > click Products > click the Product you want to add Related Product section.
- Scroll down to the Metafield section > click Related Products field to select the products you want to display as Related Product:

Step 3: Link the product metafields to your template
- From your Shopify admin, click Apps > Easy Content Builder
- Click Manage Templates > find the template of the product you want to edit, then click Customize
- Navigate to the section you want to add the Related Products.
- For example: you add Related Products to the core Product section, simply click Add block > click Featured Products:

- Open the Featured Products section you’ve just created > click the connect dynamic source icon next to the Select Products field > click Related Products > then click Save to apply the changes to the storefront.

- Once you assign the related products using dynamic sources, you can edit and change the products your way through the Theme Editor.

Use case 2: Create a Hero banner with a dynamic banner image
Step 1: Create a metafield definition for the hero banners
- From your Shopify admin, click Settings > Custom Data
- Click Products > click Add definition
- Note: You can choose another type of object (e.g., pages, articles, collections, customers) that you want to add the metafield to.
- In the Product Metafield definition form, assign a namespace (the group that your metafield will belong to) and a key (the specific metafield name) as follows:
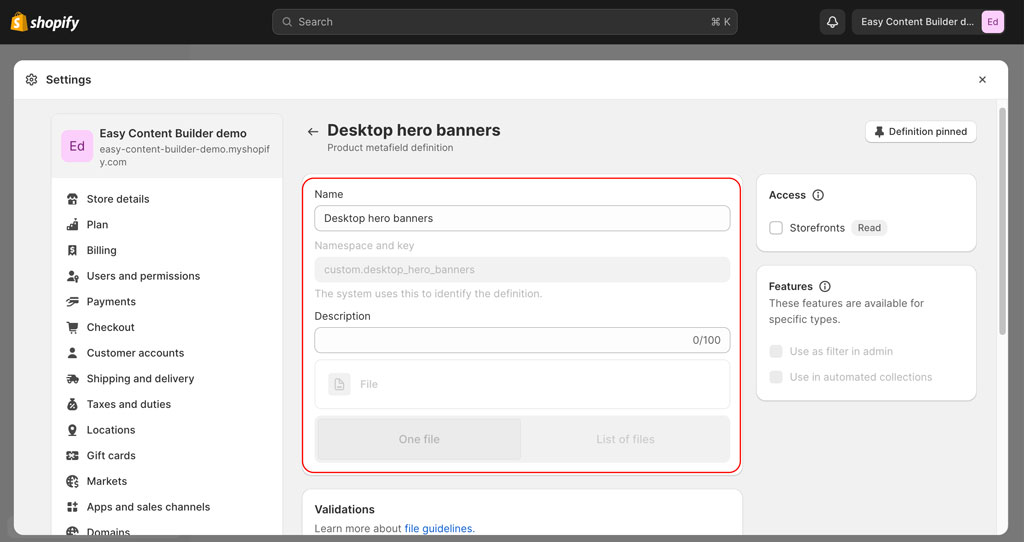
- Name: Desktop hero banners
- Namespace and key: custom.desktop_hero_banners
- Description: (optional)
- Select type > File. Then select ‘One File”.
- Save the metafield definition.
- Note: Easy Content Builder lets you upload separate hero banners for Desktop and mobile. To use a unique banner for mobile, you just need to create a second metafield for mobile banner following the exact steps above.

Step 2: Add value to the hero banner metafield
- From your Shopify admin > click Products > click the Product you want to add the Hero banner section (If you create a metafield for another object, please navigate to that specific object (For example, open the page, collection, etc.)
- Scroll down to the Metafield section > click Desktop hero banners field to upload the banner image.

Step 3: Link the hero banner metafields to your template
- From your Shopify admin, click Apps > Easy Content Builder
- Click Manage Templates > find the template of the product you want to edit, then click Customize
- If the metafields you created are for other pages (e.g., store pages, blog posts), select the corresponding template. For products, articles, or store pages you design with Easy Content Builder, you can edit these templates under Easy Content Builder > Manage Templates. For other standard pages (homepage, collection, etc), you can access these templates following this guide.
- Add a new hero section: click Add section > click Section Settings:

- Open Section Settings block you have created, click on ‘Use dynamic sources’ icon next to Background Image field and you will see all metafields you created. Select the Desktop hero banners. You follow the exact steps to link the metafield for the Background Image for Mobile (provided that you have already created a metafield for the mobile banner image). Then, you can play around with other settings (layout column, padding top, padding bottom, etc.) under the Section Settings block as you wish.

- Next, add a Section Title block to display the hero heading, tagline, CTA buttons. Under the same app section that you created the hero banner, click Add Block > select Section Title. Then fill in the Title, Tagline, Description, and button style as you wish.

- Different hero section layouts for your inspiration: view demo.
- How to create multi-column layouts: view setup guide.
Use case 3: Create and display a Product attribute using metafield
If you run a bookstore, you might need to add new product attributes (such as ISBN, author, publisher, publication date) beyond the standard product attributes such as title, price, and description.
Below is an example of how to add an ISBN (International Standard Book Number) on your product pages using metafield.
Step 1: Create a metafield definition for the Related Products
- From your Shopify admin, click Settings > Custom Data
- Click Products > click Add definition
- In the Product Metafield definition form, assign a namespace (the group that your metafield will belong to) and a key (the specific metafield name) as follows:
- Name: ISBN
- Namespace and key: custom.isbn
- Description: (optional)
- Select type > Integer, make sure you enable One value.

Step 2: Add value to the ISBN metafield
- From your Shopify admin > click Products > click the Product you want to add ISBN.
- Scroll down to the Metafield section > click ISBN field to enter the ISBN number:

Step 3: Link the ISBN metafields to your template
- From your Shopify admin, click Apps > Easy Content Builder
- Click Manage Templates > find the template of the product you want to edit, then click Customize
- Navigate to the section you want to add the ISBN number. For demo purpose, you add ISBN to the core Product section, simply click Add block > click Section Title:

- Open the Section Title block you’ve just created > click the connect dynamic source icon next to the Description field > click ISBN. You leave other settings of the Section Title, such as Title, Tagline blank and update Margin/Padding as you wish. Then click Save to apply the changes to the storefront.

How to bulk edit metafields
When you need to update metafields of multiple products or other objects, you can use Shopify bulk editing feature to save time.
Steps:
- From your Shopify admin, choose the objects (e.g. Products) where you want to edit the metafields.
- Click on the checkboxes next to each product you want to edit. Then, click on Bulk Edit.

- In the Bulk editor, click the Columns drop-down menu, and then in the Metafields section, click the Template checkbox.
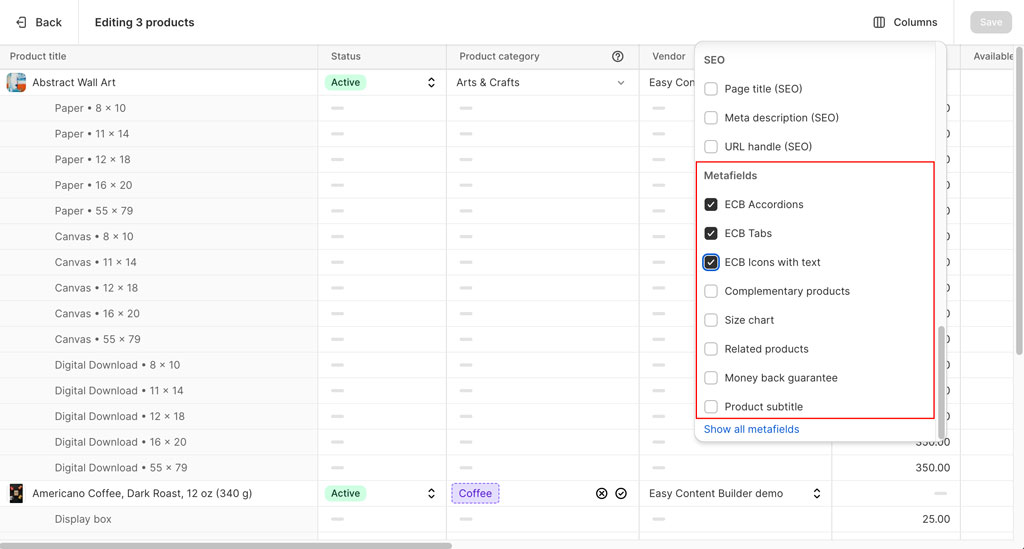
- Then, you will see all metafields available for the selected objects where you can add, update values, or make any necessary changes.
