Section as modal: Difference between revisions
| (8 intermediate revisions by the same user not shown) | |||
| Line 1: | Line 1: | ||
{{DISPLAYTITLE:Section as Modal}} | |||
You can use the [https://easy-content-builder-demo.myshopify.com/pages/section-as-modal Section as Modal] feature to display engaging content within a modal window as visitors browse your Shopify store. A popup will appear on the screen after a specific time, showcasing special offers or conveying important messages, such as exclusive discounts or newsletter sign-ups. | You can use the [https://easy-content-builder-demo.myshopify.com/pages/section-as-modal Section as Modal] feature to display engaging content within a modal window as visitors browse your Shopify store. A popup will appear on the screen after a specific time, showcasing special offers or conveying important messages, such as exclusive discounts or newsletter sign-ups. | ||
{{Note|NOTE: This block is only available for the Pro plan. You can still add and edit this block normally in the Theme Editor; however, you need to upgrade your plan to apply them to the front end.|inline}} | |||
==What is the Section as Modal perfect for?== | ==What is the Section as Modal perfect for?== | ||
| Line 15: | Line 17: | ||
From the Shopify theme editor, click on the Section as Modal on the sidebar to view the details of settings. | From the Shopify theme editor, click on the Section as Modal on the sidebar to view the details of settings. | ||
{{Note|''If you are new to our Easy Content Builder, please take a look at the [[Add_section_settings|Add Sections]] section for detailed instructions on how to add a section to your theme.|inline}} | {{Note|''If you are new to our Easy Content Builder, please take a look at the [[Add_section_settings|Add Sections]] section for detailed instructions on how to add a section to your theme.|inline}} | ||
{{Note|If you add the Modal section into a template, the pop-up will only display on the pages utilizing that specific template. | |||
If you want to show the pop-up on all pages, you must include the Modal Section in the Footer section group.|reminder}} | |||
{| class="wikitable" | {| class="wikitable" | ||
|+ | |+ | ||
| Line 45: | Line 51: | ||
{{Note|See [https://easy-content-builder-demo.myshopify.com/pages/section-variations all content blocks] available that you can add to a section.|reminder}} | {{Note|See [https://easy-content-builder-demo.myshopify.com/pages/section-variations all content blocks] available that you can add to a section.|reminder}} | ||
==Pre-built Modal template== | |||
After installing Easy Content Builder, you can use [https://easy-content-builder-demo.myshopify.com/pages/section-as-modal-promo this pre-designed template] to create a popup that suits your requirements. It includes 8 popups created using '''Section as Modal''' and relevant sections in Easy Content Builder. | |||
{{Note|Remember, only one of the 8 prebuilt popups should be enabled at a time.|reminder}} | |||
[[File:Ecb-popup-template.jpg|frameless|1024x1024px]] | |||
==Use cases== | ==Use cases== | ||
| Line 52: | Line 66: | ||
[[File:Ecb-section-as-modal-guide.jpg|frameless|1200x1200px]] | [[File:Ecb-section-as-modal-guide.jpg|frameless|1200x1200px]] | ||
'''Step 1''': Add a Section Settings section (to control the global settings of this promotional section) | '''Step 1''': Add a '''Section Settings''' section (to control the global settings of this promotional section) | ||
* Choose a one-column layout for desktop view. | * Choose a one-column layout for desktop view. | ||
* Set the top padding to 50px and the bottom padding to 50px. | * Set the top padding to 50px and the bottom padding to 50px. | ||
'''Step 2''': Add a Section Title section and make the following adjustments: | '''Step 2''': Add a '''Section Title''' section and make the following adjustments: | ||
* Text Alignment: center | * Text Alignment: center | ||
* Titel: Enter 'SALE - ALL ITEMS 25% OFF'. | * Titel: Enter 'SALE - ALL ITEMS 25% OFF'. | ||
| Line 64: | Line 78: | ||
* Padding: No Padding | * Padding: No Padding | ||
'''Step 3''': Add a Divider section and configure as below: | '''Step 3''': Add a '''Divider''' section and configure as below: | ||
* Upload a custom divider image (3x3 px) (This step is optional). Alternatively, use a pre-designed divider available in the Divider section. | * Upload a custom divider image (3x3 px) (This step is optional). Alternatively, use a pre-designed divider available in the Divider section. | ||
| Line 71: | Line 85: | ||
* Margin: Medium | * Margin: Medium | ||
'''Step 4''': Add a Featured Products/Collections section and customize the settings: | '''Step 4''': Add a '''Featured Products/Collections''' section and customize the settings: | ||
* Type: Products select manually | * Type: Products select manually | ||
| Line 78: | Line 92: | ||
* Margin: no margin | * Margin: no margin | ||
'''Step 5''': Add a Section as Modal and configure it as follows: | '''Step 5''': Add a '''Section as Modal''' and configure it as follows: | ||
* Modal Width: Small | * Modal Width: Small | ||
* Display Delay: 3000 | * Display Delay: 3000 | ||
Latest revision as of 07:54, 30 August 2024
You can use the Section as Modal feature to display engaging content within a modal window as visitors browse your Shopify store. A popup will appear on the screen after a specific time, showcasing special offers or conveying important messages, such as exclusive discounts or newsletter sign-ups.
What is the Section as Modal perfect for?
You have various options to use the Section as Modal for your Shopify themes:
- Highlight exclusive discount offers with a Countdown timer: See an example here.
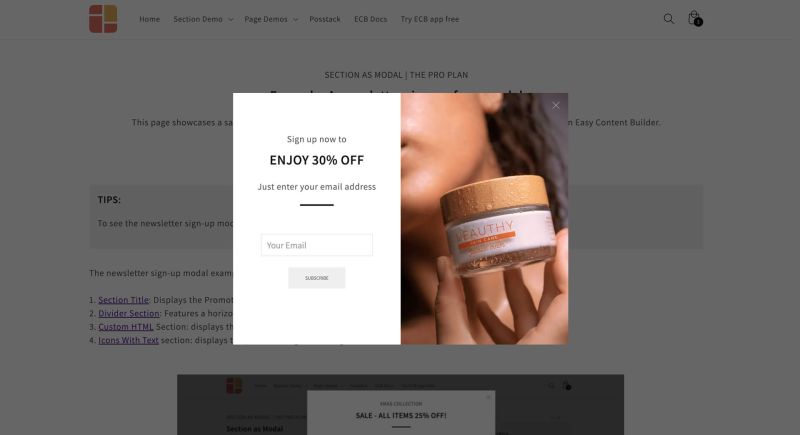
- A newsletter sign-up form for a discount offer, with a product image: See an example here.
Section As Modal settings
From the Shopify theme editor, click on the Section as Modal on the sidebar to view the details of settings.
| Section Settings | Description |
|---|---|
| Disable in Theme Editor | When checked, the modal box will not be opened in the Theme Editor, preventing it from affecting the editing of other sections. |
| Modal width | Set the modal window width (Small, Container, Full) |
| Display Delay | The time delay (in milliseconds) before the Modal box appears in your store. |
| Display Frequency | Set the modal to appear 'Always' or 'Once a day'. |
| ESC close | Enable to close the modal when the Esc key is pressed. |
| Background close | Enable to close the modal when the background is clicked. |
Add other content blocks
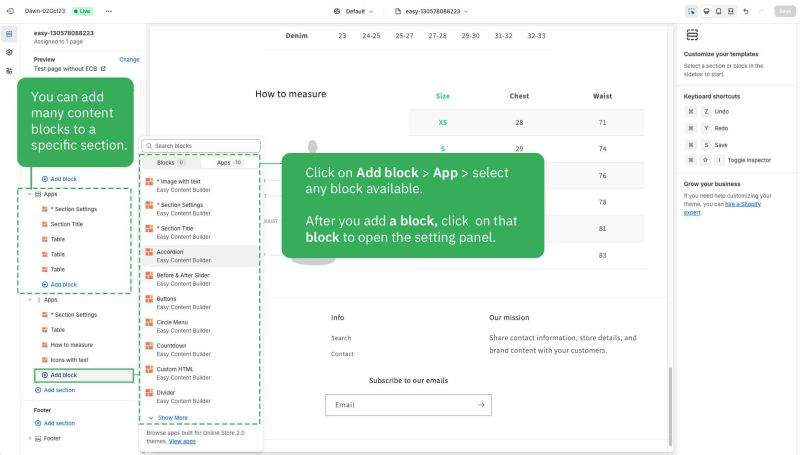
You can add many content blocks to a section you've created. These content blocks will be displayed in different positions within the section, depending on the Desktop/Mobile Layouts you configure.
Pre-built Modal template
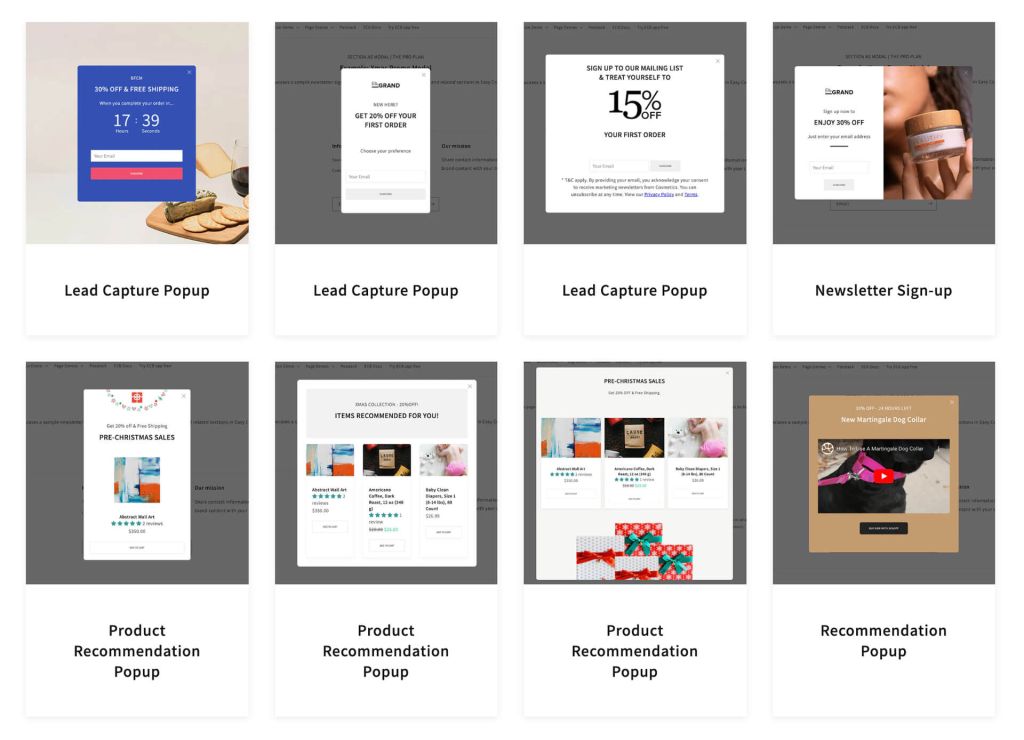
After installing Easy Content Builder, you can use this pre-designed template to create a popup that suits your requirements. It includes 8 popups created using Section as Modal and relevant sections in Easy Content Builder.
Use cases
Use Case 1: Modal Featuring Discount Offers with a Countdown Timer
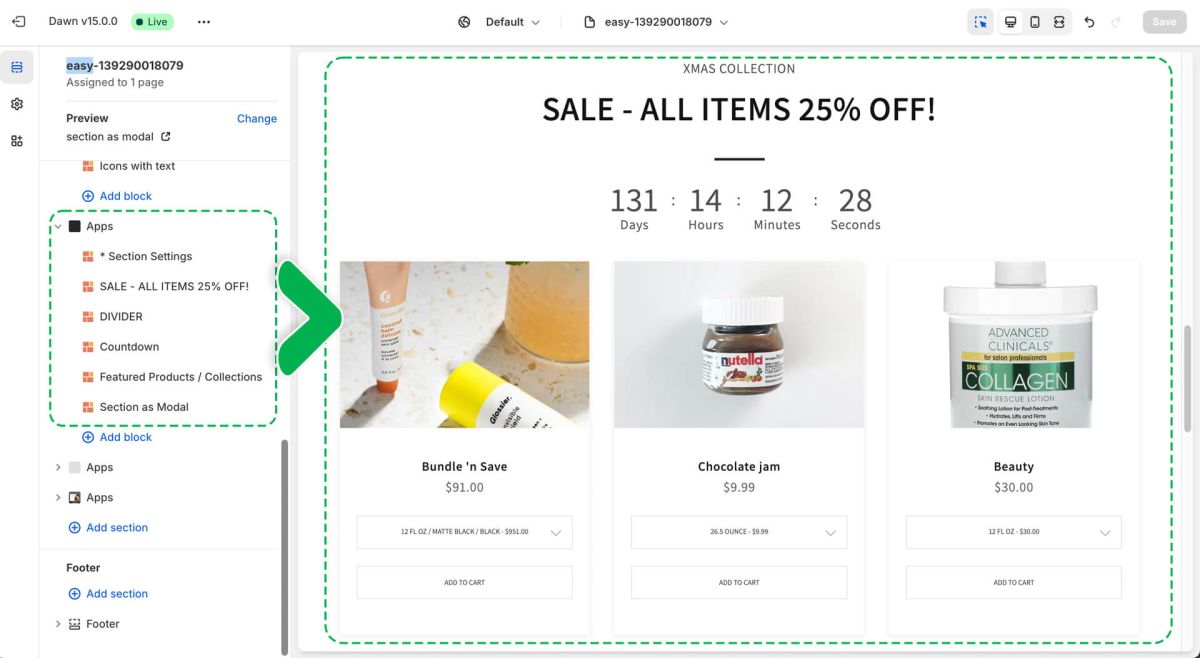
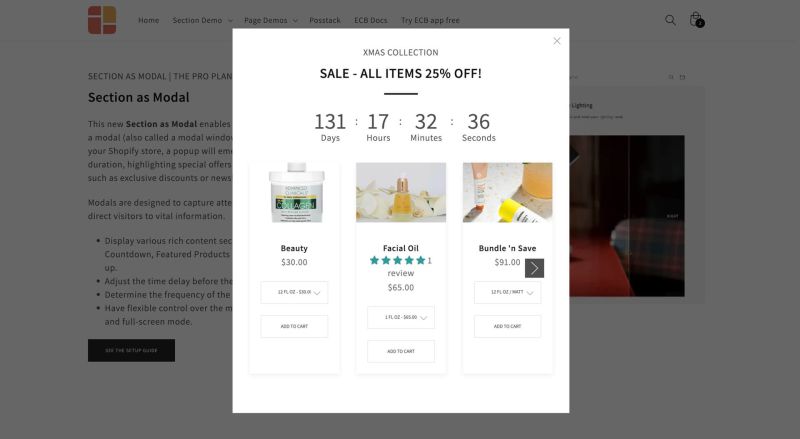 To set up the modal displaying a discount offer, you need to add the following sections in Easy Content Builder:
Step 1: Add a Section Settings section (to control the global settings of this promotional section)
- Choose a one-column layout for desktop view.
- Set the top padding to 50px and the bottom padding to 50px.
Step 2: Add a Section Title section and make the following adjustments:
- Text Alignment: center
- Titel: Enter 'SALE - ALL ITEMS 25% OFF'.
- Tagline: Enter 'XMAS COLLECTION'.
- Tagline size: Default.
- Margin: No Margin
- Padding: No Padding
Step 3: Add a Divider section and configure as below:
- Upload a custom divider image (3x3 px) (This step is optional). Alternatively, use a pre-designed divider available in the Divider section.
- Image Height: 3px
- Spacing (px): 60
- Margin: Medium
Step 4: Add a Featured Products/Collections section and customize the settings:
- Type: Products select manually
- Select Products: select the products you want.
- Add to cart buttton: enable Ajax option
- Margin: no margin
Step 5: Add a Section as Modal and configure it as follows:
- Modal Width: Small
- Display Delay: 3000
- Display Freequency: Always
- Enable ESC Close and Background Close.
After completing these steps, upon refreshing the frontend page, the modal will be automatically displayed after the set delay time. It will showcase promotional information, a countdown timer, and a slider featuring the featured products.
