Create Template For Multiple Pages: Difference between revisions
From Posstack.com Documentation
mNo edit summary |
mNo edit summary |
||
| Line 21: | Line 21: | ||
*Click on checkboxes next to each product you want to apply the new template. | *Click on checkboxes next to each product you want to apply the new template. | ||
*Then, click on '''Bulk Edit'''. | *Then, click on '''Bulk Edit'''. | ||
:[[File:Ecb - Bulk edit.png|border|frameless|1024x1024px]] | |||
*In the Bulk editor, click the '''Columns''' drop-down menu, and then in the '''General''' section, click the '''Template''' checkbox. | *In the Bulk editor, click the '''Columns''' drop-down menu, and then in the '''General''' section, click the '''Template''' checkbox. | ||
:[[File:Ecb bulk edit3.jpg|border|frameless|1024x1024px]] | |||
*Click the template field of the first line, then hold the shift key, and then click the template field of the last line. A blue shading will appear around the items you have selected. | *Click the template field of the first line, then hold the shift key, and then click the template field of the last line. A blue shading will appear around the items you have selected. | ||
*Using the drop-down menu, choose a new template for the selected items. | *Using the drop-down menu, choose a new template for the selected items. | ||
*Click '''Save'''. | *Click '''Save'''. | ||
Revision as of 04:41, 19 September 2023
This guide explains how to create templates for Product, Blog Post, and Store Pages and apply them to multiple pages at once.
To customize Homepage or Collection pages, follow section Template for Standard pages.
Step 1: Create a new template
- From your Shopify admin, click Apps > Easy Content Builder.
- From the Easy Content Builder dashboard, click Browse Templates.
- Find a prebuilt template that you want to use, and then click Choose Template. Then, select the template type (Product, Blog Post, Page) and enter the template name (The template name should be between 3-15 characters - only letters, numbers, underscores and hyphens are allowed).
- Then, you will be automatically directed to the Theme Editor where you can start adding content blocks to the template you’ve just created.
NOTE: After you have done steps above, the new template you’ve just created will appear under Easy Content Builder admin > Manage Templates section with a label ‘Not assigned to any page yet. Click Customize to preview template with: [a specific page]’.
Step 2: Assign the new template
For individual products, use the Online Store > Theme Templates section of the product editor (by going to your Shopify admin > Products, click the product from the list of existing products) to apply the new template you’ve just created to a specific product.
To apply the new template to multiple products at once, use the Bulk editor by following these steps:
- From your Shopify admin, click Products.
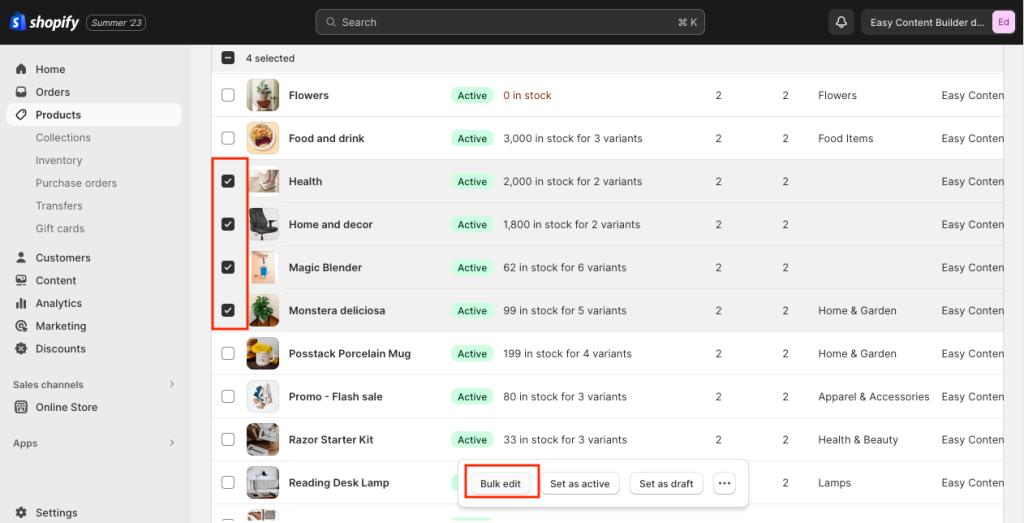
- Click on checkboxes next to each product you want to apply the new template.
- Then, click on Bulk Edit.
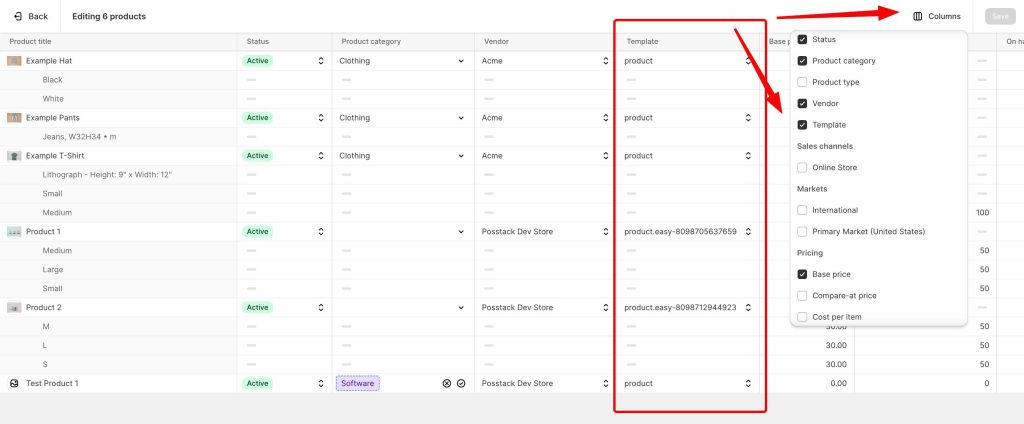
- In the Bulk editor, click the Columns drop-down menu, and then in the General section, click the Template checkbox.
- Click the template field of the first line, then hold the shift key, and then click the template field of the last line. A blue shading will appear around the items you have selected.
- Using the drop-down menu, choose a new template for the selected items.
- Click Save.


