Add metaobject entries: Difference between revisions
| (4 intermediate revisions by the same user not shown) | |||
| Line 4: | Line 4: | ||
Once you have added the custom data, you can proceed to create a Metaobject template to showcase this information (Follow the guide in the '''Next Step''' section on this page). | Once you have added the custom data, you can proceed to create a Metaobject template to showcase this information (Follow the guide in the '''Next Step''' section on this page). | ||
==Watch tutorial video== | |||
Be sure to watch the step-by-step video tutorial that showcases how to use the pre-built metaobject templates in Posstack Easy Content Builder to create Recipe pages on Shopify, [https://www.youtube.com/watch?v=8ketmVfzQ78&t click here to watch the video]. | |||
==Add Metaobject entries== | ==Add Metaobject entries== | ||
| Line 14: | Line 17: | ||
:For each metaobject you want to display on your theme, click on the corresponding metafield > click '''Add entry''' and fill out the fields for your metaobject entry. | :For each metaobject you want to display on your theme, click on the corresponding metafield > click '''Add entry''' and fill out the fields for your metaobject entry. | ||
:{{Note|You can choose from existing entries to reuse the same content across multiple pages. <br> | :{{Note|You can choose from existing entries to reuse the same content across multiple pages. <br><br>For example, if you added information about '''Author A''' for one book, you can reuse this information for other books written by this author.<br><br>This means you only need to add a new entry for the metaobject ECB Rich Text to store the information of the book being edited and select the entry of '''Author A''' from the existing entries of the metaobject ECB Author.|inline}} | ||
For example, if you added information about '''Author A''' for one book, you can reuse this information for other books written by this author. <br> | |||
This means you only need to add a new entry for the metaobject ECB Rich Text to store the information of the book being edited and select the entry of '''Author A''' from the existing entries of the metaobject ECB Author.|inline}} | |||
====For Metafield referenced to a Single Metaobject entry==== | ====For Metafield referenced to a Single Metaobject entry==== | ||
| Line 41: | Line 42: | ||
:[[File:Create-entries-media-rich-text.gif|frameless|960x960px]] | :[[File:Create-entries-media-rich-text.gif|frameless|960x960px]] | ||
==Manage Entries== | |||
==== Edit an entry==== | |||
Please keep in mind that if an entry is published anywhere on your store, then your edits will automatically be reflected wherever the entry is used. | |||
Steps to edit individual entries: | |||
* In your Shopify admin, go to Content > '''Metaobjects'''. | |||
*Click an entry you want to edit. | |||
*Make any required changes to the entry. | |||
*Use the drop-down menu to set the status to '''Draft''' or '''Active'''. | |||
*Click '''Save'''. | |||
==== Delete an entry==== | |||
{{Note|Caution: If you delete an entry, then it’s removed from anywhere it's published or used in your store. Deleting an entry can't be undone.|info}} | |||
* In your Shopify admin, go to '''Content''' > '''Metaobjects'''. | |||
*Click an entry that you want to delete. | |||
*Click '''Delete''' to remove the entry. | |||
==Next Steps== | ==Next Steps== | ||
====Create Metaobject Templates==== | ====Create Metaobject Templates==== | ||
Latest revision as of 13:05, 31 December 2024
This page provides instructions on using Metaobject to incorporate custom data for products, store pages, or blog posts.
Once you have added the custom data, you can proceed to create a Metaobject template to showcase this information (Follow the guide in the Next Step section on this page).
Watch tutorial video
Be sure to watch the step-by-step video tutorial that showcases how to use the pre-built metaobject templates in Posstack Easy Content Builder to create Recipe pages on Shopify, click here to watch the video.
Add Metaobject entries
Steps:
- Go to your Shopify admin > Products.
- Find and select the product to which you want to add metaobject-backed sections.
- On the Edit Product screen, scroll down to the Metafields section, you will see a list of new metafields (depending on which metaobject definitions you created in Step 1).
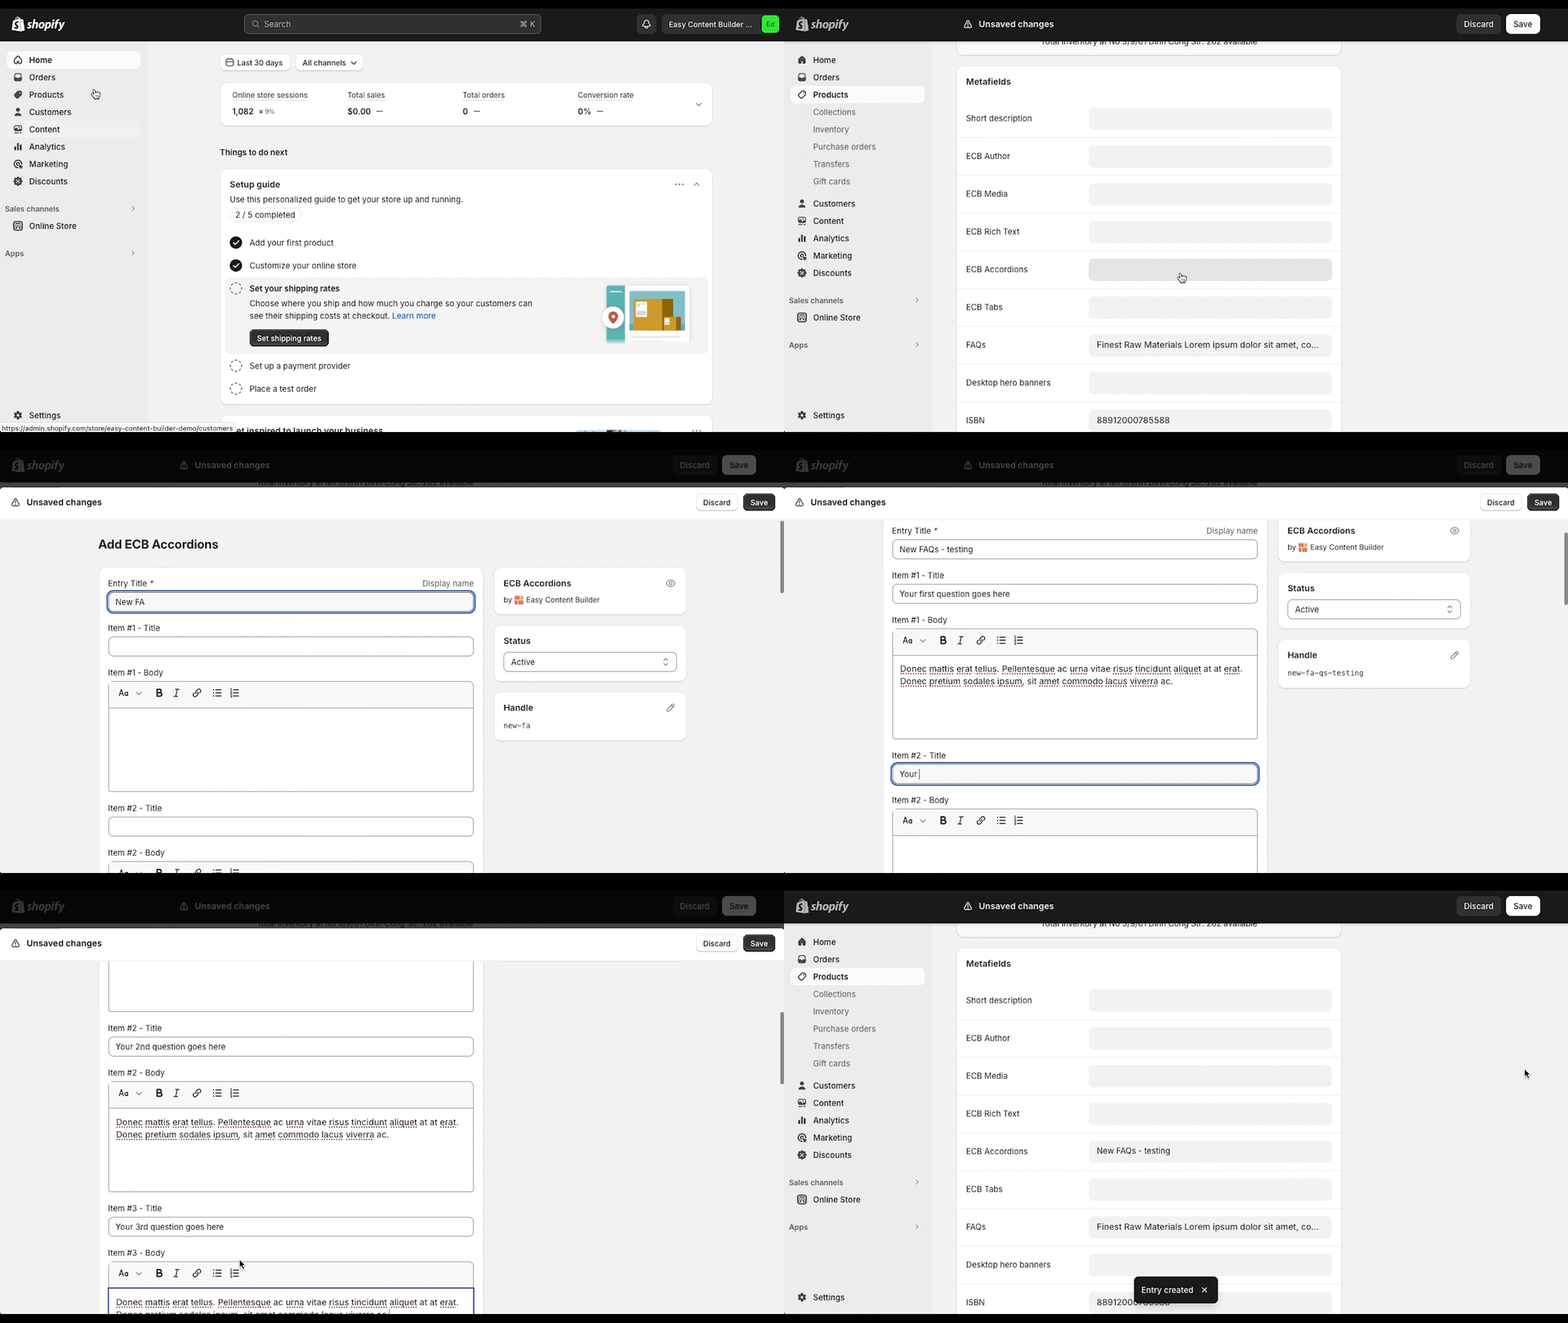
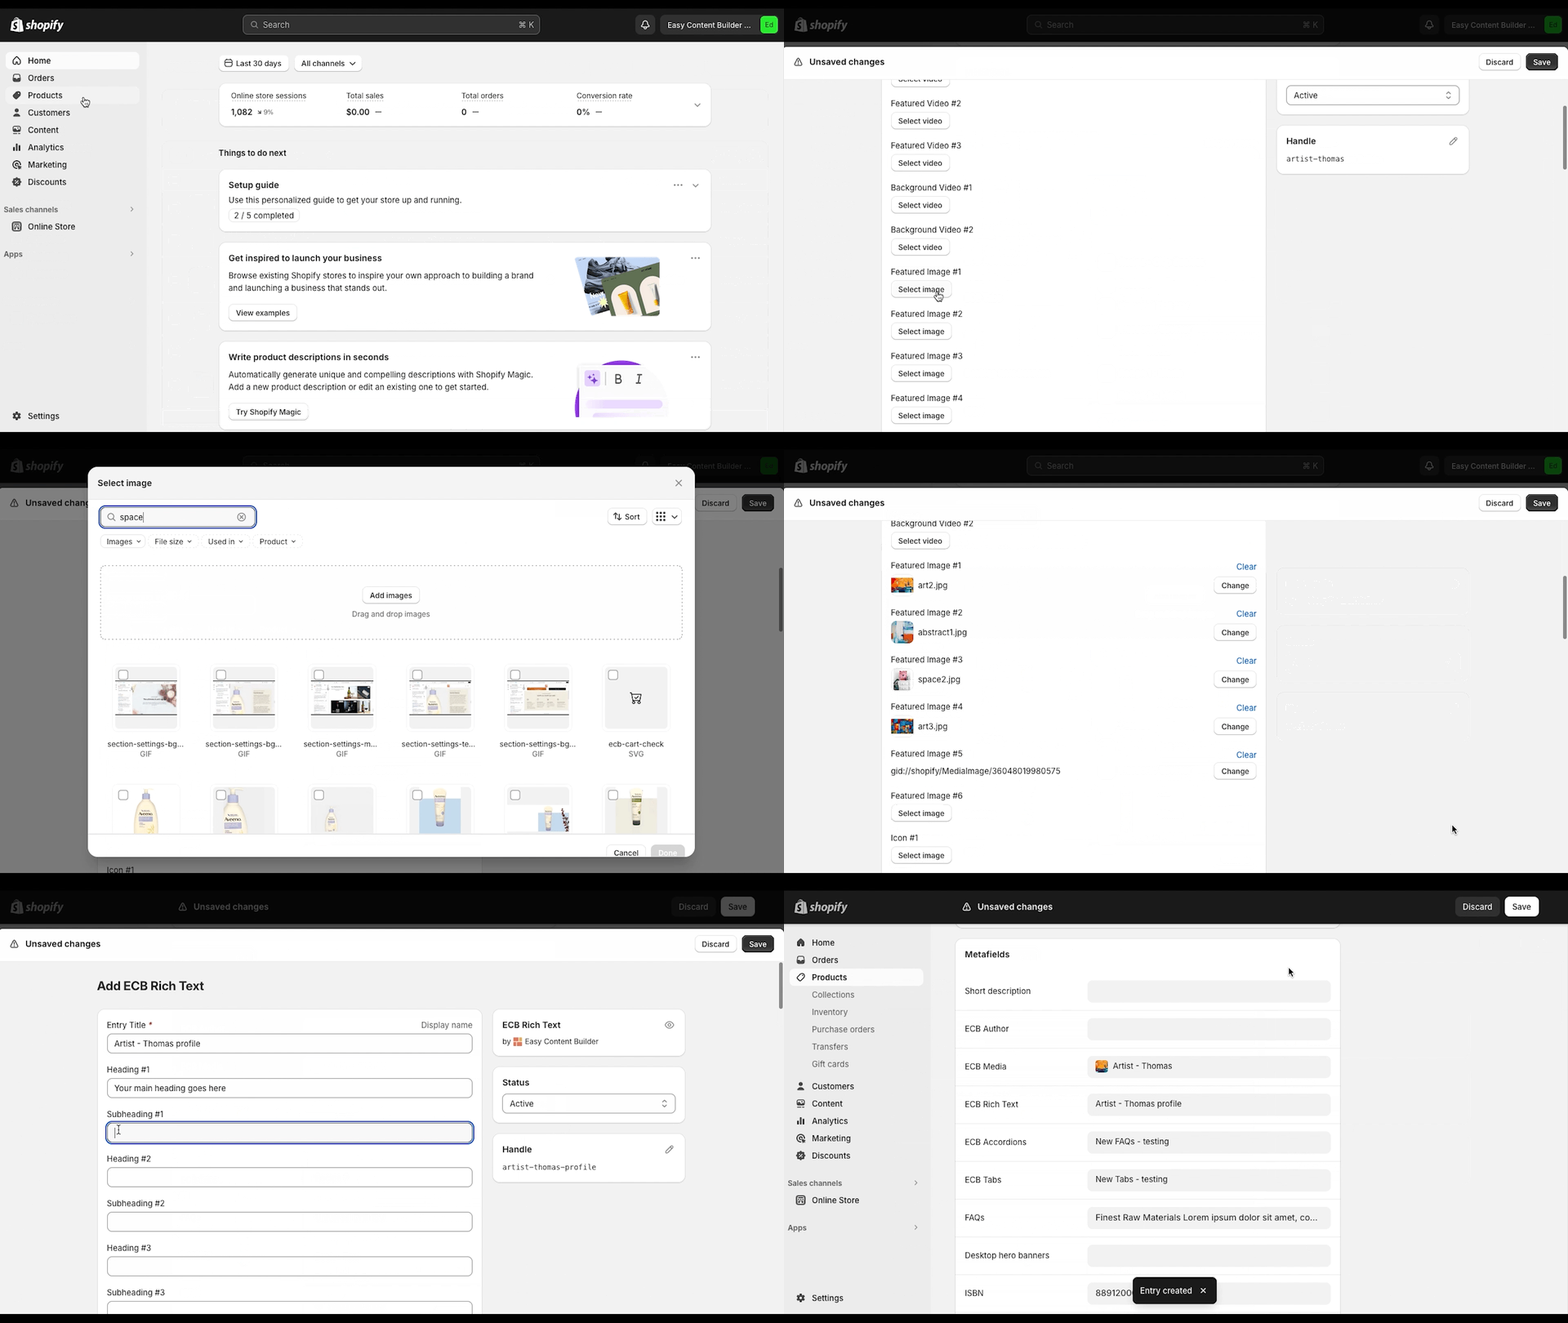
- For each metaobject you want to display on your theme, click on the corresponding metafield > click Add entry and fill out the fields for your metaobject entry.
- You can choose from existing entries to reuse the same content across multiple pages.
For example, if you added information about Author A for one book, you can reuse this information for other books written by this author.
This means you only need to add a new entry for the metaobject ECB Rich Text to store the information of the book being edited and select the entry of Author A from the existing entries of the metaobject ECB Author.
For Metafield referenced to a Single Metaobject entry
- The list of metafields in this group:
- ECB Rich Text
- ECB Media
- ECB Author
- ECB Accordions.
- ECB Tabs
- For Metafields in this group, you only need to add one metaobject entry for each metafield, like in this video:

For Metafields referenced to Multiple Metaobject entries
- The list of Metafields in this group:
- Icons With Text.
- Note: You can add one or more Metaobject entries for each Metafield, and each entry will be displayed as an item in the linked block. For example, you can add multiple items for the Icons With Text block.
- For Metafields in this group, you can add multiple metaobject entries, like in this video:
Manage Entries
Edit an entry
Please keep in mind that if an entry is published anywhere on your store, then your edits will automatically be reflected wherever the entry is used.
Steps to edit individual entries:
- In your Shopify admin, go to Content > Metaobjects.
- Click an entry you want to edit.
- Make any required changes to the entry.
- Use the drop-down menu to set the status to Draft or Active.
- Click Save.
Delete an entry
- In your Shopify admin, go to Content > Metaobjects.
- Click an entry that you want to delete.
- Click Delete to remove the entry.
Next Steps
Create Metaobject Templates
Once you have added custom data (aka Metaobject entries) for products, you will need to create a Metaobject template to display this data on the storefront.

