Add Blocks: Difference between revisions
From Posstack.com Documentation
No edit summary |
mNo edit summary |
||
| (9 intermediate revisions by the same user not shown) | |||
| Line 3: | Line 3: | ||
Each template can have multiple sections and each section has a specific variety of blocks that you can add to it. | Each template can have multiple sections and each section has a specific variety of blocks that you can add to it. | ||
[[File:Ecb-block-v2.jpg|frameless|800x800px]] | |||
{{Note|'''Note''': Make sure you add a special section called '''Section Settings''' before adding a block. Learn more on [[Section Settings|How to add a Section Settings]].|reminder}} | |||
== Add a block:== | == Add a block:== | ||
| Line 9: | Line 11: | ||
* From your Shopify admin, click Apps > '''Easy Content Builder > Manage Templates.''' | * From your Shopify admin, click Apps > '''Easy Content Builder > Manage Templates.''' | ||
* From the Easy Content Builder dashboard, find the template that you want to edit, and then click '''Customize'''. | * From the Easy Content Builder dashboard, find the template that you want to edit, and then click '''Customize'''. | ||
* From the Theme Editor, | * From the Theme Editor, click a section to load the content into the preview window and access the options available to you. | ||
* Click '''+ Add block''' > '''Apps''' in the sidebar. | |||
* Click '''+ Add block''' in the sidebar. | |||
* Select from a list of available blocks prebuilt by the Easy Content Builder, or click the Search bar to enter a search term. | * Select from a list of available blocks prebuilt by the Easy Content Builder, or click the Search bar to enter a search term. | ||
* Click '''Save'''. | * Click '''Save'''. | ||
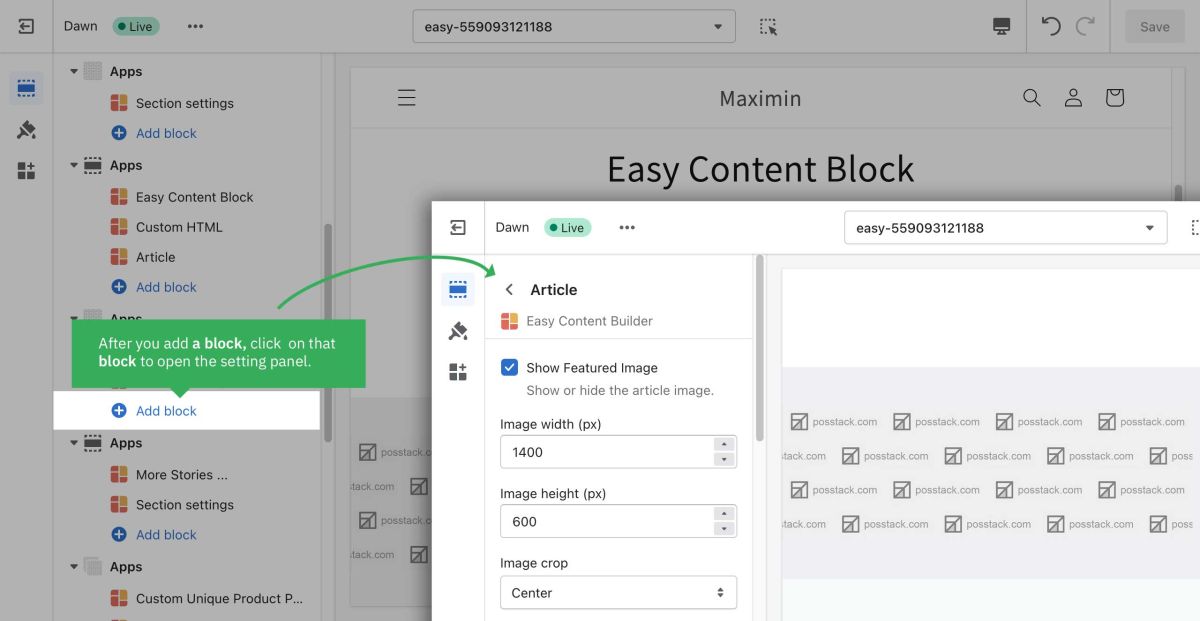
* Next, click on the block you’ve just added to open the block setting panel. The block settings will appear on the sidebar. Click '''Save''' to apply any changes you might make. | * Next, click on the block you’ve just added to open the block setting panel. The block settings will appear on the sidebar. Click '''Save''' to apply any changes you might make. [[File:Add block.jpg|1200x1200px]] | ||
Latest revision as of 13:56, 23 February 2024
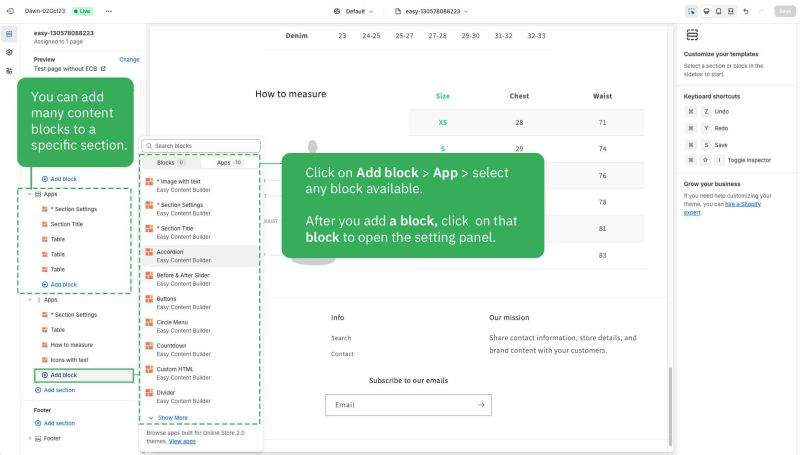
Blocks refer to the prebuilt content blocks provided by Easy Content Builder app, such as Accordion, Video, Featured Products, Custom HTML, etc. You can add any content blocks made available to the section you've created.
Each template can have multiple sections and each section has a specific variety of blocks that you can add to it.
Note: Make sure you add a special section called Section Settings before adding a block. Learn more on How to add a Section Settings.
Add a block:
- From your Shopify admin, click Apps > Easy Content Builder > Manage Templates.
- From the Easy Content Builder dashboard, find the template that you want to edit, and then click Customize.
- From the Theme Editor, click a section to load the content into the preview window and access the options available to you.
- Click + Add block > Apps in the sidebar.
- Select from a list of available blocks prebuilt by the Easy Content Builder, or click the Search bar to enter a search term.
- Click Save.
- Next, click on the block you’ve just added to open the block setting panel. The block settings will appear on the sidebar. Click Save to apply any changes you might make.


