Get Started
This tutorial will guide you through 4-easy-steps to build your first custom template using the Easy Content Builder app.
Templates are a collection of sections that are pre-built by Easy Content Builder. Once you add a template to your theme, you can add, edit, reorder, or remove any section to customize your theme.
Before you begin, make sure you add Products, Blog Posts, or Pages depending on which page type you want to create a custom template. Learn how to add a page, a product, and a blog post on Shopify.
Then follow the steps below to add your first custom template:
Adding your first template
Step 1: In your Shopify admin, select your Product/Blog Post/Page (depending on which page you want to create a custom template)
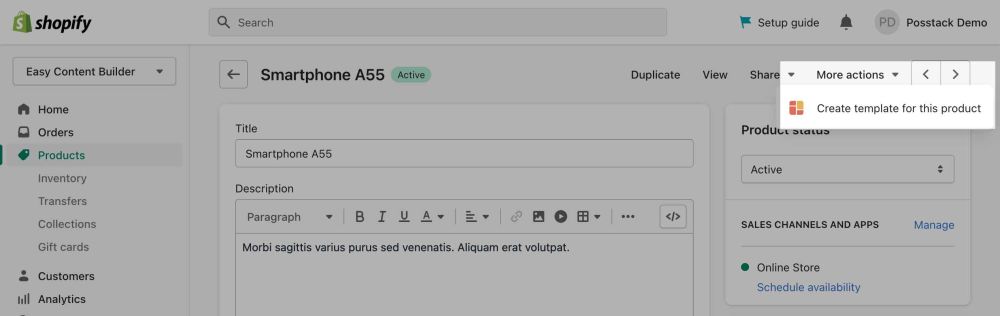
Step 2: On the Edit page, click on More actions > Create a template
- Depending on your specific page type, you will see the link label Create Template for this product, Create Template for this page, or Create Template for this article.

Step 3: Select a pre-built template suggested by the app (then you will be automatically redirected to the Theme Editor)
Step 4: Start adding and editing the app blocks as follows:
- 4.1. Define your section column layouts:
- With Easy Content Builder, you define the layout on an individual section level. This is done by adding/editing the Sections Setting block. Learn how to add a Sections Setting block.
- You can add many sections per page, each section with its column layout (See multi-column layouts examples).
- 4.2. Add new blocks to that section as you wish (See pre-built sections examples). Learn how to add app blocks.
- Important Note: Always keep the Section Settings at the bottom of each Content Block list.

Next steps
- Add your first section: follow these steps.
- Add your first block: follow these steps.
Jump in a little deeper
If you would rather want to learn more about the fundamentals of the Easy Content Builder app:
- Read to understand Clean Template and Pre-built ECB Templates.
- Browse the pre-built template collection (Product pages, Blog posts, and Other pages).