Get Started
This tutorial will guide you through 4-easy-steps to build your first custom template using the Easy Content Builder app.
Templates are a collection of sections that are pre-built by Easy Content Builder. Once you add a template to your theme, you can add, edit, reorder, or remove any section within that template to customize your theme.
Templates can be assigned to a product/blog post/page or a product/blog/page group.
Adding your first template
Step 1: In your Shopify admin, select your Product/Blog Post/Page (depending on which page you want to create a custom template)
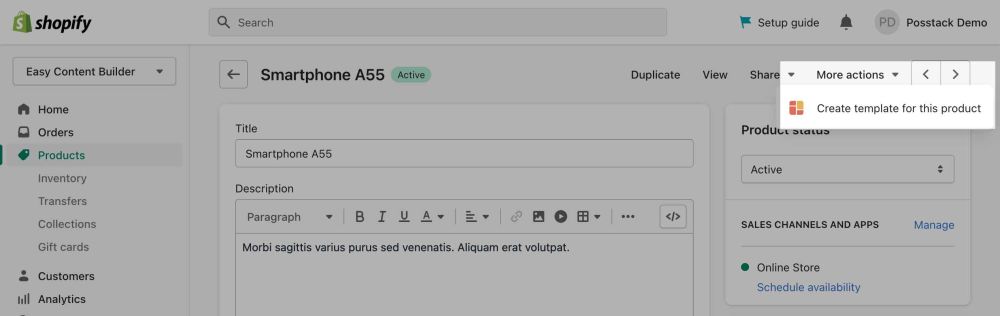
Step 2: On the Product/Blog Post/Page, click on More actions > Create a template
- Depending on your specific page type, click on the action label Create Template for this product, Create Template for this page, or Create Template for this article.

Step 3: Select a pre-built template suggested by the app (then you will be automatically redirected to the Theme Editor)

Step 4: Start adding and editing the app blocks as follows:
- 4.1. Define your section column layouts:
- With Easy Content Builder, you define the layout on an individual section level. This is done by adding/editing the Sections Setting block. Learn how to add a Sections Setting block.
- You can add many sections per page, each section with its column layout (See multi-column layouts examples).
- 4.2. Add new blocks to that section as you wish (See pre-built sections examples). Learn how to add app blocks.
- Important Note: Always keep the Section Settings at the bottom of each Content Block list.

Next steps
- Add your first section: follow these steps.
- Add your first block: follow these steps.
Jump in a little deeper
If you would rather want to learn more about the fundamentals of the Easy Content Builder app:
- Read to understand Clean Template and Pre-built ECB Templates.
- Learn how to create and assign a template for a group of products, blog posts, or pages.
- Browse the pre-built template collection (Product pages, Blog posts, and Other pages).