Add Sections: Difference between revisions
No edit summary |
|||
| (14 intermediate revisions by the same user not shown) | |||
| Line 1: | Line 1: | ||
The | ==The basics== | ||
The Easy Content Builder app uses sections to create your desired layouts. | |||
Each template can have multiple sections. Each section is made up of blocks that can also be reordered, added, and removed within that section to create an ideal layout of the section itself. | |||
You can add, reorder, delete, and hide these dynamic sections on every page template. You can further customize the section by editing its Settings. | |||
[[File:Shopify sections.jpg|border|frameless|483x483px]] | |||
==Add a section== | |||
====Step 1: Create a template==== | |||
You can follow one of the guides below to create the first template, depending on which type of page you want to customize: | |||
*Create a template for <u>Multiple pages</u> (''Perfect for a group of products, pages, or articles that use the same template layout'') | |||
* Create a template for <u>a single page</u> (''Perfect for a unique landing page, lookbook, or long-form product page.'') | |||
*Create a template for standard pages (homepage, collection pages, etc.) | |||
*Or create a <u>metaobject template</u> (''Handy for building pages with fully custom data like '''Cooking Recipes''', '''FAQs''', '''Specs''', '''Artist profile''' pages, etc.''). If you're new to Shopify metaobject, check out what metaobject is and when to use it [https://posstack.com/resources/shopify-metaobject-templates here] | |||
==== Step 2: Create a Section Settings ==== | |||
{{Note|Section Settings is a special block that Easy Content Builder provides to determine your ideal layouts (1-column, 2-column, 3-column, 4-column, or hierarchical layouts) and global configurations (full-width layout, mask color, mask image, background video, parallax animation, etc.) within the section itself.|inline}}After creating a template, you should be redirected to the Theme Editor. Here, you can add a Section Settings block to the template you created. | |||
Alternatively, you can open the Theme Editor and add a new Section Settings as follows: | |||
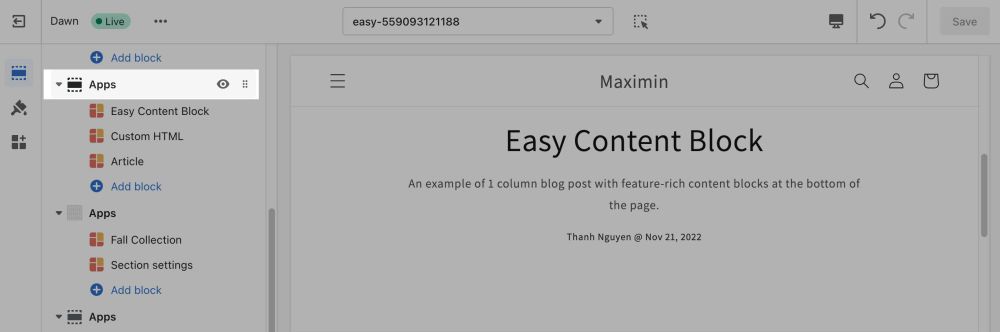
*From your Shopify admin, click Apps > '''Easy Content Builder''' | |||
*From the Easy Content Builder dashboard, click '''Manage Templates'''. Here you can delete a template or find the template that you want to edit, and then click '''Customize.''' | |||
*From the theme editor, click '''+ Add Section''' in the sidebar. | |||
*Scroll down the list of available blocks prebuilt by the Easy Content Builder and click '''Section settings.''' | |||
:[[File:Add section settings.jpg|1200x1200px]] | |||
*Next, click on Section settings to open the section setting panel and configure the layout to your needs. The section settings will appear on the sidebar. | |||
*Optional: Click and drag the '''⋮⋮''' icon next to a section to rearrange the sections on your page. [[File:Add section order.jpg|1000x1000px]] | |||
*Click '''Save''' to apply any changes you might make. | |||
:{{Note|After adding a Section Settings, a blank section is added in the theme preview mode; however, no specific content is visible. Once you add the first content block (Add block > Apps > Select a section from the list), the new content block will appear in the preview. |inline}} | |||
==== Step 3: Add content blocks ==== | |||
Now you can add many content blocks to the section you've created. These content blocks will be displayed in different positions within the section, depending on the Desktop/Mobile Layouts you configure. | |||
[[File:Ecb-block-v2.jpg|border|frameless|800x800px]] | |||
{{Note|See [https://easy-content-builder-demo.myshopify.com/pages/section-variations all content blocks] available that you can add to the section you've just created.|reminder}} | |||
==Next step== | |||
*[[Section_Settings#Multi-column_Layout_Setup|Multi-column Layout Setup]] | |||
Latest revision as of 02:34, 26 February 2024
The basics
The Easy Content Builder app uses sections to create your desired layouts.
Each template can have multiple sections. Each section is made up of blocks that can also be reordered, added, and removed within that section to create an ideal layout of the section itself.
You can add, reorder, delete, and hide these dynamic sections on every page template. You can further customize the section by editing its Settings.

Add a section
Step 1: Create a template
You can follow one of the guides below to create the first template, depending on which type of page you want to customize:
- Create a template for Multiple pages (Perfect for a group of products, pages, or articles that use the same template layout)
- Create a template for a single page (Perfect for a unique landing page, lookbook, or long-form product page.)
- Create a template for standard pages (homepage, collection pages, etc.)
- Or create a metaobject template (Handy for building pages with fully custom data like Cooking Recipes, FAQs, Specs, Artist profile pages, etc.). If you're new to Shopify metaobject, check out what metaobject is and when to use it here
Step 2: Create a Section Settings
After creating a template, you should be redirected to the Theme Editor. Here, you can add a Section Settings block to the template you created.
Alternatively, you can open the Theme Editor and add a new Section Settings as follows:
- From your Shopify admin, click Apps > Easy Content Builder
- From the Easy Content Builder dashboard, click Manage Templates. Here you can delete a template or find the template that you want to edit, and then click Customize.
- From the theme editor, click + Add Section in the sidebar.
- Scroll down the list of available blocks prebuilt by the Easy Content Builder and click Section settings.

- Next, click on Section settings to open the section setting panel and configure the layout to your needs. The section settings will appear on the sidebar.
- Optional: Click and drag the ⋮⋮ icon next to a section to rearrange the sections on your page.
- Click Save to apply any changes you might make.

- After adding a Section Settings, a blank section is added in the theme preview mode; however, no specific content is visible. Once you add the first content block (Add block > Apps > Select a section from the list), the new content block will appear in the preview.
Step 3: Add content blocks
Now you can add many content blocks to the section you've created. These content blocks will be displayed in different positions within the section, depending on the Desktop/Mobile Layouts you configure.
