Create Blog Post Templates: Difference between revisions
No edit summary |
No edit summary |
||
| Line 3: | Line 3: | ||
====Step 1: Create a new blog post ==== | ====Step 1: Create a new blog post ==== | ||
* From your Shopify admin, click ''' | * From your Shopify admin, click '''Blog Posts''' (under ''Sales channels'' section) | ||
* | * Then click '''Add''' '''block post'''. | ||
* Enter a title and content for the page. | * Enter a title and content for the page. | ||
* Click '''Save''' (You need to have a title to save the post.). | * Click '''Save''' (You need to have a title to save the post.). | ||
| Line 17: | Line 17: | ||
'''Note''': For each type of page (Product page, Webpage, Blog Post page), you just need one Clean template only. If a Clean template for the webpages does exist, please discard '''Step 2 - Create a Clean template''' for the webpages. The same rule applies to other types of pages - Product and Blog Post pages. | '''Note''': For each type of page (Product page, Webpage, Blog Post page), you just need one Clean template only. If a Clean template for the webpages does exist, please discard '''Step 2 - Create a Clean template''' for the webpages. The same rule applies to other types of pages - Product and Blog Post pages. | ||
====Step 3: Create a | ====Step 3: Create a blog post template with prebuilt Easy Content Builder templates ==== | ||
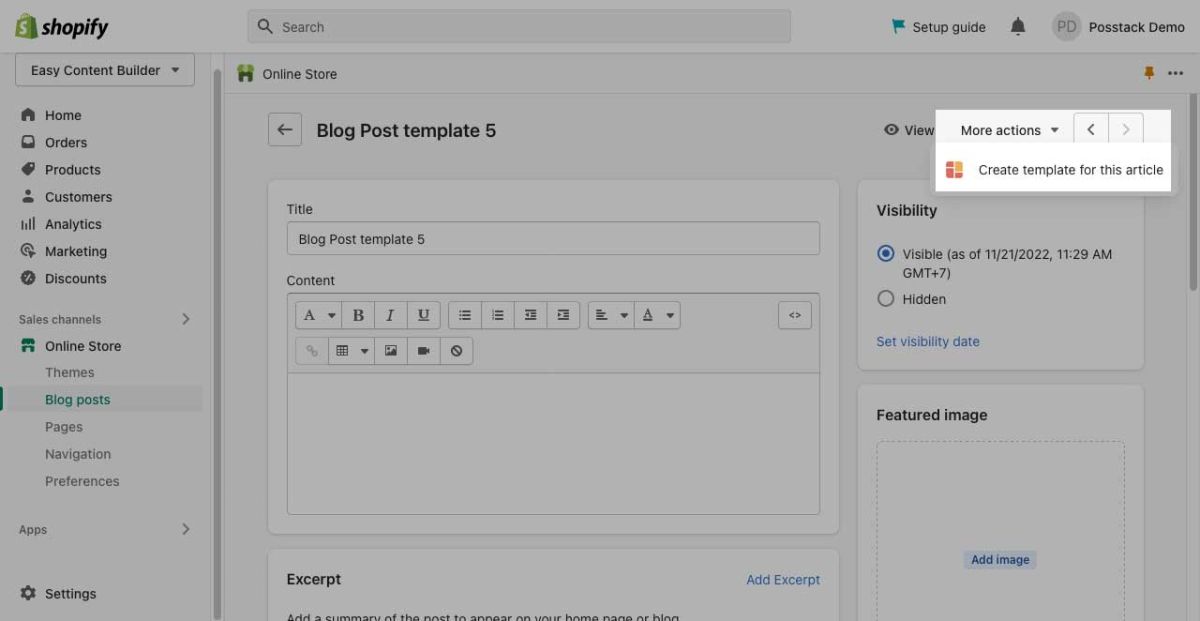
* From the | * From the Blog Post Edit page, click '''More actions''' (that appears in the upper-right of the form), click '''Create Template for this article''': [[File:Create blog post.jpg|1200x1200px]] | ||
* From Easy Content Builder dashboard, you can create a new template based on: | * From Easy Content Builder dashboard, you can create a new template based on: | ||
| Line 30: | Line 30: | ||
* When prompted to confirm, click ‘OK’. Then, you will be automatically directed to the Theme Editor where you can start adding content blocks to the template you’ve just created (Please refer to sections [[Add Sections]] and [[Add Blocks|Adding ECB Blocks]] for more details). | * When prompted to confirm, click ‘OK’. Then, you will be automatically directed to the Theme Editor where you can start adding content blocks to the template you’ve just created (Please refer to sections [[Add Sections]] and [[Add Blocks|Adding ECB Blocks]] for more details). | ||
==== Step 4: Assign a template to the | ==== Step 4: Assign a template to the blog post page you've just created ==== | ||
If you complete '''Step 3 Create a | If you complete '''Step 3 Create a blog post template with prebuilt Easy Content Builder templates''', the app automatically assigns the template you've created to the selected blog post page. | ||
When you want to manually assign available templates to a webpage, you can follow these steps: | When you want to manually assign available templates to a webpage, you can follow these steps: | ||
* Go to the Shopify admin > Sales Channel > ''' | * Go to the Shopify admin > Sales Channel > '''Blog Posts''', open the blog post you want and assign the template you’ve created (under the '''Theme Template''' section). | ||
[[File:Create blog post assign template.jpg|1200x1200px]] | [[File:Create blog post assign template.jpg|1200x1200px]] | ||
Revision as of 05:54, 22 November 2022
Create a Blog post template
Step 1: Create a new blog post
- From your Shopify admin, click Blog Posts (under Sales channels section)
- Then click Add block post.
- Enter a title and content for the page.
- Click Save (You need to have a title to save the post.).
Step 2 (optional): Create a Clean template
A Clean template allows you to hide/remove unused sections of your default templates and only display custom app sections created by the Easy Content Builder.
We recommend you create three Clean templates, each for a type of page - Product page, Webpage, and Blog Post page. Once created, you will have three Clean template files with the .clean suffix (product.clean.json, page.clean.json, article.clean.json).
Learn more about What a Clean template is and How to create a Clean template.
Note: For each type of page (Product page, Webpage, Blog Post page), you just need one Clean template only. If a Clean template for the webpages does exist, please discard Step 2 - Create a Clean template for the webpages. The same rule applies to other types of pages - Product and Blog Post pages.
Step 3: Create a blog post template with prebuilt Easy Content Builder templates
- From the Blog Post Edit page, click More actions (that appears in the upper-right of the form), click Create Template for this article:

- From Easy Content Builder dashboard, you can create a new template based on:
- Create a new template based on existing templates of the main theme: This option is only visible if you did build templates using the Easy Content Builder app before. It allows you to speed up the workflow by reusing those templates.
- Blank Template: a minimal page template with only a Section title block that serves as a starting point for developing your custom page.
- Blog Post templates: a bundle of predesigned page layouts for Blog Post pages.
- Page templates: a bundle of predesigned page layouts for webpage pages.
- Product templates: a bundle of predesigned page layouts for Product pages.

- When prompted to confirm, click ‘OK’. Then, you will be automatically directed to the Theme Editor where you can start adding content blocks to the template you’ve just created (Please refer to sections Add Sections and Adding ECB Blocks for more details).
Step 4: Assign a template to the blog post page you've just created
If you complete Step 3 Create a blog post template with prebuilt Easy Content Builder templates, the app automatically assigns the template you've created to the selected blog post page.
When you want to manually assign available templates to a webpage, you can follow these steps:
- Go to the Shopify admin > Sales Channel > Blog Posts, open the blog post you want and assign the template you’ve created (under the Theme Template section).

Next Step:
Once the new webpage template is in place, you can start adding content blocks (Please refer to the section Add Sections and ECB Block Settings for more details)