Create Product Templates: Difference between revisions
From Posstack.com Documentations
No edit summary |
|||
| (43 intermediate revisions by 2 users not shown) | |||
| Line 1: | Line 1: | ||
You can easily create a unique individual template for each of your products that presents specialized information and rich content blocks. When creating a product template using the Easy Content Builder, your original product page URL remains unchanged. | |||
You can easily create a unique individual template for each of your products that presents specialized information and rich content blocks. | |||
In this section, you will learn: | |||
== Create a new template for a Single product with the ECB app == | |||
'''<u>NOTE</u>''': We highly recommend you create three Clean templates first, each for a type of page - Product page, store page, and Blog Post page. Once created, you will have three Clean template files with the '''.clean''' suffix (''product.clean.json'', ''page.clean.json'', ''article.clean.json''). | |||
Learn more about [[Clean Template|What a Clean template is]] and [[Clean Template|How to create a Clean template]]. | |||
====Step 1: Create a new product:==== | ====Step 1: Create a new product:==== | ||
| Line 11: | Line 16: | ||
Note: If you want to create a template for an existing product, simply go to your Shopify admin > Products > click the name of the product that you want, then follow Step 2 below. | Note: If you want to create a template for an existing product, simply go to your Shopify admin > Products > click the name of the product that you want, then follow Step 2 below. | ||
====Step 2 ( | ====Step 2: Create a template for the product ==== | ||
* From the Product Edit page, click '''More''' '''actions''' (that appears in the upper-right of the form), click '''Create Template''' '''for this product''': | |||
:[[File:Create product template.jpg|1000x1000px]] | |||
* From Easy Content Builder dashboard, you can create a new template based on: | |||
** '''Select a prebuilt product template''' provided by the Easy Content Builder app. | |||
** '''Select from available templates of the main theme''' (if created before): This option is only visible if you did build templates using the Easy Content Builder app before. It allows you to speed up the workflow by reusing those templates. Please note this option is available when you upgrade to the Pro version. | |||
** Or create your own template from scratch. | |||
: [[File:Ecb create 1st template.jpg|alt=Create a new template in Easy Content Builder|1200x1200px]] | |||
==== Step 3: Customize the template in the Theme Editor ==== | |||
:*After you perform Step 2 above, you will be automatically directed to the Theme Editor where you can start adding content blocks to the template you’ve just created. | |||
::{{Note|Please refer to sections [[Add Sections]] and [[Add Blocks|Adding ECB Blocks]] for more details.|info}} | |||
== Create a new template for a group of products == | |||
==== Step 1: Open the Theme Editor ==== | |||
* From the Shopify admin, go to Online Store > Themes. Find the theme that you want to edit, and then click '''Customize'''. [[File:Create Clean template customize.jpg|1200x1200px]] | |||
==== Step 2: Create a template ==== | |||
* From the dropdown menu in the Theme Editor, click '''Products''', then scroll down and click '''Create''' '''template'''. | |||
: [[File:Create Clean template 2.jpg|1200x1200px]] | |||
* The fill in the '''Name''' & the '''''Based on''''' fields as follows: [[File:Create clean template form.png|1200x1200px]] | |||
:* '''Name''': type the name using the following name structure, where "<span style="color:red">easy-</span>“ is the prefix. The name can contain any of the following characters: (a-z), (0-9), and dash. E.g: easy-collection-phone. | |||
::{{Note| Note: When migrating templates to a new theme, the <u>ECB app only migrates the templates with the name structure above</u>. |info}} | |||
* | :* '''Based on''': Select '''Default template''' or any available template created before. | ||
: | ==== Step 3: Customize the template you've just created ==== | ||
* From | :*From the Theme Editor, you can start adding content blocks to the template you’ve just created. | ||
::{{Note|Please refer to sections [[Add Sections]] and [[Add Blocks|Adding ECB Blocks]] for more details.|info}} | |||
==== Step 4: Assign the template to the products ==== | |||
: To assign the template you've just created to any product, go to the Shopify admin > Products, open the product you want and assign the template you’ve created (under the '''Theme Template''' section). | |||
: | |||
: [[File:Create product template 2.jpg|1200x1200px]] | : [[File:Create product template 2.jpg|1200x1200px]] | ||
''' | == Assign a template to multiple products at once == | ||
:In order to assign a template created by the Easy Content Builder app to multiple products at once, you can follow these steps: | |||
:'''STEP 1''': Create a template for a specific product first (following [[Get Started|this guide]]) | |||
:'''STEP 2''': Open '''Products''' in your Shopify admin | |||
:'''STEP 3''': Use the checkboxes beside each product to select the products for the template. Then click on ''''Bulk Edit'''<nowiki/>' | |||
:[[File:Ecb - Bulk edit.png|border|frameless|1024x1024px]] | |||
:'''STEP 4''': In the Bulk editor, click on '''Columns''' (in the top right corner) and click the checkbox on the '''Template'''. | |||
:[[File:Ecb bulk edit3.jpg|border|frameless|1024x1024px]] | |||
:'''STEP 5''': Under the '''Template''' field, assign the template you created to each product. Then hit '''Save'''. | |||
:{{Note|: To know which template ID, please open the ECB dashboard in another browser tab and click on Manage Templates. Here you will see the list of templates you created.|info}} | |||
Latest revision as of 04:06, 11 August 2023
You can easily create a unique individual template for each of your products that presents specialized information and rich content blocks. When creating a product template using the Easy Content Builder, your original product page URL remains unchanged.
In this section, you will learn:
Create a new template for a Single product with the ECB app
NOTE: We highly recommend you create three Clean templates first, each for a type of page - Product page, store page, and Blog Post page. Once created, you will have three Clean template files with the .clean suffix (product.clean.json, page.clean.json, article.clean.json).
Learn more about What a Clean template is and How to create a Clean template.
Step 1: Create a new product:
- From your Shopify admin, go to Products.
- From the Products page, click Add product.
- Enter a title for your product, along with additional details.
- Click Save.
Note: If you want to create a template for an existing product, simply go to your Shopify admin > Products > click the name of the product that you want, then follow Step 2 below.
Step 2: Create a template for the product
- From the Product Edit page, click More actions (that appears in the upper-right of the form), click Create Template for this product:

- From Easy Content Builder dashboard, you can create a new template based on:
- Select a prebuilt product template provided by the Easy Content Builder app.
- Select from available templates of the main theme (if created before): This option is only visible if you did build templates using the Easy Content Builder app before. It allows you to speed up the workflow by reusing those templates. Please note this option is available when you upgrade to the Pro version.
- Or create your own template from scratch.

Step 3: Customize the template in the Theme Editor
- After you perform Step 2 above, you will be automatically directed to the Theme Editor where you can start adding content blocks to the template you’ve just created.
- Please refer to sections Add Sections and Adding ECB Blocks for more details.
Create a new template for a group of products
Step 1: Open the Theme Editor
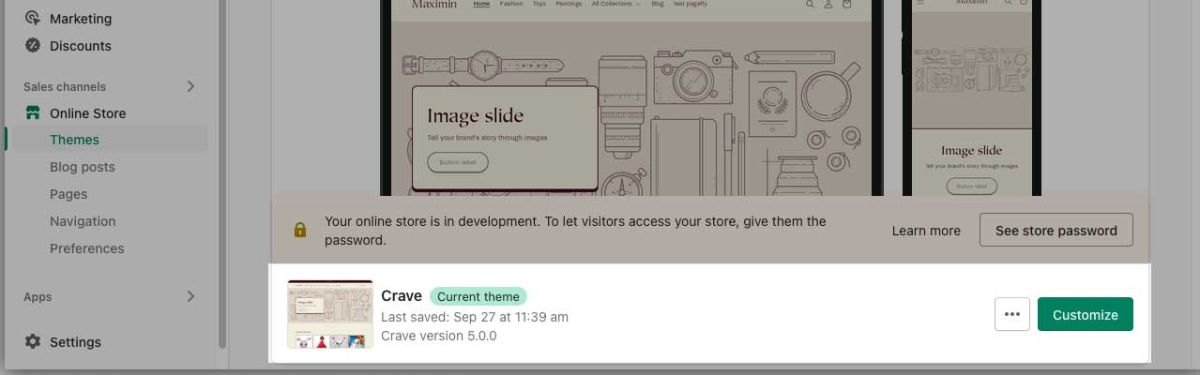
- From the Shopify admin, go to Online Store > Themes. Find the theme that you want to edit, and then click Customize.

Step 2: Create a template
- From the dropdown menu in the Theme Editor, click Products, then scroll down and click Create template.

- The fill in the Name & the Based on fields as follows:
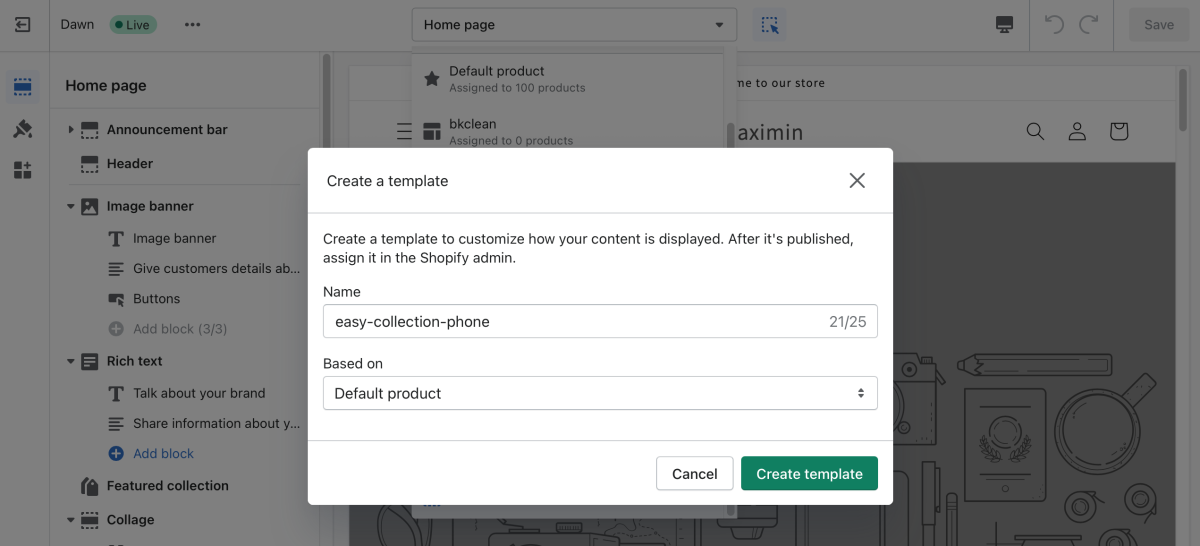

- Name: type the name using the following name structure, where "easy-“ is the prefix. The name can contain any of the following characters: (a-z), (0-9), and dash. E.g: easy-collection-phone.
- Note: When migrating templates to a new theme, the ECB app only migrates the templates with the name structure above.
- Based on: Select Default template or any available template created before.
Step 3: Customize the template you've just created
- From the Theme Editor, you can start adding content blocks to the template you’ve just created.
- Please refer to sections Add Sections and Adding ECB Blocks for more details.
Step 4: Assign the template to the products
- To assign the template you've just created to any product, go to the Shopify admin > Products, open the product you want and assign the template you’ve created (under the Theme Template section).

Assign a template to multiple products at once
- In order to assign a template created by the Easy Content Builder app to multiple products at once, you can follow these steps:
- STEP 1: Create a template for a specific product first (following this guide)
- STEP 2: Open Products in your Shopify admin
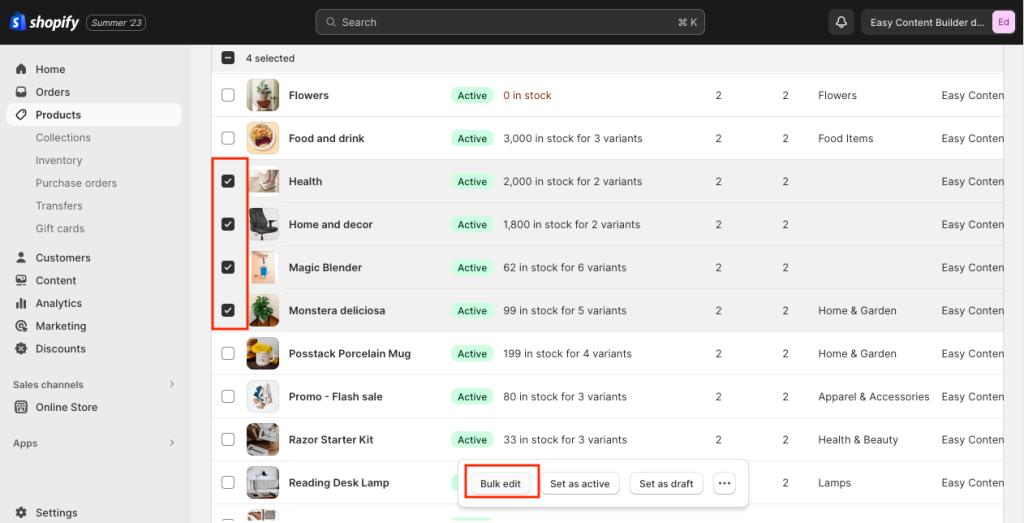
- STEP 3: Use the checkboxes beside each product to select the products for the template. Then click on 'Bulk Edit'

- STEP 4: In the Bulk editor, click on Columns (in the top right corner) and click the checkbox on the Template.
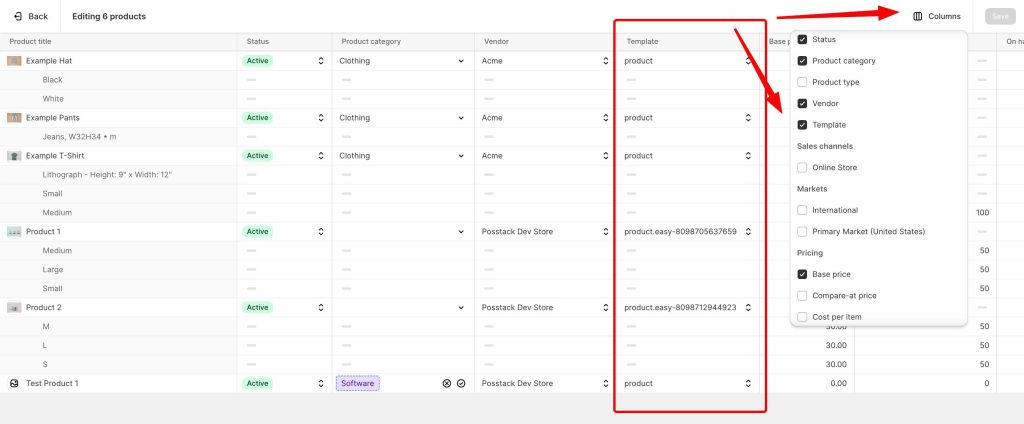
- STEP 5: Under the Template field, assign the template you created to each product. Then hit Save.
- : To know which template ID, please open the ECB dashboard in another browser tab and click on Manage Templates. Here you will see the list of templates you created.
