Create Template For Multiple Pages: Difference between revisions
| (42 intermediate revisions by the same user not shown) | |||
| Line 1: | Line 1: | ||
{{Note|This guide explains how to create | {{Note|This guide explains how to create a template and apply it to multiple pages (Product, Blog Post, or Store Pages) in bulk. <br/> | ||
Perfect for building and customizing templates for a group of items like Men clothing, Cushions, Rugs, etc.|inline}} | |||
{{Note| | {{Note|Related Guides: | ||
*[[Create_Template_For_Single_Page|How to create a template for a single page (product, blog post, etc.)]]. | |||
*[[Create_MetaObjects|How to create a Metaobjects template]] | |||
*[[Template for Standard Pages|How to customize Homepage, Collection pages]]|reminder}} | |||
=== | === Getting started=== | ||
==== Step 1: Create a new template ==== | ===== Overview ===== | ||
Templates are a collection of sections that are pre-built by Easy Content Builder. Once you add a template to your theme, you can add, edit, reorder, or remove any section within that template to customize your theme.[[File:Ecb-usecase-multiple.jpg|frameless|1024x1024px]] | |||
===== Tutorial Video ===== | |||
Watch this overview video to learn how to build a new custom template and assign it to multiple pages - individually or in bulk - using Easy Content Builder. | |||
<youtube width="960" height="540">k3C6dyc_OJ0</youtube> | |||
=== Create a new Template assigned to multiple pages=== | |||
====Step 1: Create a new template==== | |||
*From your Shopify admin, click Apps > '''Easy Content Builder'''. | *From your Shopify admin, click Apps > '''Easy Content Builder'''. | ||
:[[File:Ecb-menu.png|border|frameless|800x800px]] | :[[File:Ecb-menu.png|border|frameless|800x800px]] | ||
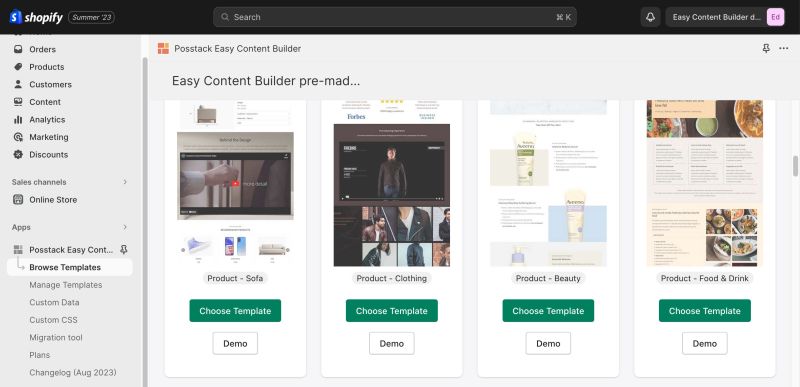
*From the Easy Content Builder dashboard, click '''Browse Templates'''. | *From the Easy Content Builder dashboard, click '''Browse Templates'''. | ||
:[[File:Ecb-browse-templates.png|frameless|200x200px]] | :[[File:Ecb-browse-templates.png|frameless|200x200px]] | ||
*Find a prebuilt template that you want to use, and then click '''Choose Template'''. | *Find a prebuilt template that you want to use, and then click '''Choose Template'''. | ||
:{{Note|You can start with a Blank template or add a premade template. | :{{Note|You can start with a Blank template or add a premade template. Templates are a collection of sections that are pre-built by Easy Content Builder. Once you add a template to your theme, you can add your images and copy to fit your brand. You can easily edit, reorder, or remove any section within that template to create your ideal page.|inline}} | ||
Templates are a collection of sections that are pre-built by Easy Content Builder. Once you add a template to your theme, you can add your images and copy to fit your brand. You can easily edit, reorder, or remove any section within that template to create your ideal page.|inline}} | :[[File:Ecb-choose-template.jpg|border|frameless|800x800px]] | ||
:[[File:Ecb-choose-template.jpg|border|frameless|800x800px]] | *Next, select the template type (Product, Blog Post, Page) and enter the template name | ||
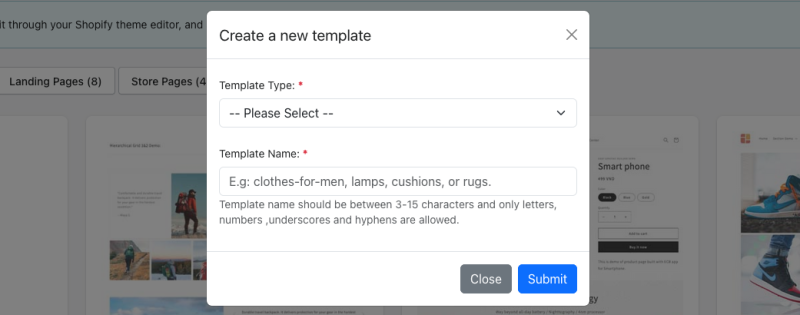
*Next, select the template type (Product, Blog Post, Page) and enter the template name | |||
:[[File:Ecb-choose-template-form.png|border|frameless|800x800px]] | :[[File:Ecb-choose-template-form.png|border|frameless|800x800px]] | ||
:{{Note|The template name should be between 3-15 characters - only letters, numbers, underscores and hyphens are allowed.|inline}} | :{{Note|The template name should be between 3-15 characters - only letters, numbers, underscores and hyphens are allowed.|inline}} | ||
| Line 21: | Line 33: | ||
:{{Note|NOTE: After you have done steps above, the new template you’ve just created will appear under Easy Content Builder admin > '''Manage Templates''' section with a label ‘''Not assigned to any page yet. Click '''Customize''' to preview template with: [a specific page]’.''|inline}} | :{{Note|NOTE: After you have done steps above, the new template you’ve just created will appear under Easy Content Builder admin > '''Manage Templates''' section with a label ‘''Not assigned to any page yet. Click '''Customize''' to preview template with: [a specific page]’.''|inline}} | ||
====Step 2: Customize the template ==== | ====Step 2: Customize the template==== | ||
From the Shopify theme editor, you'll be able to add Easy Content Builder sections, customize, re-order, or remove them like all other sections in your theme. | From the Shopify theme editor, you'll be able to add Easy Content Builder sections, customize, re-order, or remove them like all other sections in your theme. | ||
| Line 27: | Line 39: | ||
Below are common customization you might want to start with: | Below are common customization you might want to start with: | ||
====== Add Section Settings | ======Add Section Settings====== | ||
You should always add a [[Block Section Settings|Section Settings]] first. Why you need | You should always add a [[Block Section Settings|Section Settings]] first. | ||
*Learn [[Block Section Settings|how to add the Section Settings]]. | |||
*[[Section Settings#Multi-column Layout Setup|How to define multiple-column layouts]]. | |||
{{Note|'''Good to know''': Why you need [[Block Section Settings|Section Settings]]: | |||
*To determine your ideal layouts (1-column, 2-column, 3-column, 4-column, or hierarchical layouts) | *To determine your ideal layouts (1-column, 2-column, 3-column, 4-column, or hierarchical layouts) | ||
*And to control your global configurations (full-width layout, mask color, mask image, background video, parallax animation, etc.) | *And to control your global configurations (full-width layout, mask color, mask image, background video, parallax animation, etc.) | ||
:[[File:Ecb section column config.jpg|frameless|1024x1024px]]|inline}} | |||
======Add new content blocks within a section====== | |||
After adding a [[Block Section Settings|Section Settings]], you can add many content blocks to the section you've created. These content blocks will be displayed in different positions within the section, depending on the Desktop/Mobile Layouts you configure. | |||
{{Note|Each template can have multiple sections, and each section has a specific variety of blocks you can add. View all sections available [https://easy-content-builder-demo.myshopify.com/pages/section-variations here].|inline}} | |||
[[File:Ecb-block-v2.jpg|border|frameless|800x800px]] | |||
======Set the Text color====== | |||
The Text color setting is located in the Section Settings. Enter the HEX color value or choose from your currently used color (if any). Then, the new text's color will be applied to all content blocks within this section. | |||
[[File:Ecb text color.jpg|frameless|492x492px]] | |||
{{Note|Ensure you also update the Background Color or Container Background Color (under the same Section Settings panel) to pair with your new text's color. |reminder}} | |||
======Set the Background Color====== | |||
'''Step 1''': You can set the background color using '''CSS''' or '''Gradient'''. | |||
[[File:Ecb-bg-color-css.png|frameless|446x446px]] | |||
If you add a HEX color value using the CSS option and want to change to the Gradient color, just remove the HEX color and switch to the Gradient mode. | |||
[[File:Ecb-bg-color-gradient.png|frameless]] | |||
The background color will be applied full-width to the whole section. | |||
{{Note|Ensure you adjust the Text Color (under the same Section Settings panel) to keep the text visible and highly contrasting.|inline}} | |||
'''Step 2''' (Optional): Set the '''Padding Top'''/'''Padding Bottom''' (under the same Section Settings panel) to add desired horizontal space to the section. | |||
====== | ======Set the Container Background color====== | ||
[[File:Ecb-container-bg-color.png|frameless]] | |||
Use the Container Background Color setting to set the background color for the content area instead of the full-width background. You can define the background color using '''CSS''' or '''Gradient'''. | |||
{{Note| | {{Note|Ensure you set the Container Padding Top/Padding Bottom (under the same Section Settings panel) to add the desired horizontal space to the container. |inline}}[[File:Bg-container-demo.jpg|frameless|800x800px]] | ||
====== Adjust the padding/margin of each section ====== | ======Adjust the padding/margin of each section====== | ||
The Easy Content Builder lets you adjust the space (padding and margin) between elements at two levels: | The Easy Content Builder lets you adjust the space (padding and margin) between elements at two levels: | ||
*Section Settings level: refers to the global padding configurations for a section. | *Section Settings level: refers to the global padding configurations for a section. | ||
*Block level: refers to the padding/margin of a specific block within a section (One section might come with multiple blocks in it.) | *Block level: refers to the padding/margin of a specific block within a section (One section might come with multiple blocks in it.) | ||
::[[File:Ecb sections padding margin.jpg|frameless|1917x1917px]] | ::[[File:Ecb sections padding margin.jpg|frameless|1917x1917px]] | ||
======Adjust the font size, rounded corners, background color====== | |||
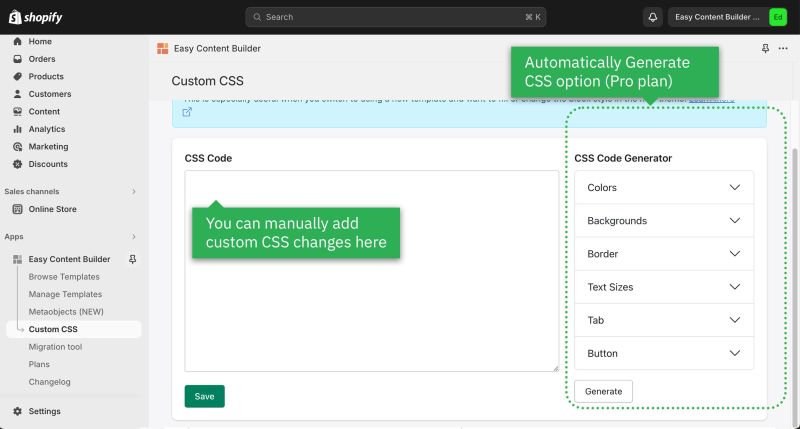
*If you want to change your font size, button, global background, border radius (rounded corners), etc., you can do so using the ECB's Custom CSS. | |||
:{{Note|For Pro plan: In addition to the standard Custom CSS feature, you have an '''CSS Code Generator''' option - a handy option to generate CSS code automatically. [[Custom CSS#Adjust the font size, border radius, background color|Learn more]]. |reminder}} | |||
:[[File:Ecb-custom-css-v2.jpg|border|frameless|800x800px]] | |||
====Step 3: Assign the new template==== | ====Step 3: Assign the new template==== | ||
====== For Products====== | ======For Products====== | ||
To apply the new template to multiple products at once, use the Bulk editor by following these steps: | To apply the new template to multiple products at once, use the Bulk editor by following these steps: | ||
*From your Shopify admin, click '''Products'''. | *From your Shopify admin, click '''Products'''. | ||
* Click on checkboxes next to each product you want to apply the new template. | *Click on checkboxes next to each product you want to apply the new template. | ||
* Then, click on '''Bulk Edit'''. | *Then, click on '''Bulk Edit'''. | ||
:[[File:Ecb - Bulk edit.png|border|frameless|1024x1024px]] | : [[File:Ecb - Bulk edit.png|border|frameless|1024x1024px]] | ||
*In the Bulk editor, click the '''Columns''' drop-down menu, and then in the '''General''' section, click the '''Template''' checkbox. | *In the Bulk editor, click the '''Columns''' drop-down menu, and then in the '''General''' section, click the '''Template''' checkbox. | ||
:[[File:Ecb bulk edit3.jpg|border|frameless|1024x1024px]] | :[[File:Ecb bulk edit3.jpg|border|frameless|1024x1024px]] | ||
*Click the template field of the first line, then hold the shift key, and then click the template field of the last line. A blue shading will appear around the items you have selected. | *Click the template field of the first line, then hold the shift key, and then click the template field of the last line. A blue shading will appear around the items you have selected. | ||
* Using the drop-down menu, choose a new template for the selected items. | *Using the drop-down menu, choose a new template for the selected items. | ||
*Click '''Save'''. | *Click '''Save'''. | ||
{{Note|To assign a template to a product individually, use the Online Store > Theme Templates section of the product editor (by going to your Shopify admin > '''Products''', click the product from the list of existing products) to apply the new template you’ve just created to a specific product.|reminder}} | {{Note|To assign a template to a product individually, use the Online Store > Theme Templates section of the product editor (by going to your Shopify admin > '''Products''', click the product from the list of existing products) to apply the new template you’ve just created to a specific product.|reminder}} | ||
======For Blog Posts and Pages ====== | ======For Blog Posts and Pages====== | ||
The bulk editing feature for blog posts and pages is no longer available. So, follow the steps below to assign a template to blog posts or pages on an individual item level: | The bulk editing feature for blog posts and pages is no longer available. So, follow the steps below to assign a template to blog posts or pages on an individual item level: | ||
#From your Shopify admin, go to '''Online Store''' > '''Pages'''/'''Blog Posts'''. | # From your Shopify admin, go to '''Online Store''' > '''Pages'''/'''Blog Posts'''. | ||
#Click the name of the blog post/page to edit. | #Click the name of the blog post/page to edit. | ||
#In the '''Online store''' section, use the drop-down menu to select the template you've created to apply to the selected page. | #In the '''Online store''' section, use the drop-down menu to select the template you've created to apply to the selected page. | ||
| Line 79: | Line 130: | ||
#From your Shopify admin, click '''Online Store''' > '''Themes'''. | #From your Shopify admin, click '''Online Store''' > '''Themes'''. | ||
#Find the theme that you want to edit, and then click '''Customize'''. | #Find the theme that you want to edit, and then click '''Customize'''. | ||
#Open the dropdown menu at the top of the page. | # Open the dropdown menu at the top of the page. | ||
#Use the dropdown menu to select a template. | # Use the dropdown menu to select a template. | ||
#In the sidebar, click '''Change'''. | #In the sidebar, click '''Change'''. | ||
#Select the product or page you want to preview with the selected template. | #Select the product or page you want to preview with the selected template. | ||
===Delete a template=== | |||
If you want to delete a template that you created using Easy Content Builder, here are the steps: | |||
*From your Shopify admin, click Apps > '''Easy Content Builder'''. | |||
*From the Easy Content Builder dashboard, click '''Manage Templates'''. | |||
*Then select the template that you want to remove and click '''Delete'''. | |||
[[File:Manage template delete.png|1200x1200px]] | |||
===Next steps=== | ===Next steps=== | ||
====== Manage and edit your templates ====== | ======Manage and edit your templates====== | ||
*Manage your templates: [[Manage Templates|follow these steps]]. | *Manage your templates: [[Manage Templates|follow these steps]]. | ||
*Edit your template: [[Edit Template|follow these steps]]. | *Edit your template: [[Edit Template|follow these steps]]. | ||
====== Set up multi-column layouts ====== | ======Set up multi-column layouts====== | ||
*Learn how to set up multi-column layouts: | *Learn how to set up multi-column layouts: | ||
::*[[Section Settings|1-col boxed layout]] | ::*[[Section Settings|1-col boxed layout]] | ||
::*[[Section Settings|1-col with Background Image]] | ::*[[Section Settings|1-col with Background Image]] | ||
::*[[Section Settings|2-col with Flexible Col Width]] | ::*[[Section Settings|2-col with Flexible Col Width]] | ||
| Line 99: | Line 159: | ||
:::{{note|We suggest you install the '''Theme Section Kit''' to customize your Shopify theme faster. This template contains prebuilt sections (Free and Pro versions) that you can edit, reorder, or hide through your Theme Editor. Preview the '''Theme Section Kit''' [https://easy-content-builder-demo.myshopify.com/pages/ecb-prebuilt-theme-sections here].|info}} | :::{{note|We suggest you install the '''Theme Section Kit''' to customize your Shopify theme faster. This template contains prebuilt sections (Free and Pro versions) that you can edit, reorder, or hide through your Theme Editor. Preview the '''Theme Section Kit''' [https://easy-content-builder-demo.myshopify.com/pages/ecb-prebuilt-theme-sections here].|info}} | ||
====== Customize with Custom CSS ====== | ======Customize with Custom CSS====== | ||
*Learn how to customize your Shopify themes with Custom CSS using Easy Content Builder: [https://www.youtube.com/watch?v=gN20FiUvVZc 5-min video tutorial]. | *Learn how to customize your Shopify themes with Custom CSS using Easy Content Builder: [https://www.youtube.com/watch?v=gN20FiUvVZc 5-min video tutorial]. | ||
*Do you want to change the primary, secondary, background color, font size, or border-radius? Refer to [[Custom CSS]] for more details on how to make those customizations. | |||
Latest revision as of 04:03, 29 February 2024
Perfect for building and customizing templates for a group of items like Men clothing, Cushions, Rugs, etc.
Getting started
Overview
Templates are a collection of sections that are pre-built by Easy Content Builder. Once you add a template to your theme, you can add, edit, reorder, or remove any section within that template to customize your theme.
Tutorial Video
Watch this overview video to learn how to build a new custom template and assign it to multiple pages - individually or in bulk - using Easy Content Builder.
Create a new Template assigned to multiple pages
Step 1: Create a new template
- From your Shopify admin, click Apps > Easy Content Builder.

- From the Easy Content Builder dashboard, click Browse Templates.

- Find a prebuilt template that you want to use, and then click Choose Template.
- You can start with a Blank template or add a premade template. Templates are a collection of sections that are pre-built by Easy Content Builder. Once you add a template to your theme, you can add your images and copy to fit your brand. You can easily edit, reorder, or remove any section within that template to create your ideal page.

- Next, select the template type (Product, Blog Post, Page) and enter the template name
- The template name should be between 3-15 characters - only letters, numbers, underscores and hyphens are allowed.

- Then, you will be automatically directed to your Shopify theme editor. Here, you can start adding content blocks to the template you’ve just created.
- NOTE: After you have done steps above, the new template you’ve just created will appear under Easy Content Builder admin > Manage Templates section with a label ‘Not assigned to any page yet. Click Customize to preview template with: [a specific page]’.
Step 2: Customize the template
From the Shopify theme editor, you'll be able to add Easy Content Builder sections, customize, re-order, or remove them like all other sections in your theme.
Below are common customization you might want to start with:
Add Section Settings
You should always add a Section Settings first.
- To determine your ideal layouts (1-column, 2-column, 3-column, 4-column, or hierarchical layouts)
- And to control your global configurations (full-width layout, mask color, mask image, background video, parallax animation, etc.)

Add new content blocks within a section
After adding a Section Settings, you can add many content blocks to the section you've created. These content blocks will be displayed in different positions within the section, depending on the Desktop/Mobile Layouts you configure.

Set the Text color
The Text color setting is located in the Section Settings. Enter the HEX color value or choose from your currently used color (if any). Then, the new text's color will be applied to all content blocks within this section.

Set the Background Color
Step 1: You can set the background color using CSS or Gradient.

If you add a HEX color value using the CSS option and want to change to the Gradient color, just remove the HEX color and switch to the Gradient mode.

The background color will be applied full-width to the whole section.
Step 2 (Optional): Set the Padding Top/Padding Bottom (under the same Section Settings panel) to add desired horizontal space to the section.
Set the Container Background color

Use the Container Background Color setting to set the background color for the content area instead of the full-width background. You can define the background color using CSS or Gradient.

Adjust the padding/margin of each section
The Easy Content Builder lets you adjust the space (padding and margin) between elements at two levels:
- Section Settings level: refers to the global padding configurations for a section.
- Block level: refers to the padding/margin of a specific block within a section (One section might come with multiple blocks in it.)

Adjust the font size, rounded corners, background color
- If you want to change your font size, button, global background, border radius (rounded corners), etc., you can do so using the ECB's Custom CSS.
- For Pro plan: In addition to the standard Custom CSS feature, you have an CSS Code Generator option - a handy option to generate CSS code automatically. Learn more.

Step 3: Assign the new template
For Products
To apply the new template to multiple products at once, use the Bulk editor by following these steps:
- From your Shopify admin, click Products.
- Click on checkboxes next to each product you want to apply the new template.
- Then, click on Bulk Edit.

- In the Bulk editor, click the Columns drop-down menu, and then in the General section, click the Template checkbox.

- Click the template field of the first line, then hold the shift key, and then click the template field of the last line. A blue shading will appear around the items you have selected.
- Using the drop-down menu, choose a new template for the selected items.
- Click Save.
For Blog Posts and Pages
The bulk editing feature for blog posts and pages is no longer available. So, follow the steps below to assign a template to blog posts or pages on an individual item level:
- From your Shopify admin, go to Online Store > Pages/Blog Posts.
- Click the name of the blog post/page to edit.
- In the Online store section, use the drop-down menu to select the template you've created to apply to the selected page.
- Click Save.
Preview your custom template
Steps to preview your products, blog posts or pages with the new custom template:
- From your Shopify admin, click Online Store > Themes.
- Find the theme that you want to edit, and then click Customize.
- Open the dropdown menu at the top of the page.
- Use the dropdown menu to select a template.
- In the sidebar, click Change.
- Select the product or page you want to preview with the selected template.
Delete a template
If you want to delete a template that you created using Easy Content Builder, here are the steps:
- From your Shopify admin, click Apps > Easy Content Builder.
- From the Easy Content Builder dashboard, click Manage Templates.
- Then select the template that you want to remove and click Delete.

Next steps
Manage and edit your templates
- Manage your templates: follow these steps.
- Edit your template: follow these steps.
Set up multi-column layouts
- Learn how to set up multi-column layouts:
- 1-col boxed layout
- 1-col with Background Image
- 2-col with Flexible Col Width
- 2-col with Blank Sections
- Hierarchical Grids (6 layout options)
- We suggest you install the Theme Section Kit to customize your Shopify theme faster. This template contains prebuilt sections (Free and Pro versions) that you can edit, reorder, or hide through your Theme Editor. Preview the Theme Section Kit here.
Customize with Custom CSS
- Learn how to customize your Shopify themes with Custom CSS using Easy Content Builder: 5-min video tutorial.
- Do you want to change the primary, secondary, background color, font size, or border-radius? Refer to Custom CSS for more details on how to make those customizations.