Create Template For Single Page: Difference between revisions
From Posstack.com Documentations
| Line 18: | Line 18: | ||
===== Step 3: Choose a pre-made template ===== | ===== Step 3: Choose a pre-made template ===== | ||
Select a | Select a prebuilt template suggested by the app (then you will be automatically redirected to the Theme Editor). Easy Content Builder offers you three options to create a new template: | ||
:* Select a prebuilt product template provided by the Easy Content Builder app. | :* Select a prebuilt product template provided by the Easy Content Builder app. | ||
:* Select from available templates of the main theme (if created before): This option is only visible if you did build templates using the Easy Content Builder app before. It allows you to speed up the workflow by reusing those templates. Please note this option is available when you upgrade to the Pro version. | :* Select from available templates of the main theme (if created before): This option is only visible if you did build templates using the Easy Content Builder app before. It allows you to speed up the workflow by reusing those templates. Please note this option is available when you upgrade to the Pro version. | ||
Revision as of 04:00, 20 September 2023
This tutorial will guide you through 4-easy-steps to build your first custom template and assign it to a single page using the Easy Content Builder app.
Templates are a collection of sections that are pre-built by Easy Content Builder. Once you add a template to your theme, you can add, edit, reorder, or remove any section within that template to customize your theme.
Templates are a collection of sections that are pre-built by Easy Content Builder. Once you add a template to your theme, you can add, edit, reorder, or remove any section within that template to customize your theme.
Templates can be assigned to a product/blog post/page or a product/blog/page group. Learn how to assign a template to multiple pages at once here.
Getting Started
Watch this overview video to learn how to build a new template and assign it to an individual page using Easy Content Builder.
Adding your first template
Step 1: Select an item (Product/Blog Post/Page)
In your Shopify admin, select your Product/Blog Post/Page (depending on which page you want to create a custom template)
Step 2: Create a template
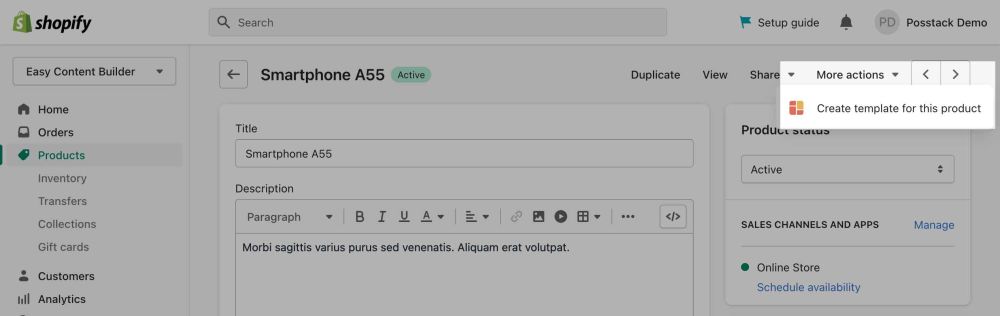
On the Product/Blog Post/Page, click on More actions > Create a template
- Depending on your specific page type, click on the action label Create Template for this product, Create Template for this page, or Create Template for this article.

Step 3: Choose a pre-made template
Select a prebuilt template suggested by the app (then you will be automatically redirected to the Theme Editor). Easy Content Builder offers you three options to create a new template:
- Select a prebuilt product template provided by the Easy Content Builder app.
- Select from available templates of the main theme (if created before): This option is only visible if you did build templates using the Easy Content Builder app before. It allows you to speed up the workflow by reusing those templates. Please note this option is available when you upgrade to the Pro version.
- Or create your own template from scratch.
- TIP: Create a clean template first to avoid a known issue - "Must have a maximum of 25 sections" and hide default sections of default template when creating page from prebuilt template.
- We suggest you install the Theme Section Kit to customize your Shopify theme faster. This template contains prebuilt sections (Free and Pro versions) that you can edit, reorder, or hide through your Theme Editor. Preview the Theme Section Kit here.


Step 4: Start customizing the template
Start adding and editing the app sections and blocks through your Shopify theme editor as follows:
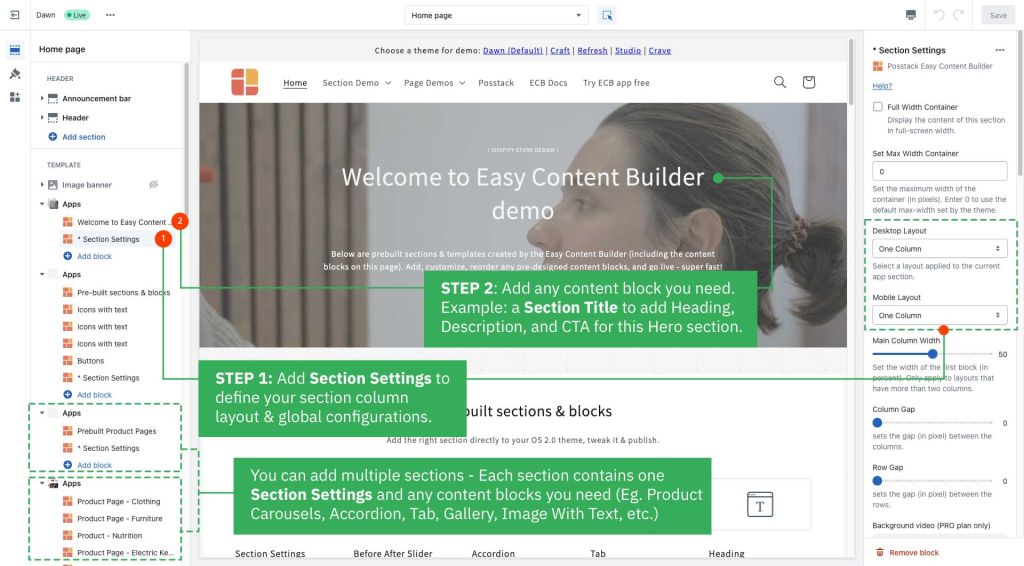
Define your section column layouts
- With Easy Content Builder, you define the layout on an individual section level. This is done by adding/editing the Sections Setting block. Learn how to add a Sections Setting block.
- You can add many sections per page, each section with its column layout.
- Useful link:
- See multi-column layouts examples
- Learn how to create multi-column layouts

Add new blocks to that section as you wish
- See pre-built sections examples
- Learn how to add app blocks.
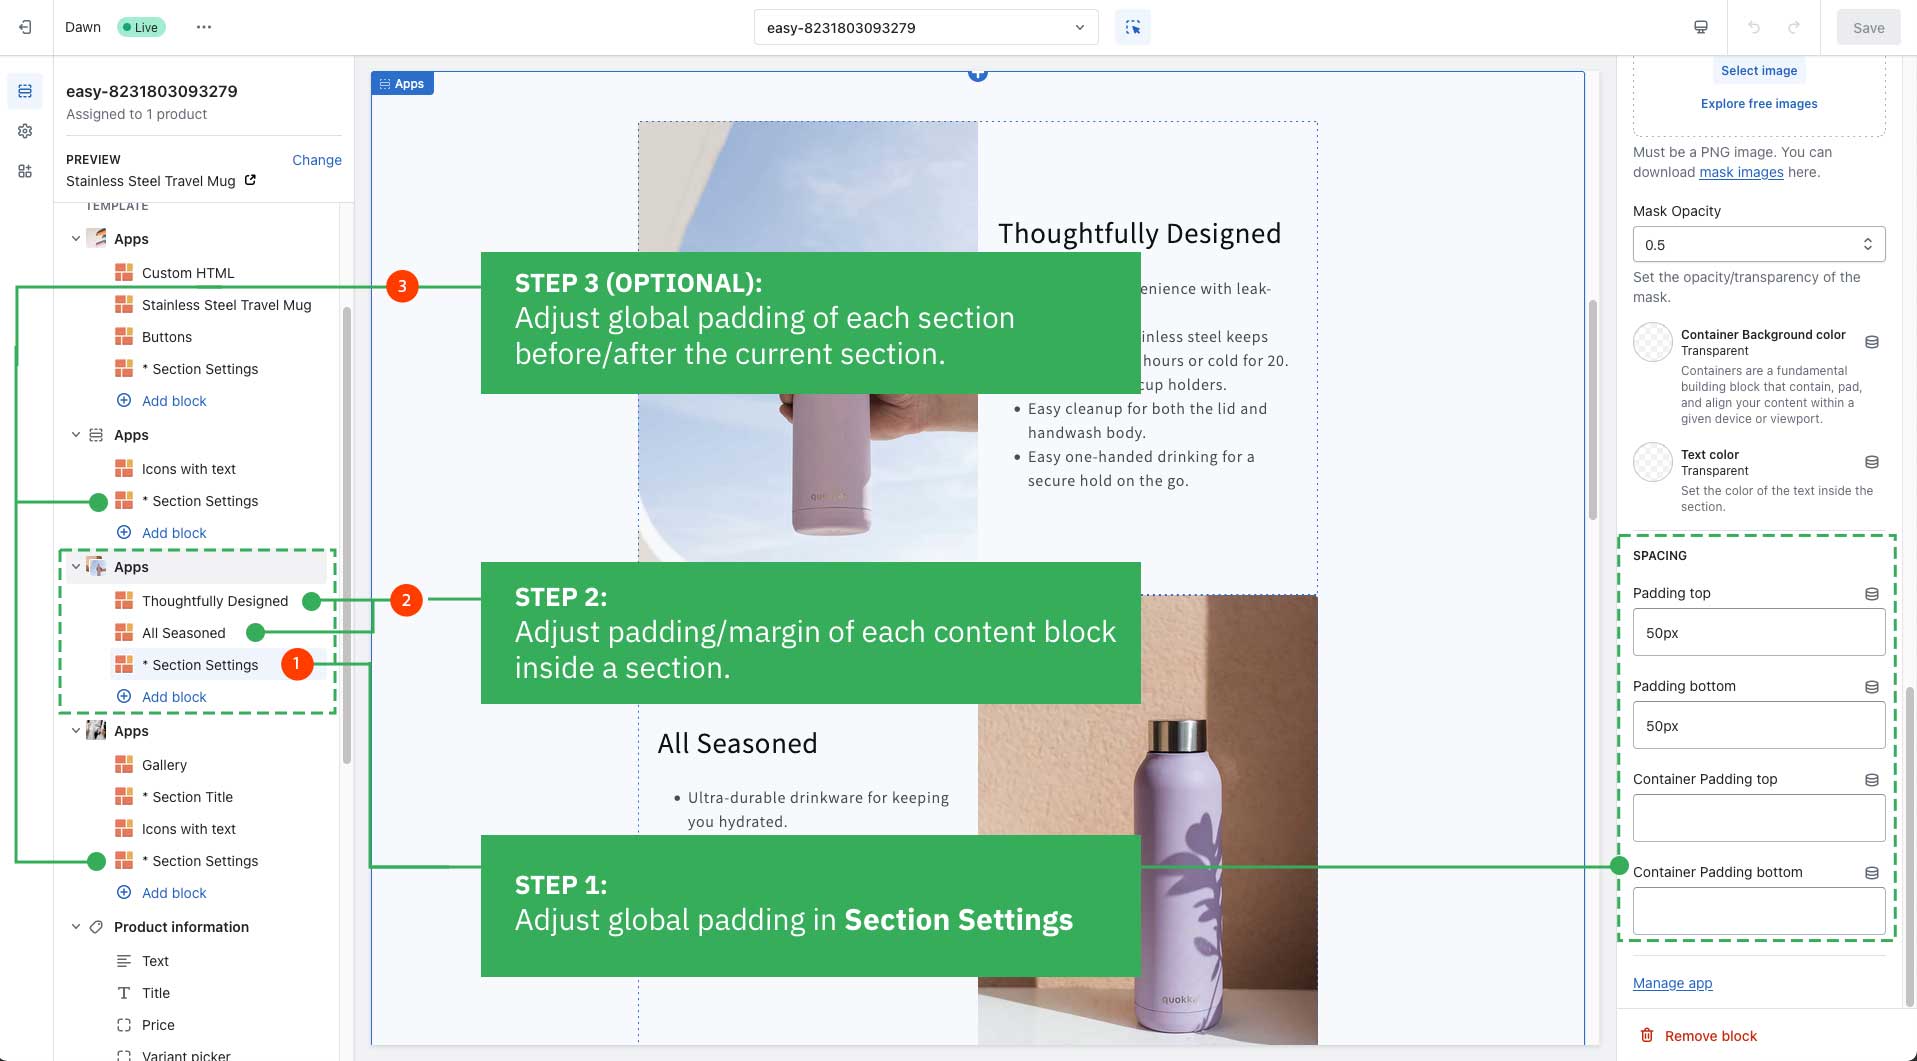
Adjust the padding/margin of each section
- The Easy Content Builder lets you adjust the space (padding and margin) between elements at two levels:
- Section Settings level: refers to the global padding configurations for a section.
- Block level: refers to the padding/margin of a specific block within a section (One section might come with multiple blocks in it.)
- The Easy Content Builder lets you adjust the space (padding and margin) between elements at two levels:

Preview your custom template
Steps to preview your products, blog posts or pages with the new custom template:
- From your Shopify admin, click Online Store > Themes.
- Find the theme that you want to edit, and then click Customize.
- Open the dropdown menu at the top of the page.
- Use the dropdown menu to select a template.
- In the sidebar, click Change.
- Select the product or page you want to preview with the selected template.
Next steps
- Manage your templates: follow these steps.
- Edit your template: follow these steps.
- Learn how to set up multi-column layouts:
- 1-col boxed layout
- 1-col with Background Image
- 2-col with Flexible Col Width
- 2-col with Blank Sections
- Hierarchical Grids (6 layout options)
- We suggest you install the Theme Section Kit to customize your Shopify theme faster. This template contains prebuilt sections (Free and Pro versions) that you can edit, reorder, or hide through your Theme Editor. Preview the Theme Section Kit here.
- Learn how to customize your Shopify themes with Custom CSS using Easy Content Builder: 5-min video tutorial.