Get Started: Difference between revisions
m (→The basics) |
m (→The basics) |
||
| Line 13: | Line 13: | ||
Easy Content Builder lets you create multiple-column layouts at the section level. You will use a special section called [[Section Settings]] to specify the column layout of each section. Then, you add multiple content blocks to each column and configure the margin/padding and the gap between columns/rows to create your desired layout. | Easy Content Builder lets you create multiple-column layouts at the section level. You will use a special section called [[Section Settings]] to specify the column layout of each section. Then, you add multiple content blocks to each column and configure the margin/padding and the gap between columns/rows to create your desired layout. | ||
You can combine one-column, two-column, three-column, four-column, or hierarchical grid layouts on the same page | You can combine one-column, two-column, three-column, four-column, or hierarchical grid layouts on the same page, like the following example: | ||
[[File:Ecb-layout-basics-2.jpg|frameless|1024x1024px]] | [[File:Ecb-layout-basics-2.jpg|frameless|1024x1024px]] | ||
More details on multiple-column layout setup: [[Section Settings#Multi-column Layout Setup|here]]. | {{Note|More details on multiple-column layout setup: [[Section Settings#Multi-column Layout Setup|here]]|reminder}}. | ||
'''Templates''' | '''Templates''' | ||
| Line 28: | Line 28: | ||
# Get familiar with how pages and sections are built using Easy Content Builder. | # Get familiar with how pages and sections are built using Easy Content Builder. | ||
# Editable templates are great for saving time to tailor your theme and keeping consistency between your page types. | # Editable templates are great for saving time to tailor your theme and keeping consistency between your page types. | ||
=== Adding your first template === | === Adding your first template === | ||
Revision as of 16:23, 17 February 2024
The basics
Sections
Sections are editable and reusable modules of content that can be added to your Shopify (OS 2.0) themes, such as Circle Menu, Overlapping Images with Text, Scrolling Announcement bar, Scrolling Logo List, Accordion, Tabs, Before & After, Gallery, Countdown, etc.
- Explore the benefits of Shopify sections: Why does it matter
- View all section variations.
The multiple-column layouts at the section level
Easy Content Builder lets you create multiple-column layouts at the section level. You will use a special section called Section Settings to specify the column layout of each section. Then, you add multiple content blocks to each column and configure the margin/padding and the gap between columns/rows to create your desired layout.
You can combine one-column, two-column, three-column, four-column, or hierarchical grid layouts on the same page, like the following example:

.
Templates
Easy Content Builder templates are a collection of sections that can be added to your existing (OS2.0) themes. Once you add a premade template Easy Content Builder provides, you can add your images and copy to fit your brand. You can easily edit, reorder, or remove any section within that template to create your ideal page.
Templates can be assigned to individual product/blog post/page or multiple product/blog post/pages at once.
Premade templates are great for:
- Get familiar with how pages and sections are built using Easy Content Builder.
- Editable templates are great for saving time to tailor your theme and keeping consistency between your page types.
Adding your first template
Here are available options to tailor your Shopify theme:
- Create a template for Multiple pages
- Create a template for a single page
- Create a template for standard pages (homepage, collection pages, etc.)
- Or create a metaobject template (If you're new to Shopify metaobject, check out what metaobject is and when to use it here)
Select an option that fits your goal and follow the respective guides below to get started.
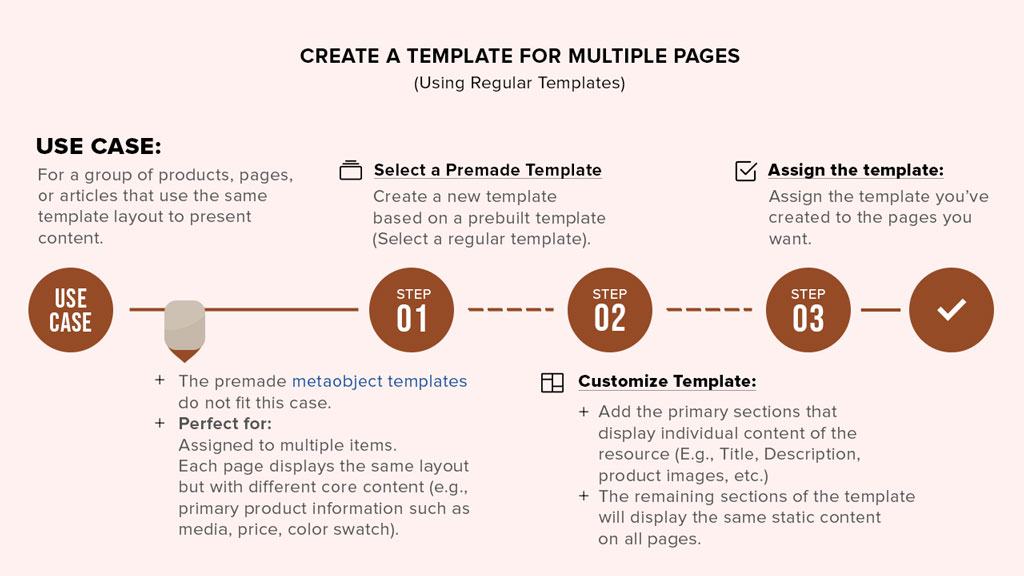
Template for Multiple pages
- If you want to create a custom template and assign this same template to multiple product/blog post/pages at once, this guide is for you.
- Overview:

- Guides:
- Create a new template - assigned to multiple pages at once: Read setup guide.
- Quickstart video:
- Watch this overview video to learn how to build a new custom template and assign it to multiple pages - individually or in bulk - using Easy Content Builder.
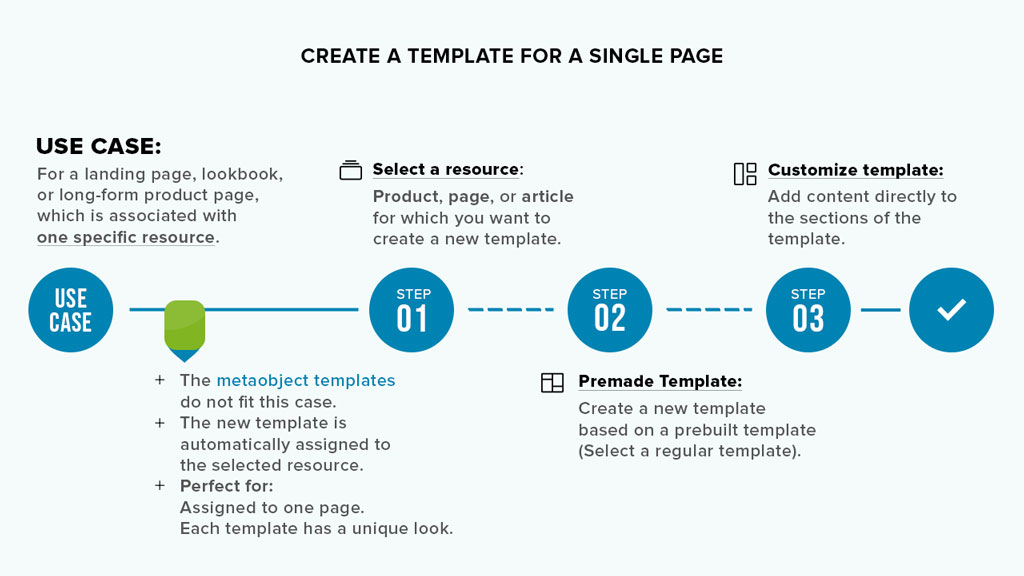
Template for Single page
- Creating a unique template for an individual page is perfect when you want each page (product, blog post, About Us, Lookbook pages, etc.) to have its own unique template.
- Overview:

- Guides:
- Create a new template - assigned to a single page: Read setup guide.
- Quickstart Video:
- Watch this overview video to learn how to build a new template and assign it to an individual page using Easy Content Builder.
Template for Standard pages
- Customize your standard pages (Homepage, Collection, etc.): Read setup guide.
Create a Metaobject Template
- Overview:

- Creating a metaobject template with 5 types of metaobjects that Easy Content Builder provides (ECB Media, ECB Rich Text, ECB Tabs, ECB Accordion, ECB Icons With Text) is available for the PRO plan only.
- Easy Content Builder app allows you to create metaobject templates, a handy way to create custom structured data that's not available in the default Shopify data structure - such as Recipes (view the demo 1, demo 2, demo 3), Books (view the demo), Artist bio (view the demo), Product specifications (view the demo 1, demo 2) etc.
- With metaobjects, you can conveniently add unique content sections per product/page and manage those custom content in a centralized place.

- Guides:
- Learn what Shopify Metaobjects are, when to use metaobjects, and how to create a metaobject template using the Easy Content Builder app here.
Preview your custom template
Steps to preview your products, blog posts or pages with the new custom template:
- From your Shopify admin, click Online Store > Themes.
- Find the theme that you want to edit, and then click Customize.
- Open the dropdown menu at the top of the page.
- Use the dropdown menu to select a template.
- In the sidebar, click Change.
- Select the product or page you want to preview with the selected template.
Next steps
Manage your templates
- Manage your templates: follow these steps.
- Edit your template: follow these steps.
Set up multiple-column layouts
- Learn how to set up multi-column layouts:
- 1-col boxed layout
- 1-col with Background Image
- 2-col with Flexible Col Width
- 2-col with Blank Sections
- Hierarchical Grids (6 layout options)
- We suggest you install the Theme Section Kit to customize your Shopify theme faster. This template contains prebuilt sections (Free and Pro versions) that you can edit, reorder, or hide through your Theme Editor. Preview the Theme Section Kit here.
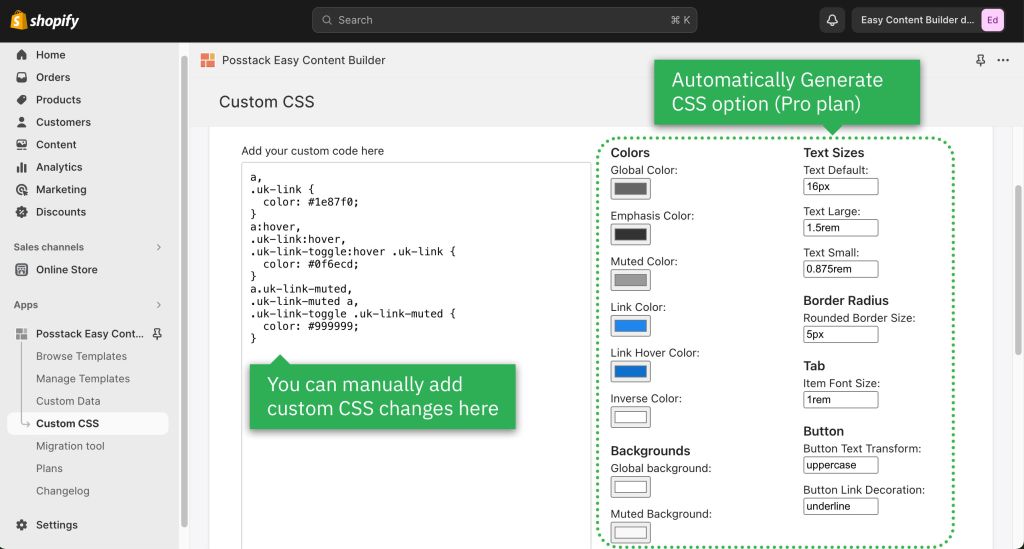
Custom CSS
- Learn how to customize your Shopify themes (change your font size, button, background, border radius, etc.) with Custom CSS using Easy Content Builder: 5-min video tutorial.
- For Pro plan: In addition to the standard Custom CSS feature, you have an Automatically Generate CSS option - a handy way to customize your theme without coding. Learn more.

Jump in a little deeper
If you would rather want to learn more about the fundamentals of the Easy Content Builder app:
- Read to understand Clean Template and Pre-built ECB Templates.
Use cases
Browse the pre-built template collections - Product pages, Landing pages, Brand pages, etc. - for inspiration.
- Grid & Layouts:
- How to create multi-column layouts: view details
- Hero Banners examples: view demo
- How to create a Hero banner: view details