Template for Standard Pages: Difference between revisions
mNo edit summary |
|||
| Line 1: | Line 1: | ||
{{Note|This guide explains how to customize your Shopify standard pages like Homepage, Collection, etc. |inline}} | {{Note|This guide explains how to customize your Shopify standard pages like Homepage, Collection, etc. |inline}} | ||
{{Note| | {{Note|If you want to create a custom template and assign this same template to multiple product/blog post/pages at once, follow [[Create Template For Multiple Pages|this setup guide]].<br/> | ||
If you want each page (product, blog post, etc.) to have its own unique template, follow [[Create_Template_For_Single_Page|this setup guide]].|reminder}} | |||
===Steps to customize your Homepage: === | ===Steps to customize your Homepage:=== | ||
====How it works:==== | ====How it works:==== | ||
| Line 14: | Line 15: | ||
Below are common customization you might want to start with: | Below are common customization you might want to start with: | ||
====== Add Section Settings block====== | ======Add Section Settings block====== | ||
You should always add a [[Block Section Settings|Section Settings]] first. Why you need this block: | You should always add a [[Block Section Settings|Section Settings]] first. Why you need this block: | ||
*To determine your ideal layouts (1-column, 2-column, 3-column, 4-column, or hierarchical layouts) | *To determine your ideal layouts (1-column, 2-column, 3-column, 4-column, or hierarchical layouts) | ||
| Line 22: | Line 23: | ||
*Define multiple-column layouts: read the [[Section Settings#Multi-column Layout Setup|setup guide]].|info}} | *Define multiple-column layouts: read the [[Section Settings#Multi-column Layout Setup|setup guide]].|info}} | ||
======Add new content blocks within a section====== | ====== Add new content blocks within a section====== | ||
Blocks refer to the prebuilt content blocks the Easy Content Builder app provides, such as [[Block Accordion|Accordion]], [[Block Before and After Slider|Before & After Slider]], [[Block Video|Video]], [[Block Featured Products|Featured Products]], [[Block Custom HTML|Custom HTML]], etc. Each template can have multiple sections, and each section has a specific variety of blocks you can add. | Blocks refer to the prebuilt content blocks the Easy Content Builder app provides, such as [[Block Accordion|Accordion]], [[Block Before and After Slider|Before & After Slider]], [[Block Video|Video]], [[Block Featured Products|Featured Products]], [[Block Custom HTML|Custom HTML]], etc. Each template can have multiple sections, and each section has a specific variety of blocks you can add. | ||
| Line 30: | Line 31: | ||
======Adjust the padding/margin of each section====== | ======Adjust the padding/margin of each section====== | ||
The Easy Content Builder lets you adjust the space (padding and margin) between elements at two levels: | The Easy Content Builder lets you adjust the space (padding and margin) between elements at two levels: | ||
*Section Settings level: refers to the global padding configurations for a section. | *Section Settings level: refers to the global padding configurations for a section. | ||
*Block level: refers to the padding/margin of a specific block within a section (One section might come with multiple blocks in it.) | *Block level: refers to the padding/margin of a specific block within a section (One section might come with multiple blocks in it.) | ||
:: [[File:Ecb sections padding margin.jpg|frameless|1917x1917px]] | ::[[File:Ecb sections padding margin.jpg|frameless|1917x1917px]] | ||
======Adjust the font size, border radius, background color====== | ======Adjust the font size, border radius, background color====== | ||
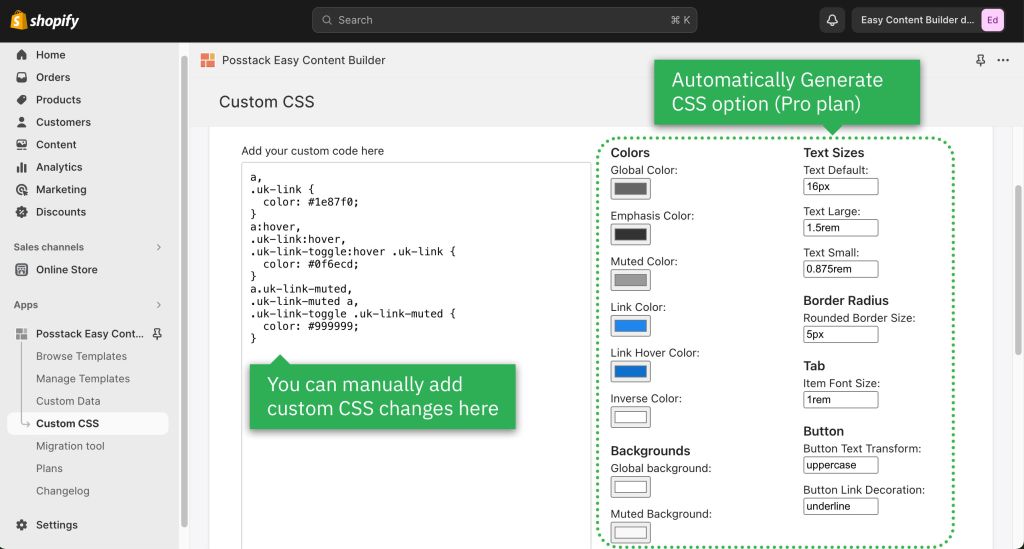
*If you want to change your font size, button, background, border radius, etc., you can do so using the ECB's Custom CSS: [https://www.youtube.com/watch?v=gN20FiUvVZc 5-min video tutorial]. | *If you want to change your font size, button, background, border radius, etc., you can do so using the ECB's Custom CSS: [https://www.youtube.com/watch?v=gN20FiUvVZc 5-min video tutorial]. | ||
:{{Note|For Pro plan: In addition to the standard Custom CSS feature, you have an '''Automatically Generate CSS''' option - a handy way to customize your theme '''without coding'''. [[Custom CSS|Learn more]]. |reminder}} | :{{Note|For Pro plan: In addition to the standard Custom CSS feature, you have an '''Automatically Generate CSS''' option - a handy way to customize your theme '''without coding'''. [[Custom CSS|Learn more]]. |reminder}} | ||
:[[File:Ecb-custom-css.jpg|border|frameless|1024x1024px]] | :[[File:Ecb-custom-css.jpg|border|frameless|1024x1024px]] | ||
===Step to customize your Collection pages: === | ===Step to customize your Collection pages:=== | ||
====How it works==== | ====How it works==== | ||
| Line 48: | Line 49: | ||
*Find the theme you want to edit, then click '''Customize'''. | *Find the theme you want to edit, then click '''Customize'''. | ||
:[[File:Ecb-customize.png|border|frameless|800x800px]] | :[[File:Ecb-customize.png|border|frameless|800x800px]] | ||
* From the dropdown menu in the Theme Editor, click the '''Collections''', then click on '''Default Collection''' (if you want to customize your default Collection page), or scroll down and click '''Create Template''' (to create your new Collection template). | *From the dropdown menu in the Theme Editor, click the '''Collections''', then click on '''Default Collection''' (if you want to customize your default Collection page), or scroll down and click '''Create Template''' (to create your new Collection template). | ||
:[[File:Ecb-customize-collection.png|border|frameless|800x800px]] | :[[File:Ecb-customize-collection.png|border|frameless|800x800px]] | ||
*Next, fill in the '''Name''' and '''Based on''' fields. | *Next, fill in the '''Name''' and '''Based on''' fields. | ||
:[[File:Ecb-collection-new-template-form.png|border|frameless|800x800px]] | :[[File:Ecb-collection-new-template-form.png|border|frameless|800x800px]] | ||
*Then, start customizing your template in your Shopify theme editor. | *Then, start customizing your template in your Shopify theme editor. | ||
====Common customization==== | ==== Common customization ==== | ||
You can start adding sections to your Collection pages following exact steps like customizing the [[Template for Standard Pages#Common customization|Homepage]]. Scroll up this page for a step-by-step guide. | You can start adding sections to your Collection pages following exact steps like customizing the [[Template for Standard Pages#Common customization|Homepage]]. Scroll up this page for a step-by-step guide. | ||
===Next steps=== | ===Next steps=== | ||
======Set up multi-column layouts====== | ======Set up multi-column layouts ====== | ||
*Learn how to set up multi-column layouts: | *Learn how to set up multi-column layouts: | ||
::*[[Section Settings|1-col boxed layout]] | ::*[[Section Settings|1-col boxed layout]] | ||
::* [[Section Settings|1-col with Background Image]] | ::*[[Section Settings|1-col with Background Image]] | ||
::*[[Section Settings|2-col with Flexible Col Width]] | ::*[[Section Settings|2-col with Flexible Col Width]] | ||
::*[[Section Settings|2-col with Blank Sections]] | ::*[[Section Settings|2-col with Blank Sections]] | ||
Revision as of 02:51, 24 November 2023
If you want each page (product, blog post, etc.) to have its own unique template, follow this setup guide.
Steps to customize your Homepage:
How it works:
- From your Shopify admin, go to Online Store > Themes.
- Find the theme you want to edit, then click Customize.

- From the dropdown menu in the Theme Editor, click Homepage and start adding the prebuilt sections that Easy Content provides.

Common customization
Below are common customization you might want to start with:
Add Section Settings block
You should always add a Section Settings first. Why you need this block:
- To determine your ideal layouts (1-column, 2-column, 3-column, 4-column, or hierarchical layouts)
- And to control your global configurations (full-width layout, mask color, mask image, background video, parallax animation, etc.)
- Define multiple-column layouts: read the setup guide.
Add new content blocks within a section
Blocks refer to the prebuilt content blocks the Easy Content Builder app provides, such as Accordion, Before & After Slider, Video, Featured Products, Custom HTML, etc. Each template can have multiple sections, and each section has a specific variety of blocks you can add.
After adding a Section Settings, you can add any content blocks made available to the section you've created.
Adjust the padding/margin of each section
The Easy Content Builder lets you adjust the space (padding and margin) between elements at two levels:
- Section Settings level: refers to the global padding configurations for a section.
- Block level: refers to the padding/margin of a specific block within a section (One section might come with multiple blocks in it.)

Adjust the font size, border radius, background color
- If you want to change your font size, button, background, border radius, etc., you can do so using the ECB's Custom CSS: 5-min video tutorial.
- For Pro plan: In addition to the standard Custom CSS feature, you have an Automatically Generate CSS option - a handy way to customize your theme without coding. Learn more.

Step to customize your Collection pages:
How it works
- From your Shopify admin, go to Online Store > Themes.
- Find the theme you want to edit, then click Customize.
- From the dropdown menu in the Theme Editor, click the Collections, then click on Default Collection (if you want to customize your default Collection page), or scroll down and click Create Template (to create your new Collection template).

- Next, fill in the Name and Based on fields.

- Then, start customizing your template in your Shopify theme editor.
Common customization
You can start adding sections to your Collection pages following exact steps like customizing the Homepage. Scroll up this page for a step-by-step guide.
Next steps
Set up multi-column layouts
- Learn how to set up multi-column layouts:
- 1-col boxed layout
- 1-col with Background Image
- 2-col with Flexible Col Width
- 2-col with Blank Sections
- Hierarchical Grids (6 layout options)
- We suggest you install the Theme Section Kit to customize your Shopify theme faster. This template contains prebuilt sections (Free and Pro versions) that you can edit, reorder, or hide through your Theme Editor. Preview the Theme Section Kit here.
Customize with Custom CSS
- Learn how to customize your Shopify themes with Custom CSS using Easy Content Builder: 5-min video tutorial.